
how to avoid trim creating lumpy seams
Forgive me if this has already been discussed before. I tried to do a search for it in previous posts and I came up with 500 possible entries (yikes!).
I want to trim a rather lightweight vest with some narrow flat braid in a style reminiscent of Greek or Balkan traditional costumes. There are some lovely examples in Tilke’s “Costume Pattern and Designs” as well as Folkwear’s “Vests from Greece and Poland”.
But as inspiring as these examples are, I’ve been stumped by a very mundane technical question and I haven’t found the answer in any book or magazine I’ve looked through.
How do I tuck the ends of the braid into the seams or binding without creating unsightly lumps? I find lots of tips on how to transfer markings to the fabric, how to go around curves, how to use specialty feet for stitching, etc, etc. But nothing I’ve seen tells me –what the bleep do you do with the ends?? Trims are notorious for fraying and I’ve already tried using Fray-Check, but on a butt end of trim, it just creates a stiff, pokey bristle. Not very attractive.
Any ideas? I imagine you home-dec sewers out there deal with this all the time. What do you do?


Replies
Sometimes you can thread the ends through a large-eyed upholstery needle and push it to the underside where you can finish it off. I've done this with thick, narrow trims and thin wider ones.
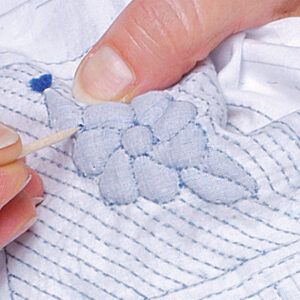
Here's what I would try. To insert braid into seam without bulk, before sewing the seam shut stitch the braid to the fabric next to the seam line. Fray and spread the end of the braid fibers onto the seam allowance and fuse them in place (if the fibers are very thick I might stitch across them instead of fusing). Then stitch the seam closed.
FYI for this application or any other Fray Block is not stiff like Fray Check.
If you check the final pattern for the trim placement, you may be able to eliminate a lot of trim ends by adding the trim last. On a vest, you can go all the way around the neck, down the fronts and around the hem with a single piece of trim. Likewise, the armholes need only one piece. Other design details can be arranged around spirals, circles or echo the neck/front/hem line of trim so that they do not need to be inserted into a seam but can meet another end.
Instead of tucking the ends in, I usually splice them at an inconspicuous place, like a side seam. Cut the trim an inch longer on each end, then unravel each about 3/8" and work the ends into the other side using either a tapestry needle or tiny crochet hook. You can ease the different strands into each other and tack it with a simple hand stitch.
thanks everyone, this is really helpful!L'lou
This post is archived.