

Better Machine-Made Buttonholes
For an improved finish, override your automatic buttonholer and stitch each buttonhole twice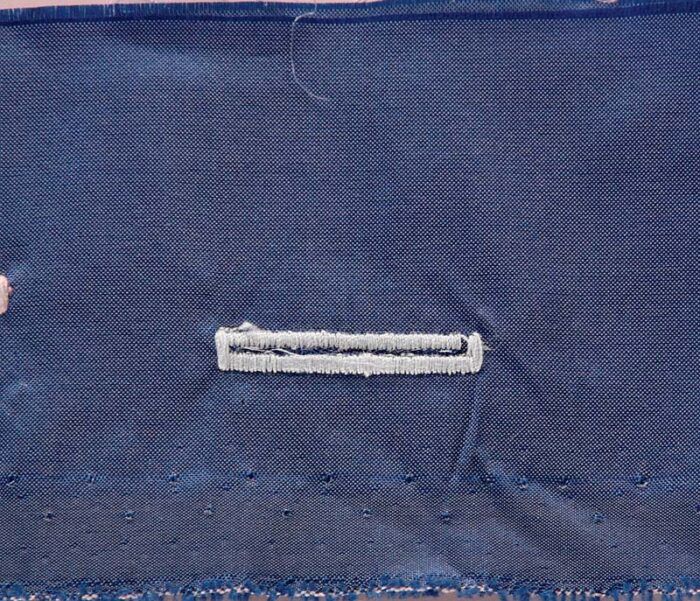
I love my trusty Bernina 1230, but I wanted my machine-made buttonholes to look better than those I get from its automatic buttonhole routine— better, in fact, than those I’ve seen from any home-sewing machine in automatic mode. It took some doing, but I did figure out just how to get the improvements I want—including smoother, fuller “lips” and no raw edges between them, as shown at far right—and I’ll describe in detail my process, which can be easily adapted to any machine that can zigzag and make satin stitches. In the drawings on p. 64, you’ll see my method step by step, but first, here’s a quick overview along with some suggestions for materials and a few tips that should help you adapt the process to your machine.
Better buttonholes in a nutshell
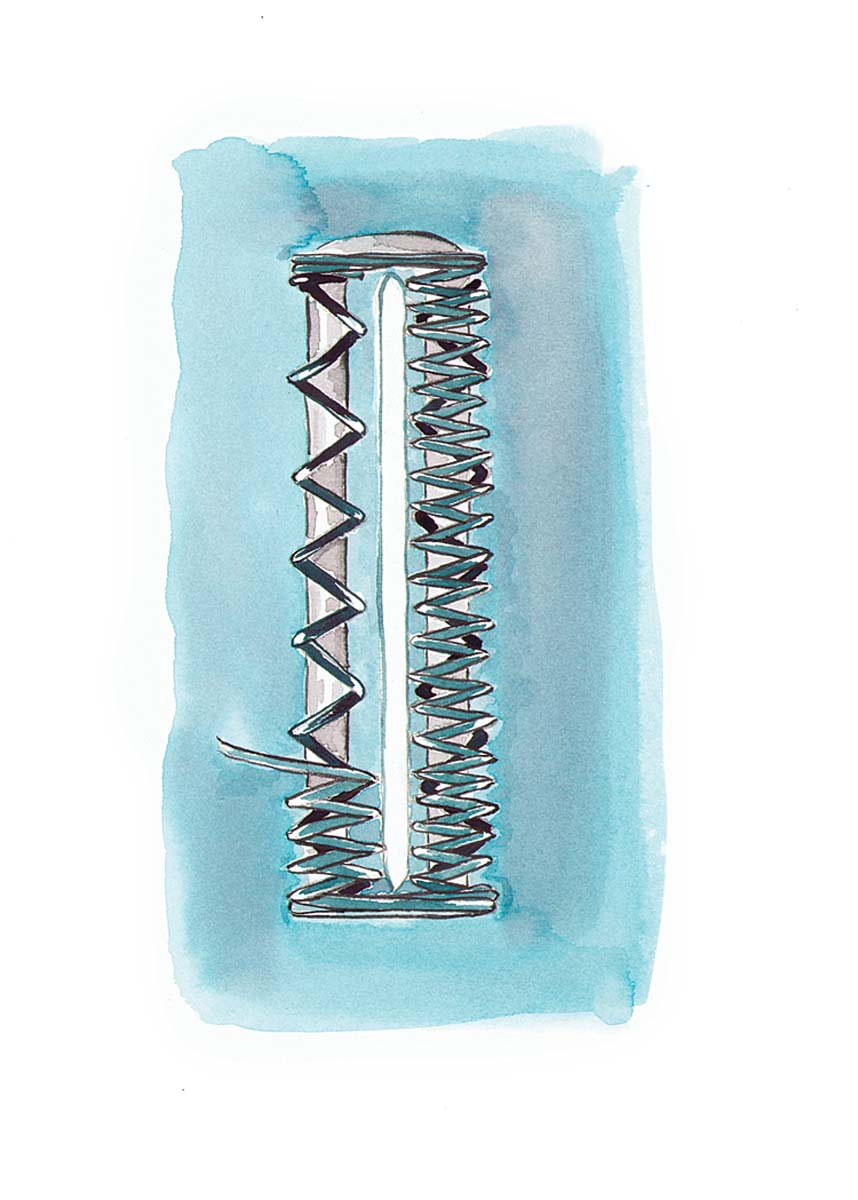
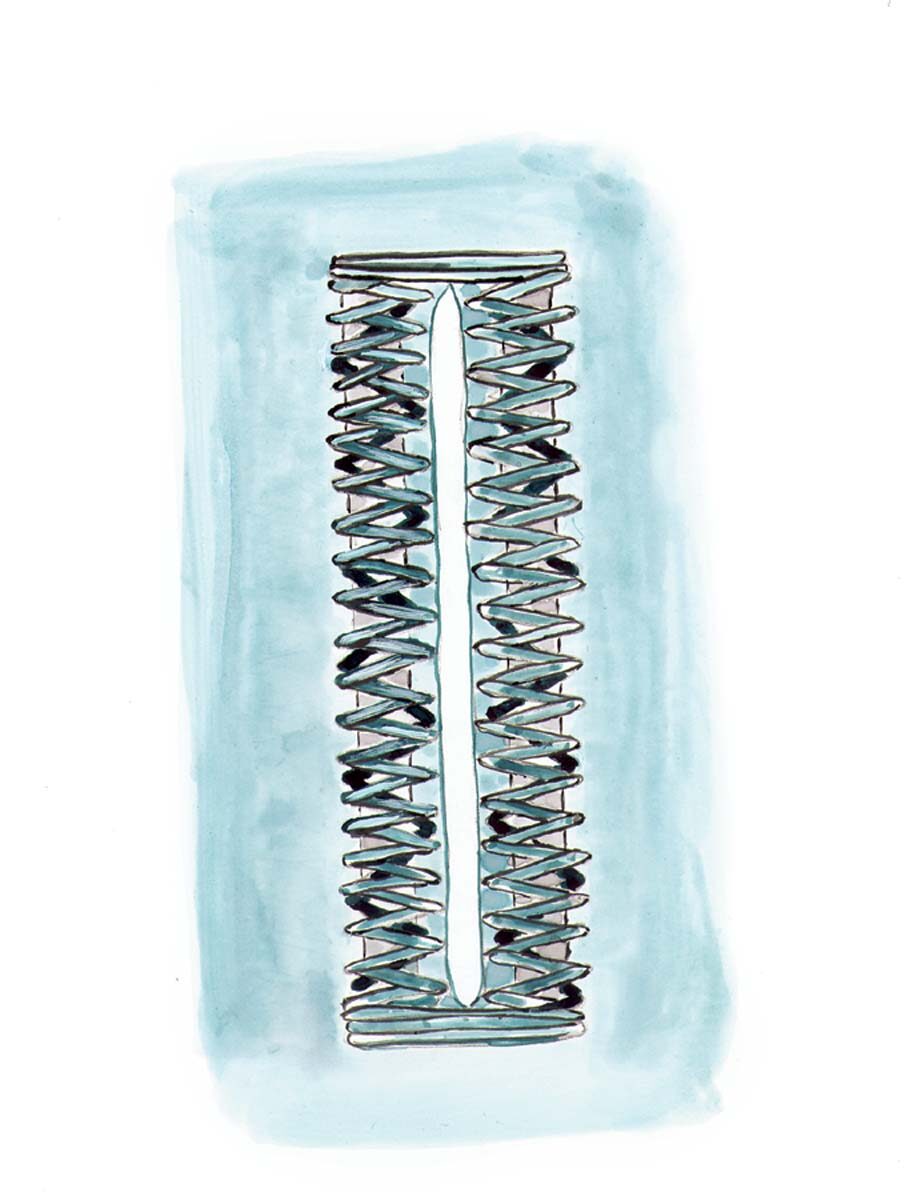
Any machine-made buttonhole is really nothing more than a slit bound by two parallel rows of narrow satin stitches, with a bar tack at each end. In short, my idea is to bypass the machine’s automatic buttonhole steps and its predetermined stitch settings for making these elements, in favor of choosing my own stitch-width and -length settings, positioning the parts exactly where I prefer, and adding cording at the same time to strengthen and pad the buttonhole. That’s Step One. The final step is to stitch the whole buttonhole a second time, after cutting it open, in order to cover up the raw edges (I call them “whiskers”) in between the lips, and to give each lip the round, smooth look I’m after.
Use 100-percent cotton thread
Essential to the effect I like is an all-cotton thread, which produces a much more
attractive satin stitch than any synthetic I’ve ever tried. I prefer a high-quality, super-smooth, two-ply machine-embroidery thread, such as Mettler Silk Finish, size 60/2, because it’s mercerized for maximum shine. It’s also slightly thinner than regular weight 50/3, so it doesn’t build up bulk as quickly, which is important when you’re doing multiple-layered satin stitches. I always use a brand new, size-70 sharp (not universal) needle when I make buttonholes, so there’s no problem penetrating tightly layered stitches.
For the cording, I use a size-8 DMC pearl cotton. My Bernina dealer carries this thread on large spools in white, ecru, and black, but it’s also available from DMC dealers in shorter lengths and in about 30 colors. I wouldn’t worry about the color, though, because once you get the hang of making two-layer button-holes, you’ll never see the cording when you’re done. Also, I always increase my bobbin tension to ensure a smoother satin stitch by threading the bobbin thread into the little hole on the bobbin finger, available on most Berninas. On machines from other manufacturers, just loosen the top tension slightly in order to achieve the same result.
I suggest you mark each buttonhole for length, instead of using the auto-length feature your machine may offer. I use a simple buttonhole foot (Bernina No. 3) that has two grooves underneath and a hook in front to hold the cording in place but no sliding plate or other length-marking features. Finally, I use a pair of Gingher appliqué scissors to open the buttonhole and trim its raw edges after the first pass, because it seems to allow me to clip as closely as possible to the stitches. But even if I clip a few stitches, it doesn’t matter, since everything gets covered up in the second pass.
Don’t trust your machine’s presets … unless you like them
On my machine, I step through the automated buttonhole settings by pushing a button. For my improved machine-made buttonhole technique, I do the same thing, but make a carefully worked out sequence of adjustments at each step. For example, I reposition the needle after the first button press (which sets me up for the first lip), because I want the space between the lips to be a little wider than the preset on my machine. You may decide that you don’t need to alter your available buttonhole settings, at least for Step One, or you may want to completely ignore your presets and build your basic buttonhole to match your preferences, with stitch widths and spacing not available otherwise—closer lips, perhaps, or narrower or wider bar tacks. Anything is possible when you make the buttonhole freehand.
I also have to turn the garment (with the needle down) to make sure the second lip is stitched forward rather than in reverse, which, in my experience, simply never results in as smooth a satin stitch. Your machine may already stitch both lips in forward mode, or you may have better luck stitching backward than I do. Regardless, make sure that for Step One you increase the stitch length to around 1mm, or about 30 sts./in. These first stitches don’t need to be satin stitches, because they just hold the cording in place while allowing you to cut the hole open and will be covered by the second pass of satin stitches. By the same logic, you don’t need to make more than two or three stitches at each bar tack, because they’ll be done twice, and you don’t want to have your feeding mechanism get caught in excess thread buildup.
For Step Two, I also use adjusted automatic settings and my No. 3 buttonhole foot, but since this layer is simply a covering of satin stitches that hides the raw edges, you could switch to a satin-stitch foot and do this step by eye. The main thing is to carefully analyze your automatic steps and presets to be sure you understand how they are made, and to be clear about how you want your buttonholes to be different. This will tell you whether you can use some or all of the presets, and which parts you need to do freehand. In any event, it’s essential, as you make the second pass, to hold the buttonhole slightly open, using your fingers on either side of the foot, to make sure the second pass doesn’t accidentally close the hole.
Practice makes perfect
On first reading, this may sound like a lot of fuss over a simple buttonhole—and it may be. But if you’re particular about your details, you’ll find that after a little practice, two-layer buttonholes don’t take much longer to make than ordinary ones, and they do look much nicer … nicer, even, than those on most off-the-rack clothes. So, if you value the difference, best of luck adapting my techniques to your own machine.
To make a two-layer buttonhole
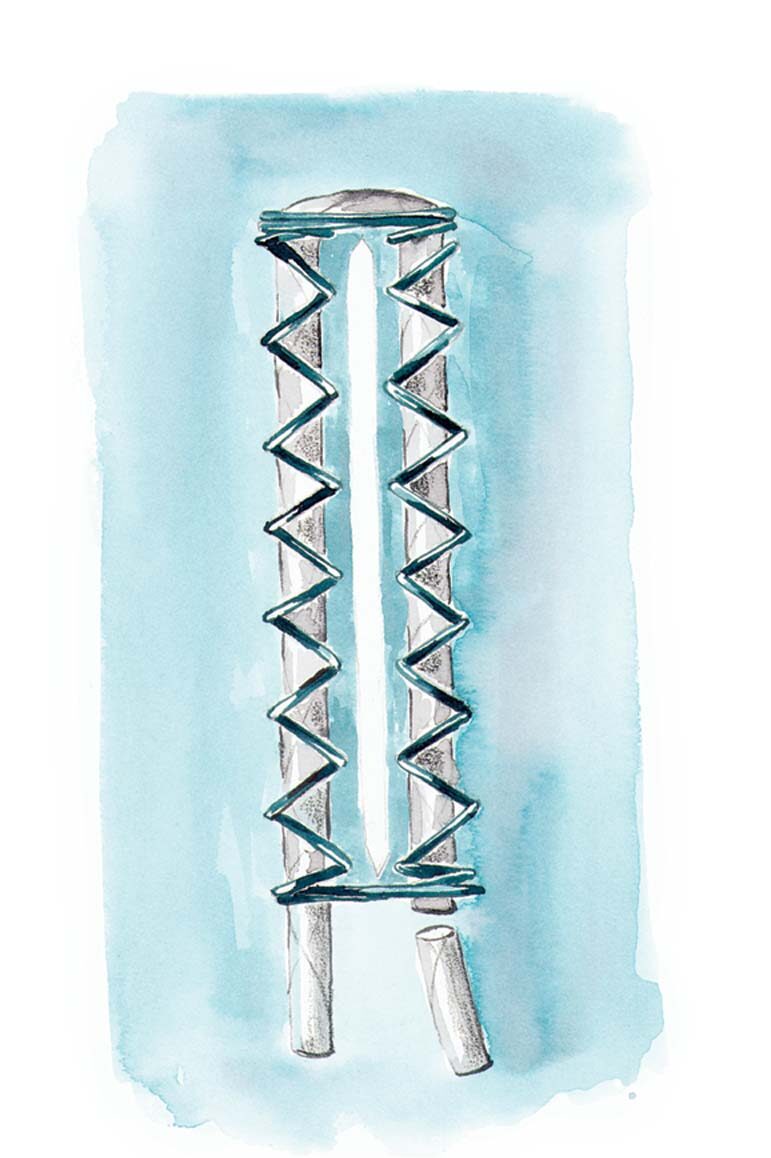
Step One: The first pass
1. Mark buttonhole length and position.
2. Set up machine with buttonhole foot for corded buttonhole—see your machine manual. Place loop of cord toward garment edge.

3. Stitch buttonhole with long zigzag (1mm stitch length) at sides, and lightly stitched bar tacks.
4. Pull cord tight, trim ends, then cut open hole, and trim raw edges as close as possible to stitches.
Step Two: The second pass
1. Adjust width and length of zigzag for your desired satin stitch, to cover first-pass stitches. Needle should swing from just outside first stitches into hole and back.
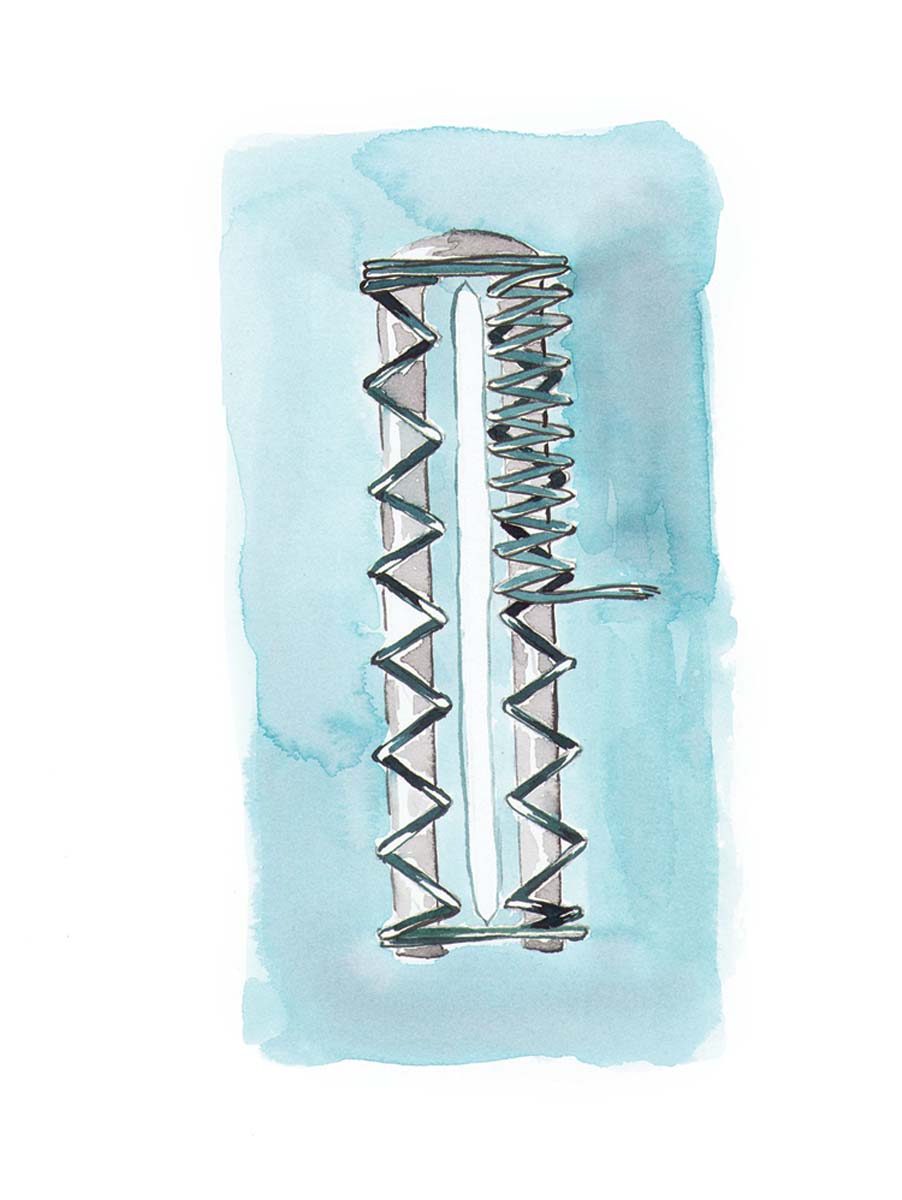
2. Repeat light, bar-tack stitching, then stitch other side, either by turning garment, or from the starting end, to avoid stitching backward.
3. End with a second, lightly stitched bar tack and a few zero-length/ zero-width stitches to tie off. Clip all threads.
Designing with machine-made buttonholes
Why can’t beautiful buttonholes be both utilitarian and decorative? And why must buttonholes always house buttons? In both cases, there’s no reason why not. Below are a few design ideas featuring buttonholes that are drawn from or inspired by garment sketches in French designer Erté’s notebooks (c. 1920s). Let Threads know what ideas you come up with.
 |
 |
 |
 |
 |
 |


Log in or create an account to post a comment.
Sign up Log in