


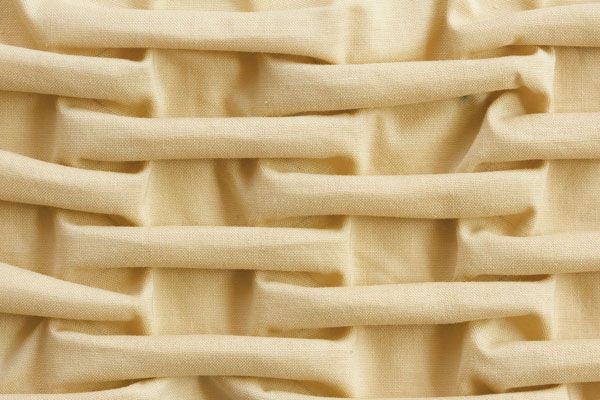
Smocking is an age-old technique typically used in heirloom and historical garments. However, this traditional surface embellishment is making a comeback in unexpected ways in modern design.
The following pattern variation on North American smocking, known as the lozenge, is sewn using a grid that alternates taut and slack stitches. Once you get the knack of this variation, you can try creating other designs on a grid and stitching your own version. By changing the scale, placement, or number of repeats, you can fabricate an interesting smocked look.
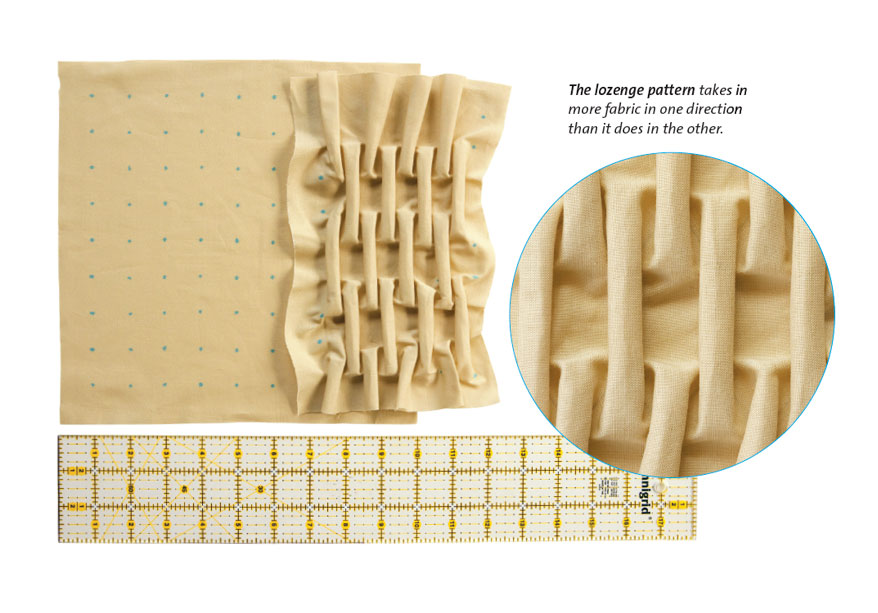
North American smocking takes up fabric lengthwise and widthwise. Plan your design, and expand your pattern to accommodate the extra fabric needed.
Choose your fabric
Smocking works best on light- to medium-weight fabrics. The technique creates multiple folds and pleats, so don’t select a material that has a lot of bulk. Typically, smocking takes up about two to three times the fabric’s width and length. If your pleats are very deep, more fabric is needed. Always test your design on scrap fabric first to estimate how much yardage you need.
Adjust your pattern
Before stitching the design, measure a test fabric’s length and width. Smock the fabric, and measure it again. Divide the fabric’s original length and width by the new measurements. Multiply the quotient by your target measurement to determine how much fabric is needed.
For example, my 10-inch square scrap became a 5-inch square after smocking a lattice pattern (see Threads #151 for the lattice pattern). I wanted to cover the blouse front’s finished neckline, which was 13 inches wide by 4 inches long. I needed to expand the pattern’s width to 26 inches and its length to 8 inches.
Follow the grid to stitch the design
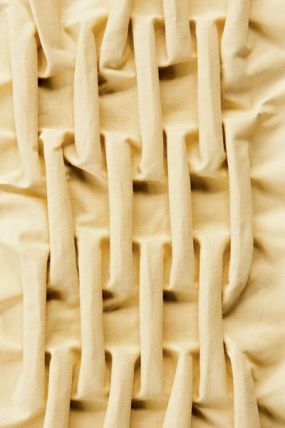
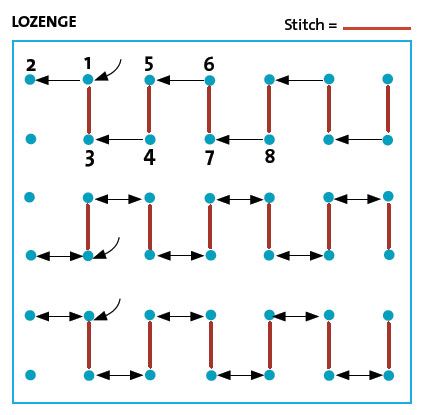
Now that your pattern is expanded to the necessary measurements, mark out your design’s grid, and stitch the smocking. The alternating taut and slack stitches help create the North American smocking’s distinctive look. Traditionally, these dots are sewn on a very small scale, about 1/4 to 1/2 inch apart. Here the scale is enlarged to 1 inch for a modern look.
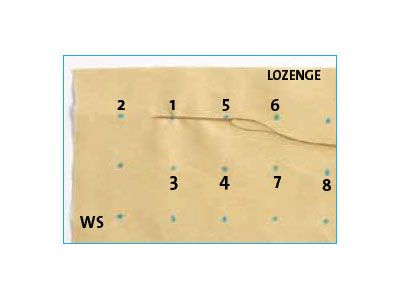
Work from left to right to create rows of the lozenge pattern. Arrows represent taut stitches, and solid red lines represent slack stitches.
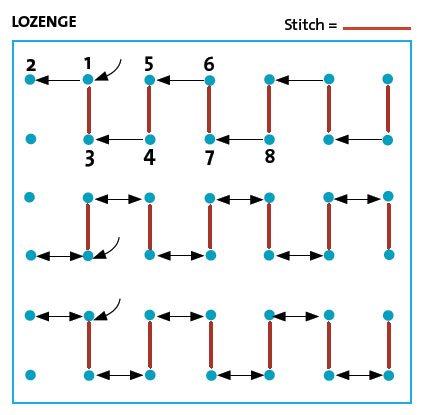
1. Draw a grid on your fabric’s wrong side using a temporary fabric-marking tool. The dots represent each stitch; take care to make sure they are spaced evenly.

2. Begin your stitch design. Follow one of the grids below to sew the smocking. Begin at dot 1. Then pick up dot 2 with your needle, and pull the thread taut to 1.

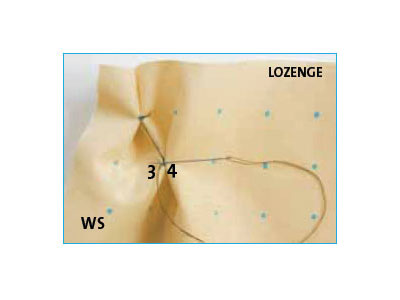
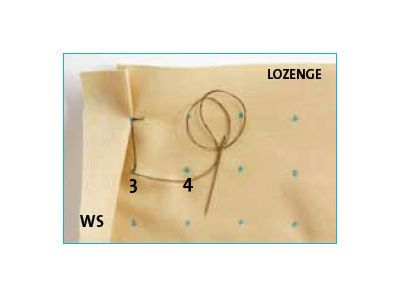
3. Pick up dot 3 with your needle, but do not pull the thread taut. Tie a knot to secure the slack thread.

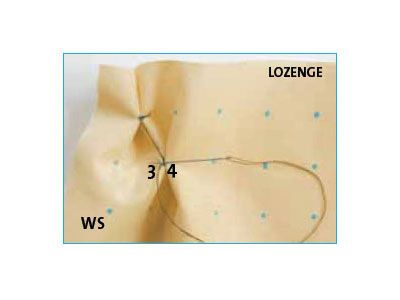
4. Pick up dot 4, and pull it taut to dot 3. Continue alternating between taut and slack stitches. At the end of the row or column, tie off the thread. Add more rows or columns as desired.
This post was excerpted from Threads #151, p.68.


this is great! when i first saw the Bottega V. honeycomb smocked dress i swore i had to figure out how to make it because i have no means to afford a designer dress of that caliber.. many ..many hours of research later i found a post on the exact same dress!! and some detailed and different smocking tutorials.. also found a book on manipulating fabric but i couldn't buy it :(
I heard once knowledge is nothing if you don't share it.. thank you for sharing this technique i will post those tomorrow
Found it!!!! http://couturedetails.blogspot.com/2007_03_01_archive.html
CRIE1982 thanks so much for posting this blog! I just got a great idea for a jacket and dress based on this technique and the BottegaV dress is absolutely gorgeous!
I was just going to say the same as Beresta! Interesting technique, but without your suggestion for implementation, I was having a hard time imagining this. Beautiful work!
In children's clothing, this is known as counterchange smocking. You can make pictures if you use a stripe fabric where the stripes are the same width and draw a grid. It is not difficult to learn and is really fun to do. Thanks for the demonstration on adult clothing.
I just saw this technique on the scoop neckline of a top on a character on the show Castle! (It was the 10/10 episode about a murdered hedge fund employee and his sister was wearing this top in a taupe color). Now that i'd be willing to make as it was a decorative touch and looked so special.
I really like this technique, It looks tres cool! If I understand right, the texture is actually the back side of the needlework, right? I was wondering, as I browse through my ancient books, if there are any more "easy to read" grid patterns for other designs handy? All the smocking tutorials I can find are for prepleated what I call 1970's /little girl dresses and apron designs and I can't seem to translate them into this technique... I can follow "connect dot 1 to dot two with a tight stitch, float over to dot 3, connect dot three to 4..." but am havign trouble figuring out what the other patterns would look like... Can anyone help me?
You can use Knott's Dots, iron on dots instead of drawing a grid.https://www.etsy.com/listing/290405007/knotts-dots-smocking-iron-on-dots-30?ref=shop_home_feat_1
wow, i love this pattern!!!