


Quick-lining is simple and speedy, and it eliminates the need for interfacing.
Look again at your favorite designer dress, blouse, skirt, or pants, and you’ll find that it’s almost as handsome inside as out. Clean, neat finishing is a hallmark of fine ready-to-wear, and the lining is key. But neatly sewing the usually contoured seam that joins the lining and facing can be tricky and time-consuming. This task is occasionally so nettlesome that I devised a fast and easy lining technique, which I call quick-lining. Not only is quick-lining simple and speedy, it also eliminates the need for interfacing!
Why line, anyway?
A lining neatly finishes a garment and makes it more opaque and easier to put on and remove. A quick-lining also functions as interfacing, subtly shaping the garment and keeping the fabric from stretching.
![]()

Quick Lining at a Glance
Cutting the lining the full length of the garment pattern simplifies lining insertion and eliminates the need for interfacing.
In most patterns, the lining is cut from special lining-pattern pieces, then seamed to the edges of the facings. To quick-line a garment, I ignore the lining pattern pieces and instead cut the lining from the full garment-pattern pieces. Then I layer and sew the facings and lining together, and thereafter treat them as one unit. When the garment is right side out, the lining’s weight helps hold the facing in place.
Quick-lining has many advantages: There’s no interfacing to select, cut, or fuse (unless you want an extra-firm waistband in your skirt or pants). The lining is easier to assemble when the lining/facing seam is simplified. This seam keeps the facings from rolling out of position; and because the facing is stitched on top of the lining, the lining helps keep the seam from showing through with wear on the right side. And, in a sleeveless garment, all the major seams, including the armholes, are finished on the sewing machine.
Simple steps to quick-line
Quick-lining involves a few easy steps that are essentially the same, regardless of the garment you’re lining. The instructions below present the key steps. Remember you’ll also need to press and trim the seams as well as clip the curved neckline and armhole seams.
![]()

To reduce bulk with medium and heavyweight fabrics, serge, rather than fold under, the facing’s raw edge before edgestitching it to the lining.
For all but sleeveless dresses
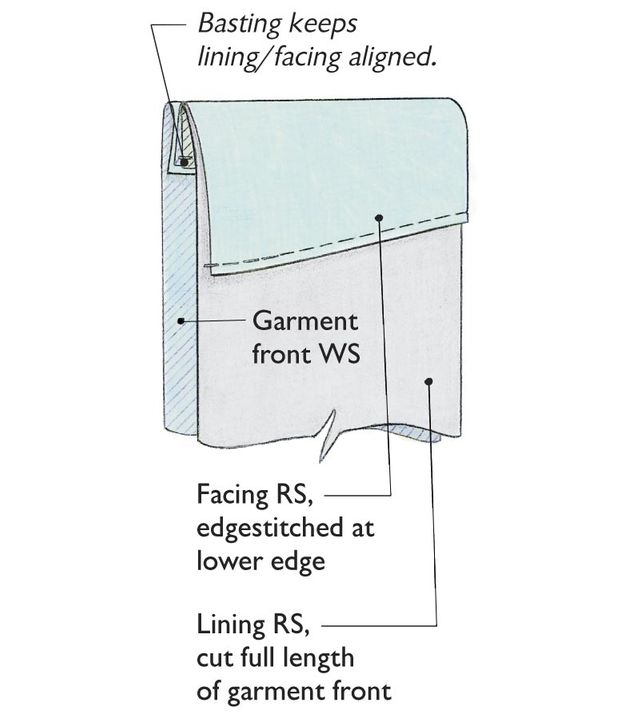
1. Sew the dress, skirt, or pants together, including inserting the zipper. Then cut out the facings according to the pattern directions. Cut the lining pieces using the full garment-pattern pieces.
2. Assemble the facings according to the pattern directions. Turn the facings’ lower edge under 1/4 in., but don’t sew it. (With a medium-weight fabric, serging the raw facing edge, rather than folding it under, as in the skirt below, reduces bulk in the lining/facing seam.) Assemble the lining for a dress or blouse at the shoulders, and for a skirt or pants at the vertical seams shown in the pattern directions.
3. Place the facing’s wrong side against the lining’s right side, align the raw edges, and pin them together. Machine-baste the lining/ facing unit 1/4 in. from the raw edges of the neck and shoulder or waist. Edgestitch the facing’s lower edge to the lining. Then sew the remaining lining/facing seams, including the sleeves.
4. Treat the lining/facing as a single unit, and attach it to the garment, right sides together. Press seam allowance towards the lining/facing unit and understitch (straight-stitch on the right side through the facing and seam allowances close to the seamline) to keep the facing from rolling out of place. Hem the lining 1 in. shorter than the garment.
5. Tack the lining to the dress at the shoulder seams (or at the side seams of skirts or pants), and slip-stitch the folded lining to the zipper.
Very heavy fabrics like some brocades often create too much bulk at the seams, and some can also be scratchy to wear. If you eliminate the facings and quick-line these fabrics to the garment edges, you’ll minimize bulk and irritation. But to give the fabrics the extra support the facing would have provided, use the facing pattern pieces to cut out interfacing and fuse it to the wrong side of the lining.
For sleeveless dresses
Quick-lining lends itself especially well to sleeveless dresses, blouses, and jumpers because all major seams are sewn by machine, and the results rival fine ready-to-wear.
Begin by cutting out the facings, and turning under and pressing their lower edges 1/4 in.; cut out the lining using the garment pattern pieces. Pin the lining and facing at the neck, shoulder, and armhole, and edgestitch the facing’s lower edge to the lining. Machine-baste the lining and facing 1/4 inch from the neck, shoulder, and armhole edges, trim edges, then clip the curves.
At the shoulders, first sew the dress front to the dress back, then the front lining/facing to the back lining/facing. Press the seam open and trim the lining/facing’s shoulder seams to 1/4 in. Trim the front and back armscye edges, tapering from 1/8 in. at the shoulder to nothing at the notch point.
To turn the dress right side out after sewing the lining/facing to the garment, pull the dress backs through the front shoulders. Understitch the neck and armscye seams. Then sew the garment’s center-back seam up to the zipper opening and insert the zipper. Sew the lining’s back-center seam to the zipper, press the seam allowance back, and slip-stitch the lining to the zipper edges.
Matching the underarm seams, sew the side seams joining the front and back lining and those joining the front and back garment. Hem the dress, then hem the lining 1 in. shorter than the dress. Turn the garment right side out, and admire your work.
Connie Long, of Mitchellville, MD, is the author of Easy Guide to Sewing Linings, Sewing with Knits, and Easy Guide to Sewing Blouses.
Drawing: Heather Lambert
by Connie Long
from Threads #60, pp. 66-68


How does the instructions work with a pleat at the bottom of the skirt? I want to line a straight skirt that has a simple pleat, center back.
Great tip thanks for it
This is great! Thank you for sharing.
Thanks, super helpful instructions. Trying it for the first time today on a skirt that came without lining instructions. A pet peeve may now be overcome, thanks so much!
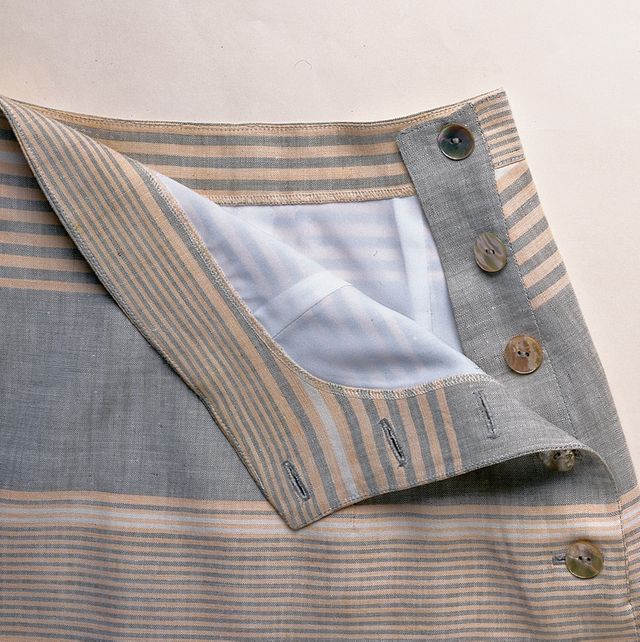
For an asymmetrical front closure, the facings must be cut in reverse: In other words, the wrong side of the pattern piece must be used "as if" it is the right side.
Correction to my previous comment. For a garment with an asymmetrical front closure, the front lining pieces must be cut in reverse but the lining facings are cut as for the garment.
I'm laughing. I have been using variations of this for years I feel like you have given me permission as if I were cheating. The genius here is the sleeveless garment. By closing it at the side seam rather than the nasty shoulder seam, the finish is beautiful. Thanks for the permission!
This is truly informative!