

Synopsis: It can be illuminating to discover that there’s a distinct, natural logic governing the most common ways shapes can be combined into repeating patterns. If you’re designing your own quilts, basic principles of symmetry can provide an invaluable, and virtually inexhaustible inspiration for your own creative explorations.
Quilters often spend a lot of time working with shapes in their projects. Patchwork pieces, appliqués, quilt blocks, and quilting motifs are essentially shapes that we bring to life by combining and recombining them into an overall design. Color and value help to create rhythm, texture, and emphasis. It’s hard for me to imagine a quilter who isn’t at least a little fascinated with shapes of all kinds, and I know a few who are quite enamored of one or two specific shapes.
But whether you’re taken with a single motif or happy to be working with whatever shapes your current quilt requires, it can be illuminating to discover that there’s a distinct, natural logic governing the most common ways shapes can be combined into repeating patterns. Traditional quilting designs and blocks almost all rely on this logic, as do repeated patterns from every culture and period of history. And if you’re designing your own quilts, this discovery can provide an invaluable, and virtually inexhaustible, inspiration for your own creative explorations.
As soon as you start arranging two or more duplicates of a single shape on a flat surface, you’re creating a pattern with them. And if your shapes are placed in some kind of repeating order, you’re operating within one or more well-defined types of symmetry. Mathematicians have described a multitude of ways that shapes can be arranged symmetrically on a flat surface, but essentially they all come down to four basic, familiar operations, officially termed translation, rotation, reflection, and glide reflection (see Four types of symmetry).
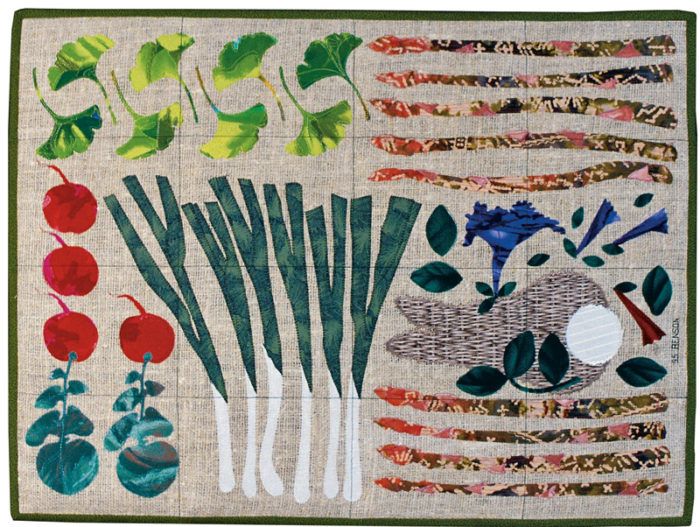
I must confess to being one of those quilters taken with a certain motif, in my case the ginkgo leaf, which is used in one way or another in all my examples. Besides having a lovely contour to look at, most ginkgo leaves are asymmetrical and thus clearly reveal how the four basic symmetry operations work. I suggest you start with asymmetrical shapes for your own explorations for this reason.
Of course, the point of learning about the symmetry operations isn’t that they provide rules to follow. It’s primarily to make sure you don’t overlook any possibilities. By all means, mix, combine, divide, stretch, and recombine any ideas the examples here suggest. I hope they prove as provocative as starting points for your quilts as they’ve been for mine.
Four types of symmetry
1. Translation
 |
 |
 |
Translated motifs move up, down, sideways, or diagonally in equal steps without changing orientation (no rotation or flipping). Good for bands and borders. Translated outlines create “stripes.” Bands of translated outlines can be further embellished with or without regard for their original symmetry.
2. Rotation
|
|
 |
 |

Rotated motifs turn around a fixed center point without changing orientation. Any number of equal repetitions is possible. This is ideal for medallions and single blocks but can also create allover patterns.
3. Reflection, or mirroring
 |
 |
 |
Reflected motifs are mirrored about a fixed axis line. This can be simulated with a real mirror. Combines well with other types of symmetry.
Adjacent motifs are mirrored; every other motif is translated. Dual, right-angle axes create a mix of rotation and reflection. You could see this design as three mirrored motifs in 3-point rotation, or one mirrored three-leaf design.
4. Glide reflection
|
|
|


Glide-reflected motifs are translated (glided), then mirrored. This can’t be simulated with a real mirror.
Tools for shape play
To make effective symmetrical patterns, you need to have plenty of duplicates (eight to ten) of the motif to play with. Photocopying, tracing, and drawing around templates are all good strategies for making precise duplicates. But in the early stages of your explorations of a shape, you usually don’t need exact duplicates; I often begin with cut-out paper shapes. I’ll simply draw or trace my motif onto newsprint that I’ve folded into four or eight layers and cut out all the duplicates at once, rather like disconnected paper dolls.
In addition to newsprint, gather a good supply of large-sized drawing paper (for backgrounds), lightweight tracing paper to record and repeat both the outline and the position of the shape, and heavyweight tracing paper for the final layout. Add rulers for drawing grid lines to help with positioning and determining spacing, compasses for laying out and dividing circles, markers for quick color studies, and glue stick or double-stick transparent tape for holding shapes in place, and you’ll be ready to start making designs.
Here’s what I do: I place the shapes on a large sheet of drawing paper and begin to position them using different symmetry operations (for more design ideas, see Figure and ground, below). When I find one I like, I tape or glue the shapes in place and tape a piece of heavyweight tracing paper over the entire layout. Then I use a template to make precision tracings of each repeat.
Figure and ground
In the language of design, motifs are called positive shapes, while the spaces between are called negative shapes. These positive and negative shapes are also referred to as figure and ground. The positive shapes, and the patterns they make, are probably the focal point of your pattern, but the negative space is every bit as important to the success of your design. If the positive shapes aren’t “grounded” to the background, they may appear to float disconnected across the surface.
To increase your awareness of the negative space around your motif, trace it, then draw a box around the shape, touching it on all four sides. Lay tracing paper over the drawing and trace just the shapes between the motif’s lines and those of the box. Repeat this exercise with several symmetrical arrangements of two or more motifs, noticing that the lines you’re tracing are the same as the outline of the positive shape, but the emphasis has shifted to the ground.
Free-motion freedom
You can, of course, use the designs you generate as patchwork templates, appliqué patterns, quilting designs, and anything else that comes to mind. But I urge you to forget as much as possible that you’re designing for any particular quilting technique, so you don’t allow worries about how you might actually sew a design in fabric to limit where the process can take you. A powerful design may actually lead you to explore new techniques, simply because you don’t want to leave that design behind.
In the quilts shown in this article, I’ve used an appliqué technique that’s easy to prepare for, and provides great freedom to design with all manner of complex and irregular shapes: free-motion stitching to outline, embellish, and finish raw-edged shapes that are cut without seam allowances. Each shape is attached with fusible web (I use Pellon Wonder-Under), which also prevents raveling. You can stitch through just your top, or through batting layers as well, but if the top isn’t stiff (as was the raw linen I used with the quilts shown here), you’ll want to back it with one of the many temporary stabilizers on the market, such as a tear-away or wash-away, or a permanent lightweight iron-on interfacing. Freezer paper works well also.
I like to prepare for free-motion appliqué by both sketching out possible paths I might follow and warming up with practice stitching on scraps. For the sketch, I lay tracing paper over the actual appliqué that’s fused in place to a background. I then draw around it in one continuous line with a pencil, without lifting the lead from the paper, just as the needle will operate. I’ll repeat this exercise a few times, making these thumbnail sketches until I’ve got a clear idea of how I want the final stitching to look, keeping in mind that I won’t be able to reproduce the drawing exactly.
Four Seasons Series
|
|
|
|


18 by 24 in., 1995; “Summer” 18 by 24 in., 1995;
“Fall” 18 by 24 in., 1995; “Winter”
Quilters, get ready to stitch
To warm up, I set up the machine and stitch just as I would for the final stitching: darning foot attached, presser foot down, and feed dogs disengaged or covered. I set the needle to stop in the fabric and set the machine for straight stitching. I use threads made for machine embroidery and have bobbins wound in white or gray thread with fine cottons also made for machine embroidery. I fuse some scraps to a heavy backing fabric so I don’t need a hoop or stabilizer, then take a stitch in the fabric so I can pull the bobbin thread to the top and make three stitches in place to lock the thread. Then I stitch around the shapes a few times following the contours and staying within the shape, then stitch around it on the background. Next, I’ll stitch into the shape following any interior lines in the design of the fabric, or drawing freely if the fabric is a solid or has areas of solid color. While the machine is running, I try to keep the orientation of the fabric to the needle the same as I move it beneath the darning foot. I move the piece from side to side and forward to back for all stitching, trying not to turn the piece (change the orientation) without stopping the machine. The stitching will be smoother and reflect the feeling of a drawn line, which is one of the reasons I like this technique for sewing appliqué.
Your stitch length is determined by how fast you move the fabric as well as how heavy your foot is on the pedal. You’ll make short stitches by moving the fabric slowly or pressing the pedal to the floor. If you move the fabric fast, your stitches will be longer. You can achieve a uniform stitch length around both simple and complex shapes by taking some time to get used to this method. The results you get will be well worth the practice time.
—Jeanne Benson designs quilts and appliqué patterns in Columbia, MD, and teaches workshops around the country.
Photos: Jeanne Benson.
Drawings: Vince Babak.
from Threads #71, pp. 52-55
Further reading
Handbook of Regular Patterns: An Introduction to Symmetry in Two Dimensions by Peter S. Stevens. Cambridge, MA: The MIT Press, 1981.
This is a classic reference on symmetry.
The Surface Plane by Martha Boles and Rochelle Newman. Bradford, MA: Pythagorean Press/ Brown and Benchmark, 1996 (508-372-3129).
A well-illustrated interdisciplinary high-school-level text, including chapters on symmetry and design, and many geometric constructions of interest to quilt makers.
Symmetry: A Design System for Quiltmakers by Ruth B. McDowell. Lafayette, CA: C&T Publishing, 1994.
Describes all 17 types of two-dimensional symmetry in terms of quilting patterns.


I was very excited to read this artical finding it full of information that will help me in all aspects of my quilting,sewing,and embroidery. I plan on using the ideas and techniques especially in planning embroidery designs. Understanding the concepts of symmtry and placement is very valuable. Thanks for the inspiration and information!!
This is a great article! Having a basic knowledge about design is so important. Thank you!
Birgitte
http://www.SewDanish.etsy.com
Scandinavian Textile Art, Unique Handmade Supplies
Dear Editors ~
Thank you so much for reprinting this article! So much excellent information has been published over the years, and certainly we can't *all* have a complete collection of Threads!
I really appreciate the thoroughness of this piece - indeed, a good grasp of design principles is vital for all kinds of sewers and crafters.
Bright Blessings!
loved it :-)