A Couture Segmented Hemming Technique Enhances Gored Dresses
Susan Khalje explains a section-by-section approachSynopsis: Much of the time, hemming a garment is straightforward. You mark the hemline, determine a hem allowance width and trim accordingly, then turn up the hem, stitch it into place, and that’s that. But every now and then, a hem can do something more: It can make a powerful design statement of its own, adding shape and contour and grace—and interest—to the bottom of the garment.
I’d like to share a hemming technique that truly does make such a difference. To show just how much, I’ve made two dresses, identical except for how they are hemmed. This dress design, Vogue 1724, has multiple panels giving it a sweeping flare at the hemline.

Proof of principle
The dress above is hemmed with a bias facing that spans the entire hemline. The result is fine. The hem does what it’s supposed to do, which is finish the dress’s bottom edge. Another option would be to fold up the hem allowance, press, and stitch it in place.
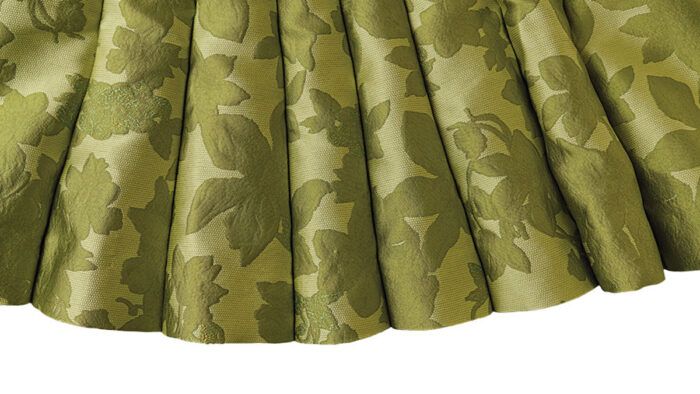
But the dress at left has a critical difference: Each panel is hemmed before it’s attached to the adjacent panel, and the lower parts of the seams, from about the hips down, are left unpressed and unopened. The seams fall out of sight within the skirt’s fullness. The result is a gracefully shaped hem, emphasized by the outwardly curved panels.

Suitable designs and fabrics
You need a multipaneled garment for this to work. While the dresses shown on the previous pages have 16 panels each, and the skirt below has 20, it’s an equally e ective treatment when worked with fewer panels.
Which fabrics work best? Ideally, you’d want something with body. You can beef things up from behind the scenes with underlinings, but it’s good to start with something reasonably bodied. I can imagine this technique in faille; lace, backed by a firm underlining; brocade; jacquard; piqué; moiré; silk dupioni or shantung underlined with silk organza; eyelet, with an underlining; and satin-faced organza with a deep hem allowance as a design element and to give added structure. I’ve had students use wool crepe with this treatment, and it’s gorgeous. You can even try subtle plaids, but be careful—if the design is too bold, it can overpower and obscure the curves you’re trying to highlight.
I’d avoid anything lightweight. Cotton lawn, for instance, wouldn’t work; the volume would be nice, but the flares of fabric just wouldn’t keep their shape. While linen might start out looking lovely, the inevitable wrinkles would quickly spoil the graceful hem that you’ve worked so hard to create.
Seams, open and closed
This is a simple technique: Each panel is hemmed before it is joined to the adjacent panel. You would normally press seam allowances open once they’ve been sewn, but in this case, they’re not opened. The stitched seam is pressed flat, to meld the stitches and to make sure the seam lies straight. Then the seam allowances are trimmed and finished.
At a certain point along a dress’s vertical seams—and this depends on the garment—the seam allowances at the top are pressed open as usual; experimenting will guide you as to the best place to make this transition from open to closed. On the green dress, it’s at about the full hipline.

Facing the flare
Each panel is prehemmed. But when the hem allowance of a flared panel is turned up, there’s extra volume to contend with. You can gather the extra width onto a piece of hem lace or binding or make a series of little folds. However, the fabric can be less than cooperative, and sometimes the volume of the folds or gathers is visible on the fabric’s right side.
There’s a good alternative: a bias facing. You can save a bit of fabric—you don’t need to cut much of a hem allowance. Plus, the bias facing, sewn on a curve, turns up beautifully, and the give in the bias easily molds to the curve of the hem. Since so much of this technique’s appeal focuses on the hemline, a faced hem is a big help in defining a beautiful curved edge. For truly couture results with this technique, follow the steps in “Face the Hem Segments,” below.
Next time you’re sewing a garment with a paneled skirt, consider this approach. It visibly elevates a basic design to a graceful couture piece.
Construct with care
Before you address the hem, make smart choices in assembling the garment. These make the hemming easier and give a cleaner finish.
Wide-to-narrow rule
There are few hard-and-fast rules in sewing, but this is one of them: If you’re sewing a fit-and-flare design, respect the wide-to-narrow rule. Stitch panel seams from bottom to top.
When two garment sections are pinned and sewn from wide to narrow, the fabric edges along which you are sewing are more stable, and less likely to distort.
If sewn from narrow to wide, the edges are unstable and they’ll waver as you sew, resulting in a wobbly seam. Experiment and you’ll see the difference. It’s amazing.
Seam strategy
In the segmented hemming method, you have a choice: Sew all the vertical seams, leaving the bottom 8 inches or so unsewn, then do the hems, then finish sewing the seams. The advantage of this method is that you can try on the nearly completed garment to determine the exact hem placement. It’s cumbersome, though, to hem all the sections when the garment is nearly together.
A more manageable option is to determine the hem placement in a toile fitting, hem each section, and then sew the seams, carefully matching the finished hems.
Edge finishes
Once the seams are sewn and pressed, the raw edges need to be tidied. There are a number of options once the seam allowances are trimmed evenly.
Hand-overcasting, a lovely couture finish, is probably the least obtrusive of all, but it’s time-consuming in this case. Machine zigzagging certainly works, as does serging the raw edges.
Probably the prettiest treatment is to bind the seam allowances. If there’s enough fabric to cut one seam allowance extrawide, it can be used to wrap the raw edges, securing the final fold with fell stitches, as shown in A, B, and C.
Otherwise, a separate binding (made or purchased, bias or straight-of-grain), can be applied. Machine-sew the binding to the seam allowance, then wrap it and sew by hand or machine.
Adapted lining
Linings are often joined to the bottom of a garment, but that doesn’t work in this instance. The lining doesn’t have to be as full as the garment. Each panel can be pared down, or a simpler lining can be used, with fewer panels and enough volume to allow movement.
Face the hem segments
A hem facing makes sense on a flared hem, as it gives you a reasonable hem allowance, eliminates excess width from a cut-on allowance, and firms up the lower edge so the garment maintains its shape.
1. Cut the facings
Cut silk taffeta bias strips for hem facings; they’re about 3 inches wide. The skirt’s vertical seams are prepared with a standard 5 ⁄ 8-inchwide seam allowance.
2. Attach the facing
Trim the hem allowance to 3 ⁄ 4 inch wide. With right sides together and hem edge aligned, stitch the layers together on the hemline. The seam allowances can be trimmed and/or clipped, but sometimes that extra fabric gives definition, shape, and body to the hemline.
3. Press the facing seam
Press the layers flat to meld the stitches, then press the seam allowances toward the facing. Press only along the seamline, where the silk taffeta and the fashion fabric meet. The bias will ripple slightly; you’ll smooth it in step 5.
4. Press the facing up
Favor the fold slightly so the facing is just out of sight on the wrong side. Again, press only along the lower edge. Pin the vertical edges to the dress panel’s edges; this reveals the excess in the bias facing’s width.
5. Shape the bias fabric
This is the most important step, so use patience as you complete it. Press and shape the facing to mimic the hemline curve, eliminating any folds or gathers. It can take several passes with the iron to shape the bias so that it’s completely flat, but it will conform to the curve of the fashion fabric.

6. Hand-sew the hem
Once you’re happy with the facing’s shape, pin along its top edge, placing the pins perpendicular to the facing. Turn under a narrow edge at the top of the facing. I recommend using lots of pins to contain the bias and prevent it from stretching out before it’s stitched. Slipstitch it to the fashion fabric. Keep the stitches shallow; you want them to be as invisible as possible on the garment’s right side.
Contributing Editor Susan Khalje specializes in couture techniques that guarantee more beautiful sewing results. SusanKhalje.com.
From Threads #222
Stunning piece and exceptional work. I am truly grateful that you shared this beautiful technique with us.