

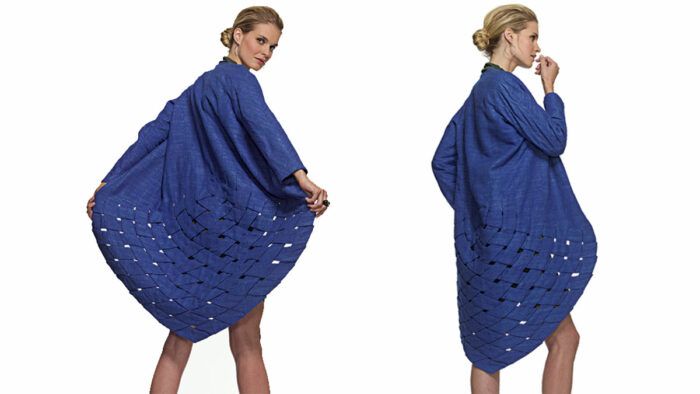
Synopsis: When I started draping the one-of-a-kind coat feature in Threads #140, I really didn’t consider how the pattern itself would look. The coat itself is made of many narrow strips, stitched parallel to each other to form the bodice and sleeves, and then woven together to create the swooping skirt section. Although I began draping with straight strips of paper, you’ll see that I ended up with something quite different.
This basket-weave jacket appeared on Threads pages once before—when it won an award in the Inspired by Threads Challenge. My technique was inspired by my mother, a basket weaver. Here’s the step-by-step process for crafting your own basket-weave garment.
From design concept to pattern
Fashioned from tussah silk in a cobalt blue, the jacket panels are seamed together through the bodice and then released to cross in a basket-weave effect at the hem. The strips are all draped by hand.
Moving from the initial concept to the completed jacket is a complex but fascinating process. It tests pattern making, draping, and sewing skills. The original design consists of a jacket made from 22 panels that are stitched together to form the upper bodice and then divided into strips to weave a lattice around the lower jacket. You can either draft your own jacket pattern, as I did to incorporate the garment panels, or start with a commercial pattern.
Once the basic jacket shape is determined by the pattern, sew a test muslin of the bodice to use as the foundation for the next steps.
Project Runway Style
|

To weave smoothly, the woven strips need the proper curved shape. This requires hand draping to find the right shape and proper length of each strip. I start with rough-cut paper strips to block in the patterns. I clip into the strips and tape them back together to form the exact curve I want.
The “paper draft and drape as you go” method is easy once all the strips are woven. Use the pieces from one half of the muslin to keep the final pattern symmetrical. Even though each finished strip is only two inches wide, the pattern curves require much more fabric yardage than you think they will. This technique produces an art-to-wear piece that gets as much attention leaving a room as it does entering.
Convert the basic pattern
Start with a commercial jacket or vest pattern with simple lines. The alternative is to make your own jacket pattern for the upper bodice.
Cut your pattern
Lay out the front and back bodice paper pattern pieces, and divide them into vertical panels. For a symmetrical weave pattern, include a center-back seam. Cut your pattern into panels, and add seam allowances. Mark a horizontal line where you want the panels to separate into loose strips for the woven lattice.

Put the pieces together
Carefully number each panel. Mark the points where the upper panels become individual strips for weaving (dotted line at left).
1. Attach the paper strips to the jacket panels. Cut the strips to the finished width of your choice. Extra length for each strip is essential, as the overlapping process shortens each one. In my case, the strips were 2 inches wide. These curve from the center back to the center front along a generous arc. Determine the finished length by hand-fitting each strip.

2. Begin weaving the strips, starting at center back. Continue in a crossed, over-under method from the center back toward the front edge. Cut and overlap the strips at intervals as you weave to adjust the shape. Use tape to secure the new curve. Note: as you weave, you’ll have to constantly adjust the strip you’re weaving as well as the previous strips.

3. Continue to weave from back to front. Adjust the strips as you weave to refine the curved shape as desired. When all of the strips are woven, trim any excess length at the front edge, and tape the intersection to secure the woven design within the jacket body. Pin the end of the strip in position, and cut it off where it intersects the front edge strip.

4. Make a test muslin. After you have completed the paper pattern, convert it into muslin. Sew the jacket. Examine the muslin, and adjust the strips to improve the spacing and the overall shape of the woven bands. The jacket may not be perfectly symmetrical, so choose the better side for your final pattern and then mirror it.


Line the bodice and strips separately
The jacket is lined in two parts: use a traditional lining for the bodice, and separate, self-fabric lining for each strip. Cut the bodice lining to cover the raw lining edges at the tops of the lined strips. First, line the jacket bodice; then insert the strip linings.
1. Eliminate the multiple panel seams in the bodice. Use your preferred method to cut and sew in the bodice lining, but leave the lower edge free.
2. Cut a self-fabric lining for each strip. Be sure to add seam allowances to the patterns. Then number the pieces for easy reference, and mark dots at the upper ends where the jacket panels separate for weaving.

3. With right sides together, sew each lining piece to its strip along the long edges and the lower end. Turn the strips right-side out through the open upper end.
4. Turn under the lower edge of the bodice lining. Hand-sew the bodice lining in place to cover the raw edges of the strips.

Why not draft the pattern flat?The take-up required for the weaving process can’t be estimated in flat drafting, and the drafted strips will likely end up too short once woven. TIP: Buy extra fabric.The shapes of your final patterns determine how much fabric you need. Nest the pattern pieces, and keep them on-grain. |
Enid Wilson of Bellingham, Washington, designs handcrafted cards and stationery and sews for the fun of it. See her article “Coat Check” in the December 2008/January 2009 issue of Threads.
Photos except where noted: Joseph Kugielsky. Styling credits: Dress—Chilli Couture (AgentRedPR.com), Earrings—Judith Bright (JudithBright.com), Ring—Lisa Freede (LisaFreede.com), Necklace—Ben-Amun (Ben-Amun.com), Shoes—Carlos Santana (available at select Macy’s stores).
An Online Extra to Threads #140, pp. 44-48


This week I walked into a fabric store in mid-Michigan and (pure coincidence!) saw this coat in real life - it is amazing! The coat is a work of art! My compliments to the creator. And the creator's mother, the fabric store owner, is blessed with a beautiful gift.
I love the work and the creative mind behind this. Such patience to the journey to the goal. That for me is the fun, finding new direction.
This is such a cool design idea