
Add Shimmer to a Floaty, No-Sew Wrap
Brush, stamp, or stencil metallic paint onto an organza panel

Spring and summer dressing, for me, tends to fall into the relaxed, easy-to-wear realm. But sometimes I want a look that feels special, even if it’s not a traditional special-occasion outfit. That was the inspiration for this wrap: It’s light as a feather, has a bit of shine and texture, and can be worn in a number of ways.
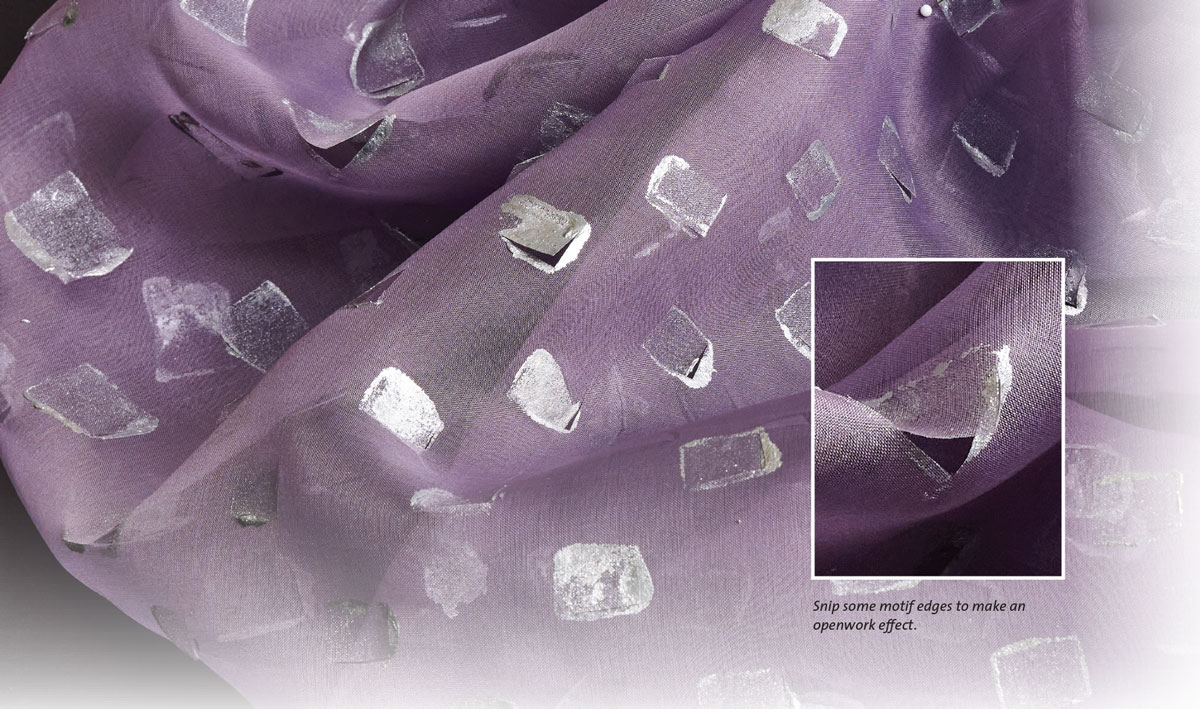
This wrap is made with nothing more than silk organza and fabric paint. My first idea was to create a perfectly geometric, linear pattern with a paintbrush. Instead, I found that applying the paint with a foam stamp created irregular motifs I liked much better. I then cut along two edges of each motif so that, when the scarf is twisted or wrapped, the stamped marks stand up slightly, adding texture. The paint seeped through the fabric so both faces shimmer.
I’ll show you some methods I tried, and I encourage you to experiment with paint colors, motif sizes and shapes, and cutting configurations.
Select Your Materials
You’ll need fabric and paint, as well as painting and cutting tools. Check your craft supplies, as you may be able to make do with items you already have in your collection.
Fabric
Silk organza is available in dozens of colors (EmmaOneSock.com), and two yards yields two large, 20-inch-by-72-inch scarves. Tear across the ends to straighten them.
You can also use polyester organza; it has a glassy shine, which gives a different effect. Chiffon and georgette aren’t ideal, as the painted motifs stiffen the fabric.
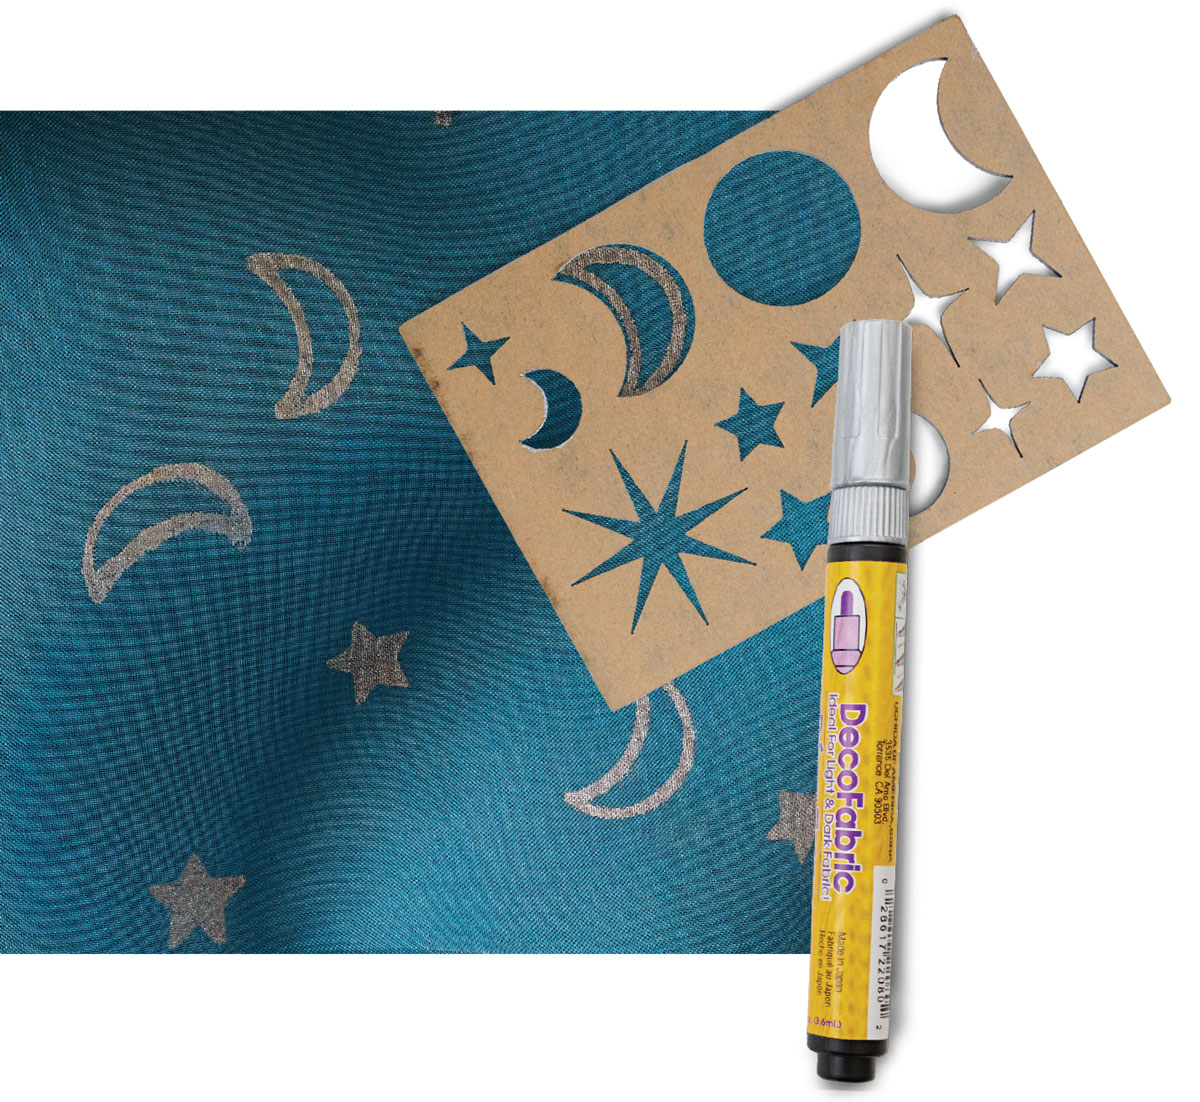
Paints
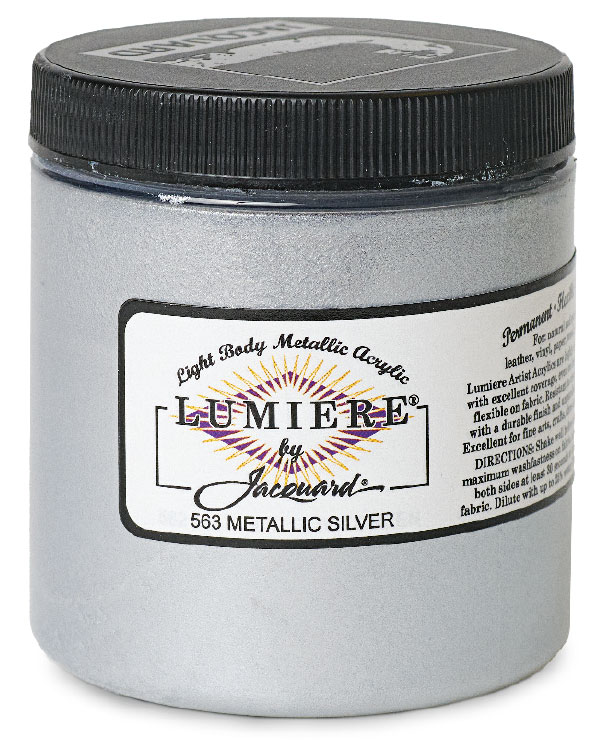
For fabric paint, I like Lumiere by Jacquard (DharmaTrading.com). It’s easy to apply and to clean up and sets with heat.
Finer, consistent lines are achievable with a DecoFabric marker (DharmaTrading.com). The markers don’t deliver as thick a coating, however, so the marks are less shimmery than those made with paint.
Brushes and more
Try an assortment of paint applicators. Bristle or foam paintbrushes and microbrushes intended for fine model painting work well, particularly for painting the wrap’s edges to seal them. Create stamps in the size and shape you like by cutting foam makeup applicator sponges. Stencils come in many shapes. Motifs shouldn’t be much larger than 2 inches in any dimension as they may weigh the fabric down.
Painting station setup
This painting technique relies on the paint seeping generously through the fabric, so you’ll want to cover the painting surface to protect it. Keep a roll of waxed paper and/or large trash-can liners handy. Use a small paper plate as a paint palette. Pattern weights are helpful for holding the organza in place as you paint.
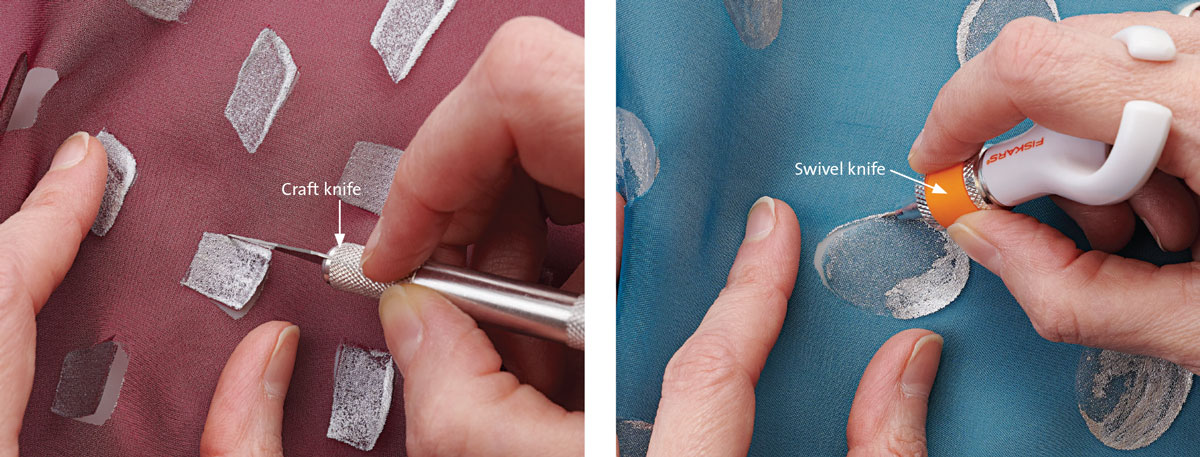
Cutting tools
You can cut the openings with a blade or scissors. Karen Kay Buckley’s microserrated Perfect Scissors (KarenKayBuckley.com) work well on silk organza. Straight cuts are easy to make with a standard craft or hobby knife. For curved cuts, try Fiskars Softgrip Fingertip Swivel Detail Knife (Michaels.com). It’s comfortable to use and enables you to make intricate, detailed cuts. When cutting with a blade, be sure to have a smooth cutting board to work on.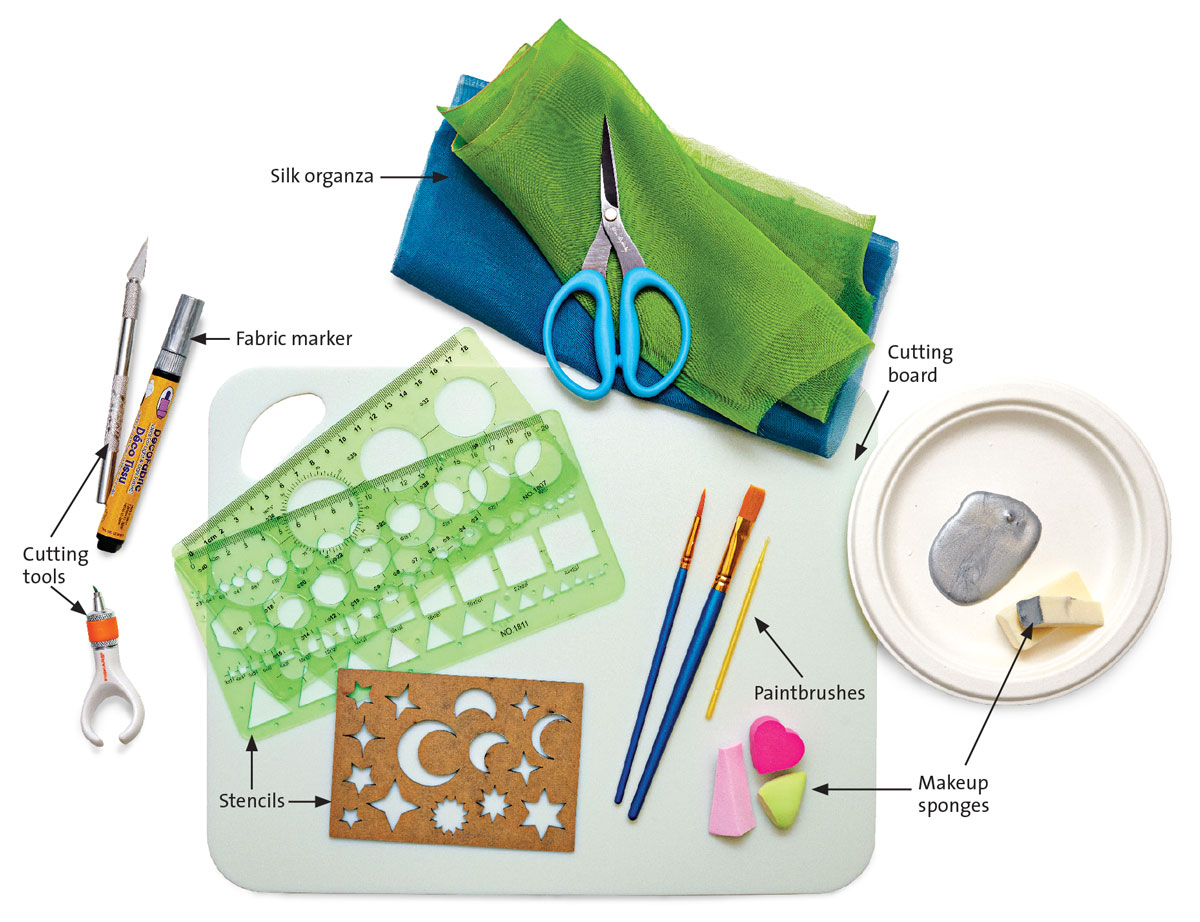
Plan a Design
If you want a relatively even distribution of motifs, especially on a large piece, make a template.
Create the template on paper or pattern material with a 1-inch grid; the motifs work best if they’re no closer together than an inch. Mark dots to indicate stamp placement.
Lay the organza over the tem-plate, aligning the edges and securing them with weights. Transfer the dots with a removable marker such as a FriXion pen. FriXion marks come out with heat from an iron, so they disappear when you eventually heat-set the motifs. Remove the template before painting.
Apply the Paint
There are lots of ways to make marks. Play with your tools to find the motifs you like best—there’s no right or wrong.
Prep and planning
The actual painting techniques are easy, but there is some mess involved. To avoid getting paint where you don’t want it, you’ll need a methodical approach.
Always work on a surface covered with a nonporous material. When you’ve painted an area of about 2 square feet, carefully peel the fabric off the backing before it dries and elevate it so it won’t stick. I slipped overturned disposable cups under the fabric to hold it up, about 8 inches apart. Give the painted area 10 or 20 minutes to dry, then move on to the next area.
If the worksurface still has wet paint on it, spread another layer of waxed paper for a clean working area. Don’t worry about minor, unintended blotches: When worn, the scarf’s embellishment coalesces into an allover look.
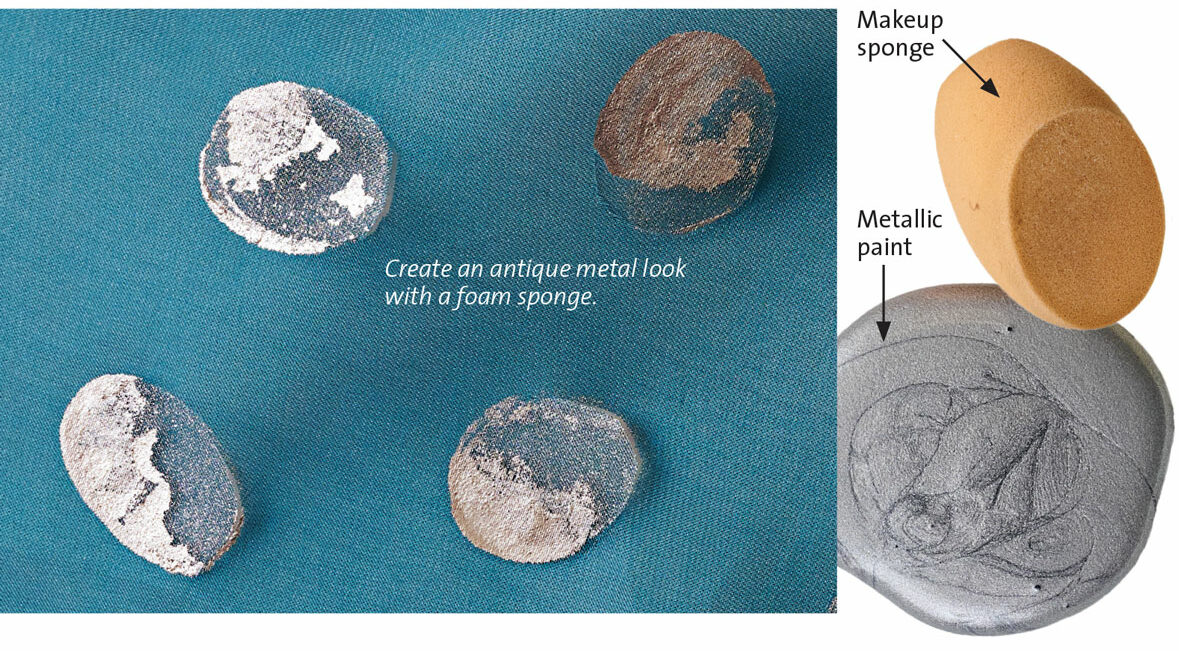
Stamping
Makeup sponges are ideal for stamping with fabric paint. They come in a range of sizes and shapes and are easy to cut with sharp scissors. Simply dip a sponge’s stamping surface into the paint and press the sponge onto the fabric. Experiment with how much paint to load onto the sponge and how many motifs you can print with a single dip.
Stamping with full-strength paint doesn’t produce a perfectly even mark: The shapes look like weathered metal leaf, with variegated levels of sheen throughout.
Freehand painting
With a 1⁄2-inch-wide paintbrush, you can create fairly consistent marks. I loaded the bristles with paint and made rectangular dabs. The paint goes on more heavily and evenly than with a sponge; when cut, the effect is somewhat like a paillette.

Stenciling
For the greatest control, try a stencil and fabric-paint marker rather than a paintbrush. Note that the organza has a tendency to shift under the stencil, and the paint can collect on the stencil’s edges, so you’ll need to work systematically to avoid transferring paint where you don’t want it.
Cut Strategically
Subtle openings throughout the painted work add dimension and another element of transparency. However, they are not essential.
- To create openwork, cut along or within the painted edges; the paint seals the cuts so they don’t ravel.
- Begin by cutting every second or third motif to test the effect; you can cut more later if you like.
- To maintain the organza’s integrity, cut judiciously. For larger motifs, cut only halfway around. If large motifs are closely spaced, consider leaving some uncut. On smaller marks, you can cut a bit more.
Carol J. Fresia is Threads’ editor.


This is so interesting and is so beautiful. It has me thinking I might like to give it a try.