
Learn to Braid a Japanese Cord for Unique Sewing Accents
Learn this Japanese technique for braiding a 16-strand custom cord.
 Kumihimo is a Japanese braiding technique that enables you to make a custom cord to match your sewing project.
The disk setup is quick, and once you’ve completed a round or two of the braiding, you’ll find the repetitive process calming and fulfilling.
Try this braiding technique by following the tutorial below. You can also watch a demonstration of the braiding: “Video: Learn Kumihimo, a Japanese Braiding Technique.”
A traditional art form
Kumihimo is simple to learn and even easier to get hooked on. There are innumerable variations, and a change of braiding material further multiplies the optitns for beautiful results. Once you learn some basic technique, you’ll find it’s impossible to make an unattractive cord.
Traditionally, kumihimo is done with weighted threads on a tall wooden stand with a ring-shape top, called a marudai. Artisans braid while sitting cross-legged on the floor, with arm movements reminiscent of a dance. You can learn dozens of complex braid patterns in Kumihimo: The Essence of Japanese Braiding by Aiko Sakai and Makiko Tada (translated by Connie Prener and Ethel Kawamura; Lacis, 2004).
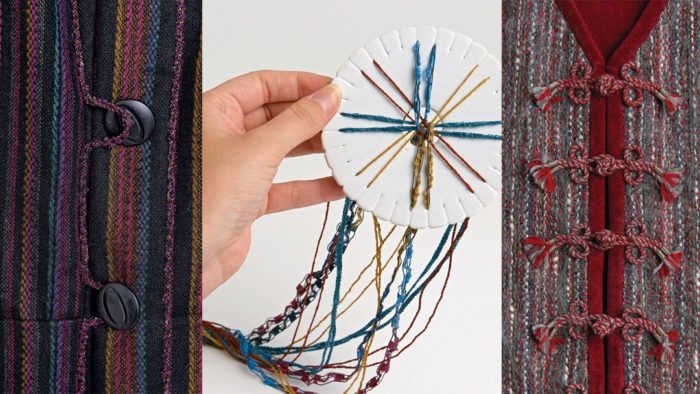
Today, a foam disk with grooves cut into the perimeter to support the braiding material can stand in for the marudai. This lovely art form is portable. It’s useful for creating cords to make frogs, loops, ball buttons, and other closures. The tutorial below explains how to create a spiral-patterned cord with 16 strands.
Braiding
1. Prepare the threads. Cut eight thread strands, each one four times the desired finished braid length. Fold each in half, creating 16 strands. Knot the folded ends together in an overhand knot. Place the knot through the disk’s center hole so it is on the disk’s underside.
2. Arrange the threads. Fan the threads around the disk, forming eight pairs of strands. Secure the strands in the disk’s slits: Place a pair at each of the four cardinal directions, and one pair between them, as shown at right. Note that color placement affects the spiral design, so experiment with arrangements of the thread pairs to find the one you like best.
3. Move the first thread. From the “southern” pair, lift the left thread and move it to the slit left of the opposite, “northern” pair.

4. Move the second thread. From the original northern pair, move the right thread down to the slit right of the original southern pair.

5. Rotate the disk. Turn it counterclockwise, bringing the next pair to the southern position. Braid the next pair. Repeat steps 3 and 4 with this new set of north/south pairs. Rotate the disk again, and continue until the braid is the desired length.

Tip
Start with a ring. It’s easy to turn your braid into a lanyard or key ring by tying the folded strands to a ring before braiding.

Resume a braid
If you stop braiding and wish to start again, here’s how to find the right strands to braid first:
Determine which of the threads are uppermost as they emerge from the center hole (A). Place one of these threads at the north position (B). Then rotate the disk counterclockwise, shifting this pair one position to the left (C). Begin braiding with the threads now at north/south.

This is an excerpt from “Unique Braided Trims” by Daryl Lancaster, Threads #194, p. 22.
Photos: Mike Yamin.


It would have been very informative to include how to tie off the braid??