
How to Sew a Dimensional Cuff Detail
Draft a pattern for a shapely sleeve appliqué
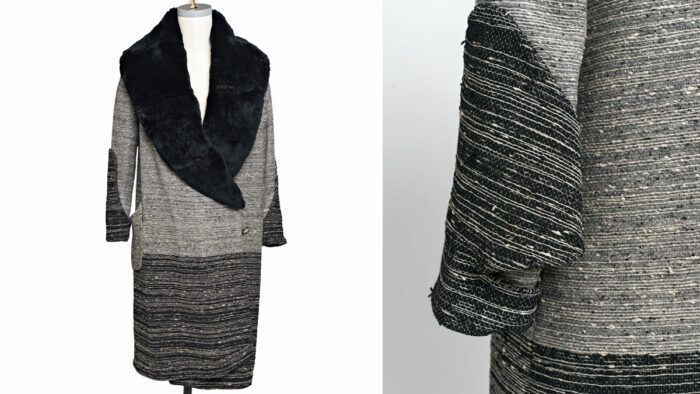
Women’s coats in the 1920s tended to have a simple silhouette. A prevalent style was a roomy, surplice-front wrap, often with a single-button closure at the left hip. This intriguing example is made from a two-tone textured wool. The darker section is placed at the hem and balances the visual weight of the large fur collar. On the sleeves, the dark fabric is used to form gauntlet-like cuff extensions. These rise to elbow level, and the back portion wraps around the sleeve in a dimensional swoop. Learn to draft a pattern for a similar cuff detail below.
Add drama to a simple, one-piece coat sleeve with a cuff that clings to, then swoops away from, the arm. It’s easy to create the pattern based on the original sleeve pattern. I’ll show you how to make a cuff that is similar in proportions to the one shown, but you can adjust the measurements as desired for more or less height or volume. You could even create a more geometric version.
In the original coat, the cuff was attached to the unhemmed sleeve, and its bottom edge turned up along with the sleeve’s hem allowance. This made for a bulky and stiff sleeve hem. A better method is to apply the cuff as a facing that is turned to the sleeve’s right side. This finishes the sleeve hem with fewer layers for a clean, supple edge.Begin by tracing the sleeve pattern. Replace its hem allowance with a 5⁄8-inch-wide seam allowance.

Draft the Pattern
1. Add reference lines to the pattern. Draw a vertical line down the sleeve’s center, parallel to the grainline. Draw a horizontal line 2 inches above the hemline.
2. Draw the front curve. Make a mark on the center line 12 inches from the hemline. From this point, draw a subtle S-curve that terminates at the intersection of the front underarm seam and the 2-inch line. Work with a fashion curve to create a pleasing curve.
3. Transfer the front curve to the back. Fold the sleeve in half along the center line. Trace the front curve onto the back half of the sleeve; if the back is wider, extend the curve until it reaches the back underarm seam at the 2-inch line.

4. Trace the appliqué pattern. Trace the appliqué onto pattern paper. Copy all lines from the hem’s seam allowance up to the curved line.
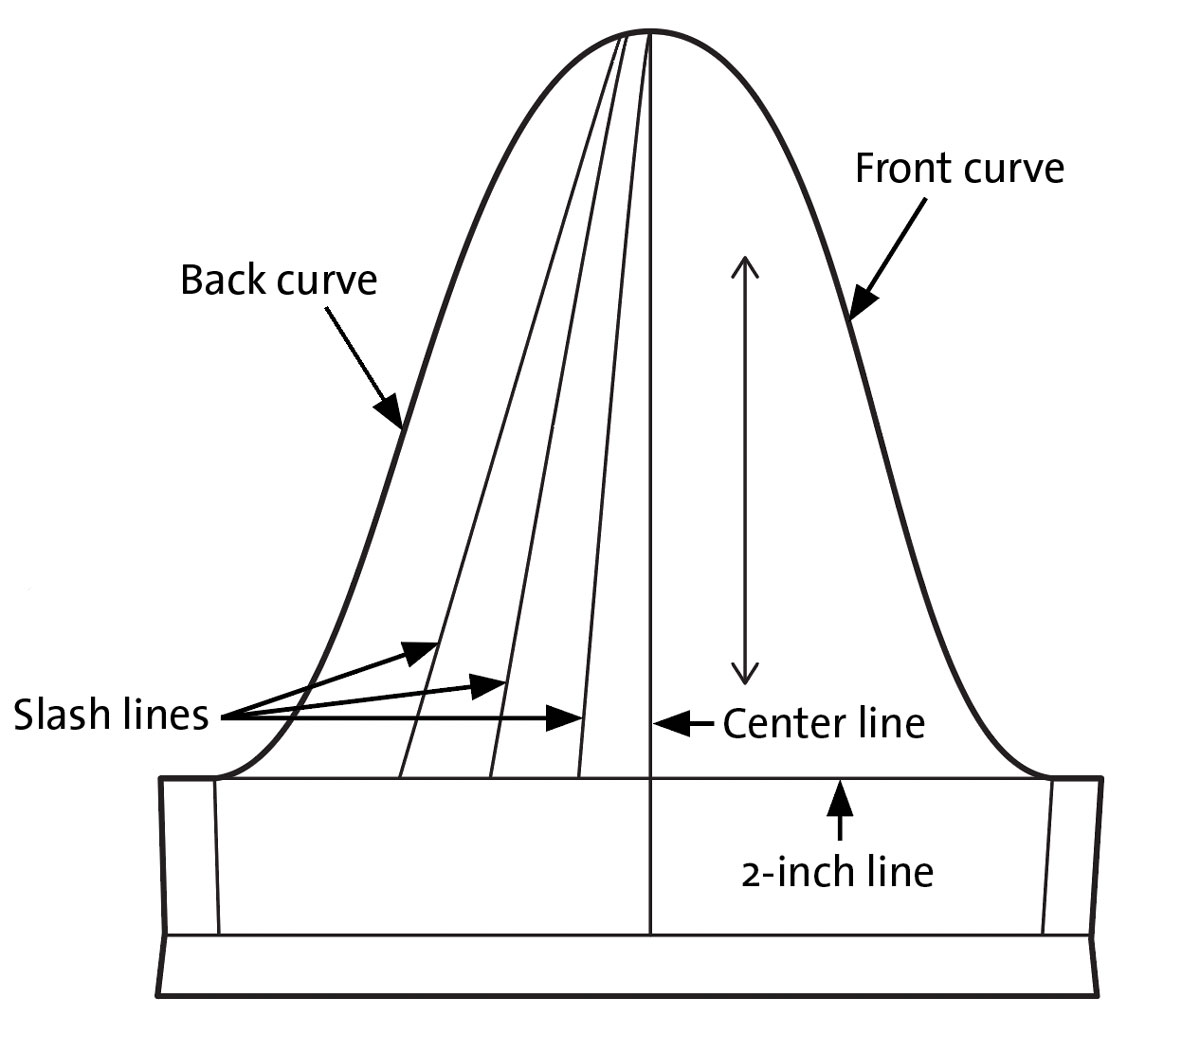
5. Draw slash lines on the pattern’s back half. On the back half, draw three lines from the curve’s upper edge, close to the apex, down to the 2-inch line. Space them approximately evenly along the line.

6. Slash and spread the pattern. Cut horizontally along the 2-inch line from the back underarm seam to the center line. Then cut up the center line to the apex, leaving a hinge. Cut up each of the slash lines to the top, leaving hinges to keep the wedges connected. Tape the front half of the sleeve and the lower portion of the back half to pattern paper. Then, spread the back wedges evenly, until the distance from the outer edge to the center is double the original length at the 2-inch line. In this case, the original was 5-1⁄2 inches long; the expanded portion measures 11 inches at its lower edge. Tape the wedges in place.

7. Draw the new outline. Create a smooth curve along the lower edge of the expanded section, ending where the center line meets the 2-inch line. Add seam allowances to all the curved edges and along the 2-inch line where it was cut. This allowance can be 1⁄4 inch wide or wider, depending on the fabric’s thickness. At the inner corner, taper the allowance to almost nothing.
Construct and attach the cuff
This is a straightforward process, but work carefully as you clip, trim, and turn the cuff’s curved edges.
1. Cut the cuff pieces. Cut four from fashion fabric: two outer pieces and two facings. If the fabric is bulky or stiff, cut the facings from lining fabric. If the fabric needs body, interface one or more layers for each cuff. Test interfacings with fabric scraps to determine which layers you want to interface.
 |
 |
2. Sew the cuffs. With right sides together, sew a facing to each cuff piece. Leave the hem edge open. Clip, trim, and notch the seam allowances. Then turn the cuffs right side out and press. If desired, favor the facing slightly to the right side to create a piped effect.
3. Attach the cuffs. Place one cuff into each sleeve, with the cuff’s right side against the sleeve’s wrong side. Be sure to orient each cuff correctly, so the swoop’s point is toward the sleeve’s back. Sew around the sleeve hem with a 5⁄8-inch-wide seam allowance. Grade the seam allowances. Press them and the cuffs away from the sleeves.

4. Anchor the front curve edge. Fold the cuff up. Smooth the front curve onto the sleeve and pin the edge from the underarm seam to the curve’s apex. Secure the front curve’s edge to the sleeve with basting stitches.

5. Position the swoop’s point. Pin it 1 inch to 2 inches above the cuff’s lower back edge at the underarm seam. From the curve’s apex to the point, pin the back curve to the sleeve. The swoop’s lower edge remains free. You may adjust the swoop position as desired, placing the point higher, lower, or away from the underarm seam, to achieve a pleasing effect. When you are satisfied, baste the back curve’s edge, then slipstitch all but the swoop’s lower edge. Remove the basting stitches.
Carol J. Fresia is Threads’ senior technical editor.


This is cool. I have long wanted to make Miss Fisher’s beautiful brocade and fur coat designed by Marion Boyce, cut much like this. Since brocades can have two usable sides this might be a great idea for my dream coat. I wish you also had suggestions for a pattern for the coat.
I recommend visiting the Decades of Style pattern website. They have a few coats in the 1920s and 1930s categories that could work to recreate that Miss Fisher style. You could also look a the coat patterns available on SetGirlz.com, which I believe were traced directly off vintage examples. In both cases you may need to make creative alterations to get the exact look you're after.
Good luck!
Carol Fresia, Threads Senior Technical Editor