
Grain affects the drape and design of a garment in various ways. Unless we pay close attention to grain throughout the construction of a garment, that is, not only in the blocking and cutting phase, but also in unit construction (see definition in the thread “Bishop Method teachings”), the garment may not drape on the body in a pleasing fasion. Grain awareness is key in keeping the fabric “fresh” throughout the construction process.
The unit construction teaching, once learned, can lend a more professional result to your garments because the idea is to pay attention to grain as we stitch and to reduce the handling of a given unit (sleeve, collar, facing, etc.). A good example of the marriage of grain awareness and unit construction is the stay-stitching of the bodice. Let me elaborate.
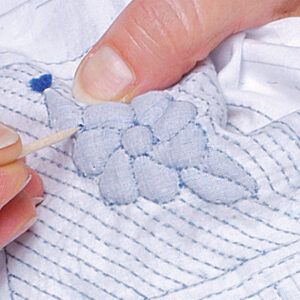
Stay-stitching is a line of directional stitching which is done before construction. It stabilizes edges that might be pulled out of shape during construction. Stay-stitching should be done on curved and bias edges of fabrics. On curved edges, the grain changes direction as the edge curves. On even curves, such as necklines and waistlines, stay-stitch in two separate steps (see below). On uneven curves, such as armholes, stay-stitch in the direction that stays longest with the grain.
When stay-stitching the neckline, shoulder line and armhole of a bodice, try this sequence to eliminate overhandling the fabric during this very first step after cutting.
(1) Lay the bodice face up. (2) Stay-stitch at 1/2″ with a regulation stitch (that is, not basting) from right shoulder line of garment (as worn; your left side as it faces you) down and around neckline to center front, stitch off the fabric just past the center front clip mark. (3) Lift the presser foot and pull the work out of the bed of the machine for an inch or two. (4) Stay-stich the left shoulder line of the garment (as worn) from neckline to armhole edge. Pull the work out a little from the bed of the machine as before, this time leaving a little longer thread to work with. (5) Holding thread ends out away from the work, now stay-stitch the left armhole edge of the garment (as worn) from shoulder line down and around to underarm. (6) Pull the fabric completely out of the bed of the machine and clip your threads. (7) Now turn the bodice over and repeat same sequence as above for the left neckline, right shoulder line, and right armhole.
This explanation may seem simplistic for some advanced sewers out there, but I don’t want to eliminate anything in the teaching. Here is the point Mrs. Bishop wanted you to keep in mind: You’re only turning your fabric once. This very basic and simplistic teaching eliminates turning the fabric over and over which can lend a worn and “homemade” appearance to the final garment. Multiply that handling many times over through the construction life of the garment and you’ll get the picture.
Of course, each of the areas described are stitched directionally, that is, with the grain, not against the grain. Stitching against the grain on any given unit is what causes the fabric to pucker. If the unit is stitched directionally in virtually every case, not even stay-stitching (unless there is a thread tension problem) will produce puckers.
Stitching against the grain forces the grain out of position. Straight edges can be stitched in either direction without distorting the grain. A general rule to follow is to stitch from widest to narrowest when the shape of the pattern piece allows. For example, stitch a skirt from hem to waist or a fitted bodice from underarm to waist. For woven fabrics, if it is difficult to determine in which direction to stitch, slide your thumb and forefinger along the edge. If the edge stays smooth, you are going with the grain; stitch in this direction. If the yarns at the edges stand out (like petting a cat “against the grain”), you are going against the grain; stitch in the other direction. For knit fabrics, if it is difficult to determine in which direction to stitch (yes, knits too will pucker if sewn against the grain), it is most important to stitch related seams in the same direction. For example, the seams in a skirt should all be stitched in the same direction. The rule is: Follow these directions unless the design dictates otherwise.
When joining seams, it is imperative that you move the work to the inside of the machine in order to maintain the stitching directionally, even if the area has been stay-stitched. This can take some practice for new sewers. I have seen this idea pooh-poohed by some professionals in the sewing industry today. I couldn’t disagree more strongly. My suggestion? Try it and see the results for yourself. Experience is the best teacher.


Replies
Thanks for this refresher in sewing directionally. I remember when patterns had marks showing the correct direction of stitching, and I was told that cutting direction should correspond to stitching direction. I knew to stitch from shoulder line toward center of neckline, but I never learned to order the stay-stitching to minimize handling. I appreciate the description; it appears also to be more efficient than stitching, removing from machine, and clipping threads for each separate section of stay-stitching.
"When joining seams, it is imperative that you move the work to the inside of the machine in order to maintain the stitching directionally, even if the area has been stay-stitched."....
I am enjoying your "lessons", but this statement has me 'scratching my head'. I'm not disagreeing, I'm lost... sometimes 'literal-ness' ties me up in knots!
"joining seams" = sewing the seam? or sewing the intersection of 4 pieces? (seaming over an existing seam)
"inside of the machine"... I know you do not mean 'under the cover' literally INSIDE the machine, "seam allowances to the left of the needle" thus the work (bulk of the garment) is under the arm or "head" of the machine?
Maybe I should give up trying to think about anything until tomorrow morning!!?
Much of what you are teaching I have learned the "hard" way; trial BY error!!
Thanks for all you are doing to help improve the sewing skills represented here!
Becky
Becky, I think I get it. Donna, correct me please if I am wrong. Usually when we sew the bulk of the fabric is to the left of the presser foot and needle. When sewing directionally sometimes that bulk has to be to the right of the needle and presser foot, "in the machine". Let's say you are sewing from the hem to the waist on one side seam and the fabric is all bulked up to the left of the needle. Now to sew the opposite seam from hem to waist the bulk of the fabric now needs to be to the right of the needle/presser foot. Hope I have Donna's thoughts explained. I know this one well because I try to always sew directionally and it is a little awkward having all that cloth "inside" the machine, aka, to the right of the needle. Hope I am right in this. solo
Hello DonnaKaye,
I have the same question as Becky-book. I read Solo's explanation and understand it but I just would like to be sure that's what is meant. Couldn't one just turn fabrics over when doing the other side to maintain directionality or is that impermissible in a quality garment?
Are there other advantages to sewing with the bulk on the inside, i.e. to the right, while the seam allowances are to the left?
Thanks. Z
To clarify my earlier posting, you may sometimes have to work with the seam allowance to the outside of the machine, i.e., to the left of the needle. A good example of this would be the shoulder seam. Sometimes the back shoulder seam is a little longer than the front, in other words, where the back needs to be eased into the front. On one side your work would lay on the stitching unit with the bulk of the fabric to the outside, i.e., to the left of the needle. But when stitching the other shoulder seam, in order to have front up and back down, in order to ease the back into the front, you must put the bulk of the fabric on the bed of the machine, with the seam allowance to the left of the needle. Where easing is not required, it is fine to work with the bulk of the fabric to the left of the needle, as long as you are stitching directionally. I suppose you could say that I should have qualified my statement by saying when necessary. Does this help clarify my meaning?
This helps me tremendously--the shoulder example was a great one to use because now I understand clearly how that preserves the directionality. Thanks again. Z
You are very welcome . . . .D.
Thank you, thank you!
I was turning myself inside out trying to figure out if you meant some thing more complicated than that.... of course the longer piece (to be eased) goes next to feed dogs! and that means SA to the left sometimes!
Becky
Do you ever consider grain of the cut when sewing? I read in anold sewing book that you sew with the grain of the cut and I've have been trying to apply it with my sewing. A more obvious use of this would be when sewing a neckline sew one direction from CF and then sew the other direction from CF. I only ask because from past posting you seem like an exacting seamstress and I thought you might know if there is anything to what I had read in a old Singer pamthlet on sewing. I think they used the metaphor of you would want to pet a cat in only one direction so you would sew a shoulder seam from neckline to shoulder always.
I like that cat analogy! I certainly would not want to be rubbed against the grain!!
Becky
This post is archived.