

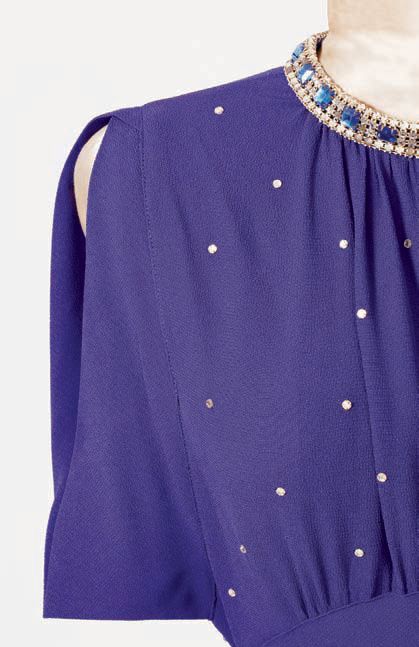
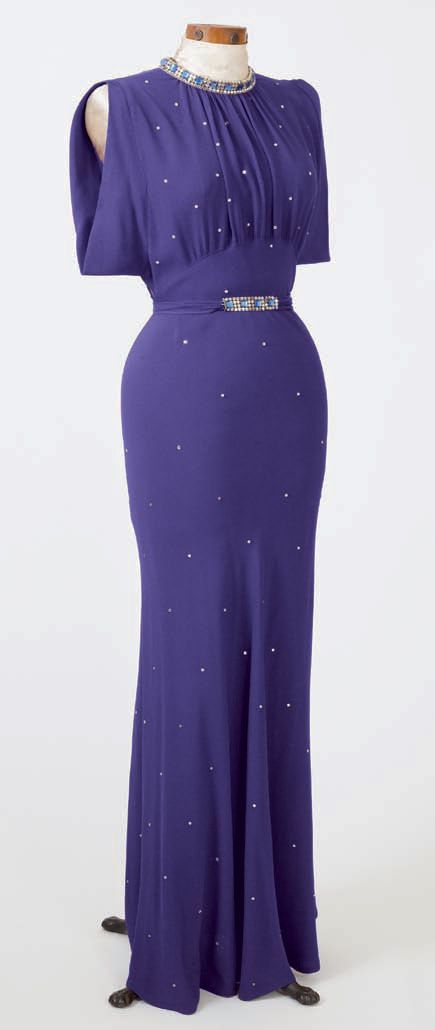
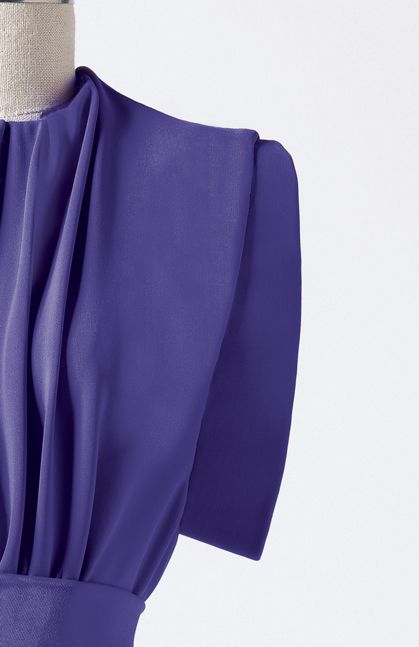
Threads Senior Technical Editor Judith Neukam shares her technique for creating a banded armcye in this article from Threads #164 (December 2012/January 2013). If you seek a silhouette with a trim waist and fit arms, this gown is the illusion maker you’re looking for. This clever armscye band fools the eye into seeing a narrower waist and slimmer arms. The inspiration dress has a jewel neckline that opens at the center back and a shirred center front, but you could change those style details. Learn how to adjust the pattern to make the armscye treatment shown, create the band, and sew it. This detail could be added to almost any sleeveless pattern.
Adjust the bodice pattern
Start with any sleeveless pattern. If the front pattern has a side-seam bust dart, rotate it to the front hem. Trace a copy of the front and back pattern pieces. Draw all changes on these patterns, and then trace copies of the smaller pieces that overlap.
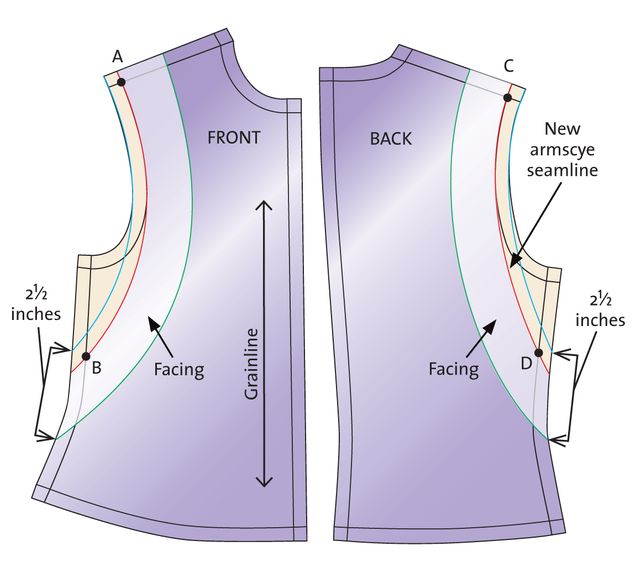
1. On the front pattern, draw a new armscye from the shoulder seam edge to the side seam, ending 2 or 3 inches above the waist. Follow the original armscye for the top half, and straighten the curve as you extend its length, as shown. Add seam allowances to the new line. Repeat for the back armscye.

2. Make the new facings. On the front and back patterns, draw a line from the shoulder to the side seam 2-1⁄2-in. from the armhole cutting line. Trace the line and the rest of the armscye and seam allowances.
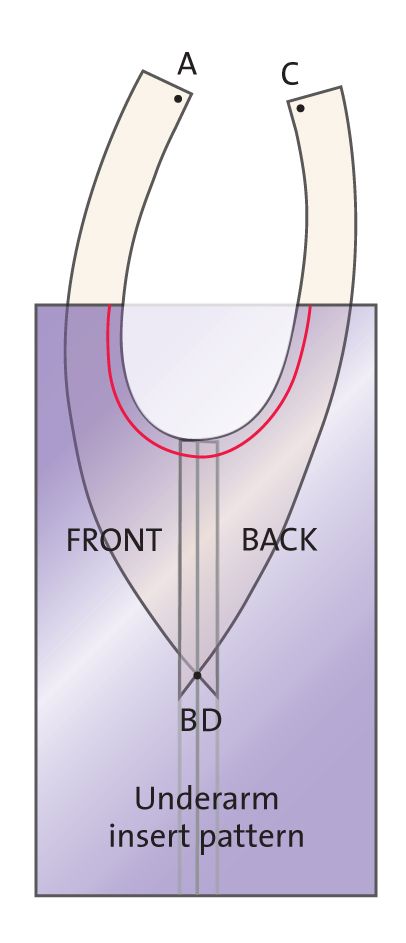
3. Draft an underarm insert to keep the dress modest. Align the original armscye pattern’s side seamlines. Draw a rectangle to include about half of the original lower armscye, and extend it below the waist. Trace the lower armscye and seam allowances.

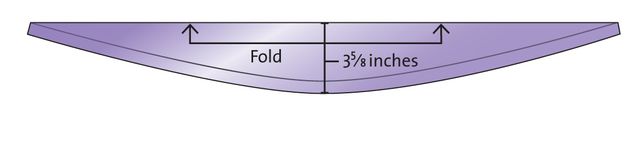
4. Make the armscye band pattern. On the new armscye, measure from A to B and from C to D and add the two lengths to determine the length of the armscye band. Add 3-1⁄4-in. , and draw a straight line that length. Fold the line in half to determine the center and draw a perpendicular line 3-5⁄8-in. long. From this line, draw a curved line to the ends of the straight line. This is the band pattern and includes the seam allowance.

Sew the armscye band
Cut, interface, and fold two armscye bands with the right sides out. Assemble the garment as usual, leaving the armscye unfinished. Interface the facing pieces and clean-finish their outside edges.
1. Sew the facing seams. With right sides together, join the front and back facings at the shoulder seam. Repeat for the side seams.
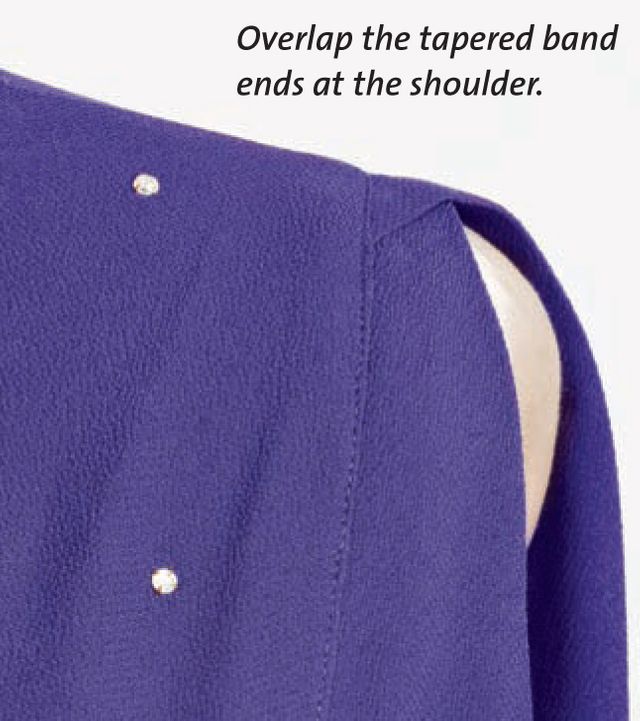
2. Start pinning the band at the point where the side seams meet. Center the band’s raw edge to the side seam, right sides together, and pin from the underarm to the shoulder. At the shoulder, lap the front end under the back.
3. Position the facing over the band. Align the facing edge to the armscye seam, matching the shoulder and side seams, and the armscye band edges. Sew the seam. Turn the facing to the inside; press the band away from the armscye.
4. Sew the underarm inserts. Cut four underarm inserts. Sew them together in pairs, right sides together, leaving an opening for turning. Turn each pair right side out and press. Attach the inserts inside the garment by sewing them to the facings; alternatively, make them removable by using snaps or hooks and eyes to hold them in place.


Her siren's song sung, the upcoming issue is all I can see, as it's full speed ahead into the rocks of a bookstore cash register.
How fun--I will try the banded armseye. I always learn something from your articles. Thank you
Wow! what a fantastic sleeve. Yes I will definitely be making this..Thanks a heap.
This is a lovely sleeve. Re: the instructions to measure from A to B and C to D. Point A and C are shown on the shoulder point of the old armhole. To measure to points B&D would require measuring along the short distance of the shoulder seam and then turning and measuring along the curve of the new armscye. Is this correct? Seems more logical to me for points A and C to be located at the top of the new armhole curve.
This sleeve will be on my to do list for sure. Thanks.
Judith, thank you for this. I've been looking for variations on big sleeves. This one is so very graceful.
I love the whole dress!!! What pattern is this based on??