

Ever since I was a preteen, I’ve been captivated by vintage style. Back then, I fantasized about being a woman from the ’30s wearing all of the fabulous clothing that my favorite old Hollywood actresses wore. Inspired by my grandmother’s dropped-waist dresses from the early ’20s, I soon started making my own dress patterns from paper bags. As an adult, I finally discovered some real vintage patterns at a garage sale, and I’ve been hooked ever since.
Today, with the help of online search engines and the popularity of all things vintage, it’s easier than ever to acquire vintage patterns. There are tons of Websites devoted entirely to the buying and selling of original and reproduction vintage patterns (replicas of vintage patterns, some of which offer clarified instructions or patterns graded into multiple sizes).
Sewing with the real-deal pattern in its original form is a wonderful experience and a fun way to re-create the innovative details and flattering designs of the past. However, vintage patterns can be intimidating. Aside from their fragile envelopes and delicate pattern tissue, they look and read much differently from the commercial patterns we’re used to today.
Here, I’ll explain the major differences and show you techniques that will help you easily navigate the world of vintage patterns. Once you know what to expect, and with some practice, you’ll be able to pick up any old pattern that you like and create a fabulous garment from the past.
Patterns today vs. yesterday
Part of what makes vintage patterns thrilling to work with is that they’re so different (for a decade by decade overview, see “Vintage pattern timeline” below). Of course, when working with something that’s unfamiliar, challenges are bound to arise. Read on for more important details to know about before you get started with any vintage pattern.
Pattern envelope information
The first place that you will find some differences is right on the pattern envelope. Here, aside from the beautiful artwork and lithographs of the garments, you will find a variety of information, such as yardage charts and instruction.
One area in particular that can be confusing is the yardage recommendations. The reason is that before the mid-1950s, fabrics were available in narrower widths than those of our contemporary fabrics. Back in the day, fabric was rationed to be affordable, so fabric cuts of 36 inches or 39 inches wide (rather than today’s 45- to 60-inch widths) were commonplace. That means you can expect to do some yardage conversions when you shop for fabric.
Pattern format
You’ll also discover that the format of pre-1950s vintage patterns varies from the preprinted tissue sheets we know today. With vintage patterns, the tissue paper pieces come pre-cut and devoid of any printing. Only McCall featured the “Printo Gravure” pattern (the earliest printed pattern) in the early 1920s. Instead of printing, machine-made perforations, consisting of circles, squares, and triangles, were used to indicate information like the straight of grain line, marking symbols, and notches. Making it even more confusing, the meaning of these perforations also varied from company to company. Often, not even the maker’s name or pattern number is included on each piece. Rather, you’ll find them marked with a perforated number or letter corresponding to a diagram. I recommend labelling the pieces on your traced off version to avoid any mix-ups.
Pattern instruction
In the earliest commercial patterns, very little instruction was included because it was assumed that the majority of women knew how to sew most any garment. Starting in the mid-1920s, pattern companies began printing more detailed instructions, layout diagrams, and schematics of the pieces on a separate sheet. Depending on how old your pattern is, you may find less instruction than what you’re used to, and you may need to look to the Web or to sewing manuals for guidance.
Seam allowances
The major pattern companies today (independent companies aside) have an industry-established seam allowance of 5/8 inch. But that wasn’t always the case. Depending on the company and the year of manufacture, seam allowances may be 3/8,1/2, 3/4 or 5/8 inch. Rather than being standard, seam allowances were set by each pattern manufacturer. For example, in the late 19th and early 20th centuries, Butterick Publishing Company patterns had 3/4-inch seam allowances at some edges, and a standard 3/8-inch allowance on all the remaining edges. It wasn’t until the early 1940s that the company established a standard uniform seam allowance of 5/8 inch.
Sizing standards
When addressing size, the first thing you’ll note is that vintage patterns come one size per envelope. This means you’ll often need to grade a pattern you like to your size. Next, the sizing standards (the set of body measurements) that were once used are not the same standards used today. For example, a pattern in size 18 from before the late 1950s was made to fit a figure with a 36-inch bust, 30-inch waist, and 39-inch low hip (taken 7 inches below the natural waistline). Generally, today’s pattern size 18 has been made to fit a 40-inch bust, 32-inch waist, and 42-inch low hip. So, when choosing a size, be sure to look at the measurements on the envelope rather than going by the given size.
Fitting issues
Not only were women built differently in the past, but garments were made to fit closer to the body than they are today. This varied ease and fit may require you to make some alterations. In particular, a surprising amount of ease is often found at the bustline, even for sizes smaller than B cup. Especially with pre-1940s McCall patterns, the placement of the bust dart is also quite high. By lowering the bust dart, however, you can eliminate any extra ease here. Another common area of adjustment is in the long rise of trouser styles before the mid-1950s. Depending on the pattern, there can be as much as 1-1/2 inches of additional length built into the rise that doesn’t fit with today’s style or taste. You may also need to adjust the ease of set-in sleeve styles at the armscye and the shoulder, as it can be restricting. Although some of these vintage pattern quirks can be frustrating, knowing about them ahead of time lets you focus on what is an otherwise truly rewarding experience.
How to handle a vintage pattern
Now that you know the ins and outs of vintage patterns, here’s how to get the best results.
Always trace off the pattern
Because of their delicate nature, it is imperative that you make a copy of your pattern to work from. To remove the factory folds for ease of tracing, gently press each pattern piece on a low heat, dry iron setting. Then, lightly trace each piece onto your pattern paper using a pencil, or a pen that will not bleed through. Be sure to transfer all markings, such as straight of grain symbols, darts, or stop-stitching points and notches. I also find it helpful to number the pieces and check to make sure you’re not missing any.
Make a muslin to fit
When working with any pattern, it’s always a good idea to make a muslin to ensure a good fit. Considering all of the fitting and sizing differences in vintage patterns, it’s even more important. Aside from adjusting the fit, a muslin lets you take a practice run at figuring out how the sometimes complicated pattern shapes go together, and at using vintage techniques with which you may not be familiar.
Embrace vintage sewing techniques
The old saying, “When in Rome, do as the Romans do” goes for vintage patterns, too. Although they require more time and effort than some of our modern methods, in some cases using the vintage sewing techniques your pattern intended can yield you a better-looking, more authentic garment. Here are a few old-time methods to embrace:
Bias bindings
Since linings were rare, rayon bias bindings were often used to finish seams. A double fold bias binding was used in lightweight fabrics and a single fold bias binding for heavier fabrics.
Bound buttonholes
Bound buttonholes were the prevalent method for creating buttonholes in vintage clothing. The edges of the buttonholes are finished with a stitched-on fabric or leather binding to create a beautiful garment detail.
 |
 |
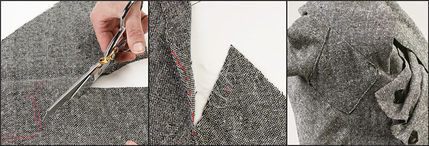
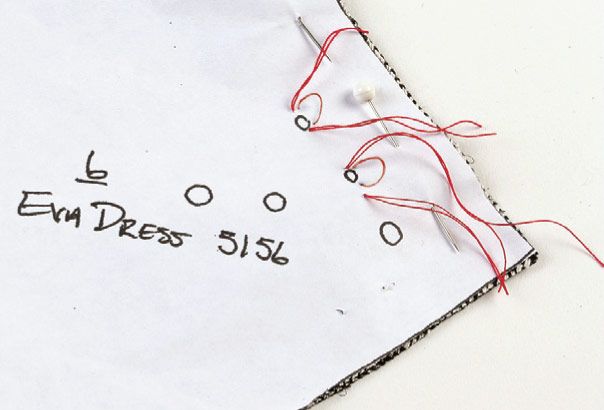
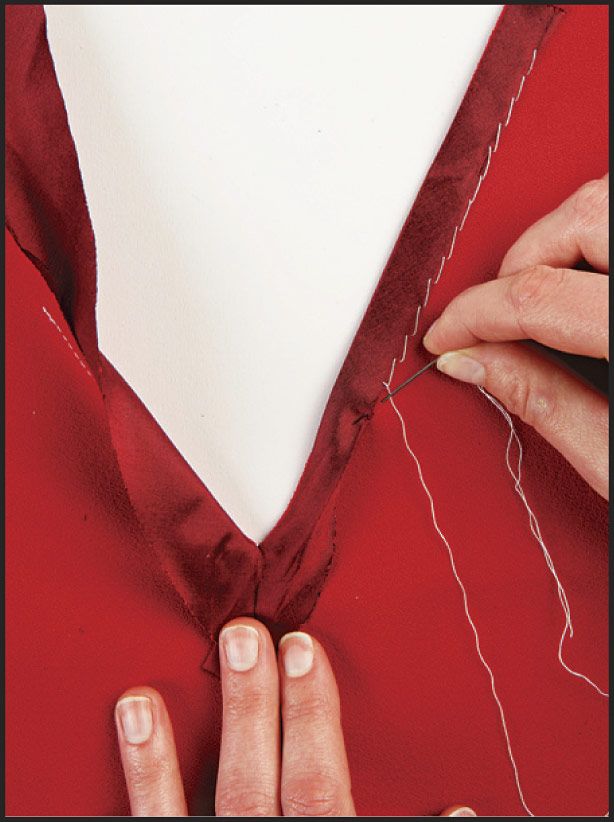
Tailor’s tacks.
Long before tracing wheels and carbon dressmaker’s paper, the traditional method of transferring markings from the pattern piece onto the fabric was with tailor’s tacks. In light of the unique symbols and perforations in vintage patterns, I find that tailor’s tacks work best at transferring the markings accurately.


Vintage speak: a glossary of terms
Vintage patterns come with vintage terminology, not all of which may be familiar. Here are some of the terms you might encounter.
Continuous lap: A strip of fabric cut on the straight grain and used to face edges of an opening or slit in a garment.
Jabot: A ruffle or cravat-like accent attached to the front of a dress or blouse.
Lapped seam: A seam in which one seam allowance edge is lapped over the seam allowance of its joining piece and stitched.
Pintuck: Very small tucks stitched just a pin’s width from the fold to slightly shape a garment piece. In the late 1920s, a series of pin tucks were often applied across the natural waistline of a frock for shaping and detail.
Plaits: An array of narrow (known today as “knife”) pleats often applied at the hem of a dress, the ends of sleeves, or around the neck opening.
Shirring: Three or more rows of gathers made by small running stitches in parallel lines. The rows are spaced as desired.
Slide fastener: The original term for zippers.
True bias: Fabric that is cut at a precise 45-degree angle to the fabric grainline.
Toile: The French term for fabric pattern. Originally pertained to the muslin test garment.
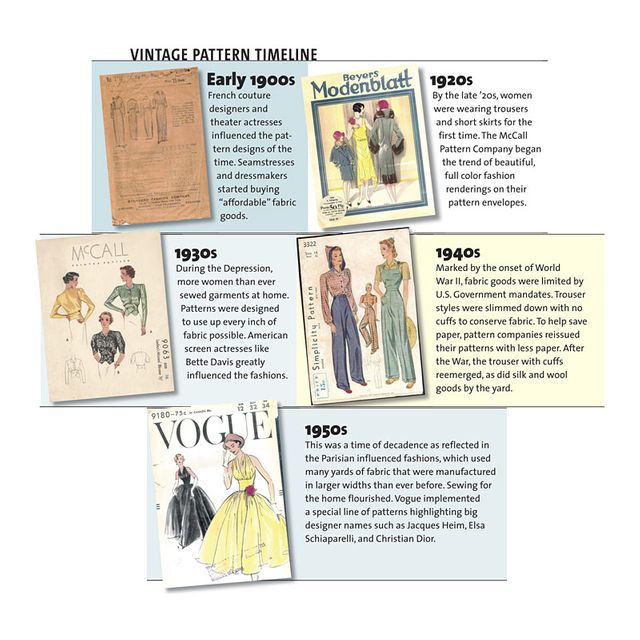
Vintage pattern timeline
![]()

Early 1900s
French couture designers and theater actresses influenced the pattern designs of the time. Seamstresses and dressmakers started buying “affordable” fabric goods.
1920s
By the late 1920s, women were wearing trousers and short skirts for the first time. The McCall Pattern Company began the trend of beautiful, full-color fashion renderings on their pattern envelopes.
1930s
During the Depression, more women than ever sewed garments at home. Patterns were designed to use up every inch of fabric possible. American screen actresses like Bette Davis greatly influenced the fashions.
1940s
Marked by the onset of World War II, fabric goods were limited by U.S. Government mandates. Trouser styles were slimmed down with no cuffs to conserve fabric. To help save paper, pattern companies reissued their patterns with less paper. After the War, the trouser with cuffs reemerged, as did silk and wool goods by the yard.
1950s
This was a time of decadence as reflected in the Parisian-influenced fashions, which used many yards of fabric that were manufactured in larger widths than ever before. Sewing for the home flourished. Vogue implemented a special line of patterns highlighting big designer names such as Jacques Heim, Elsa Schiaparelli, and Christian Dior.
The key to vintage pattern perforations
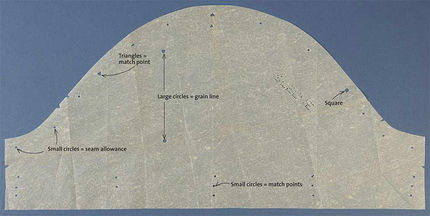
Large circles lined up in pairs with a few inches between them typically indicate the grainline. Large circles alone typically indicate stop-stitching points, button positions, center fronts, or seam allowances with a let-out.
Small, individual circles around the edges of the pattern indicate the seam allowance, and small circles in a series of two or three close together indicate matching points.
Two small circles placed a small distance apart indicate buttonhole placement and length.
Square perforations, prevalent in Vogue patterns, typically refer to the placement of buttonholes.
Triangular perforations, also found often in Vogue patterns, indicate where to match one part of a pattern piece to another.
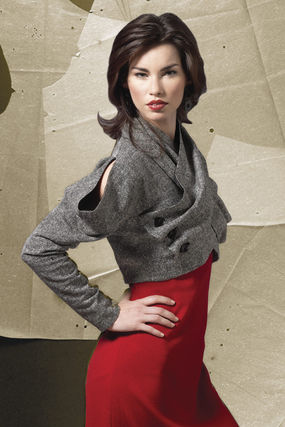
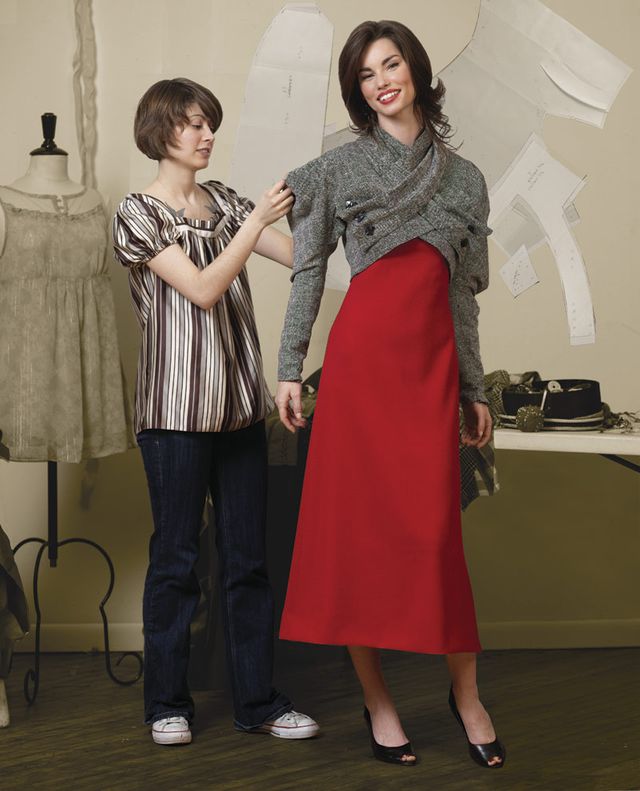
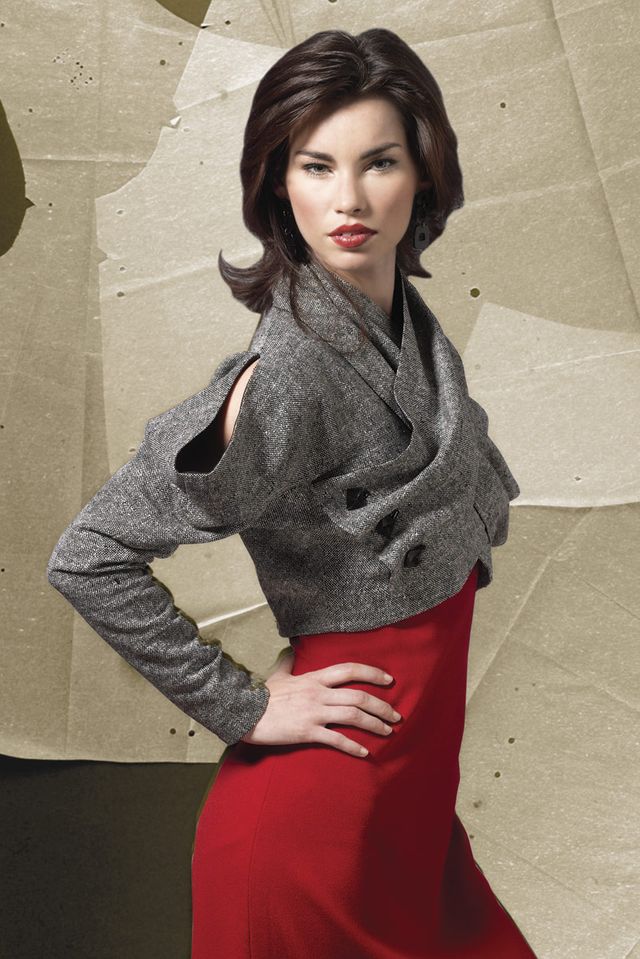
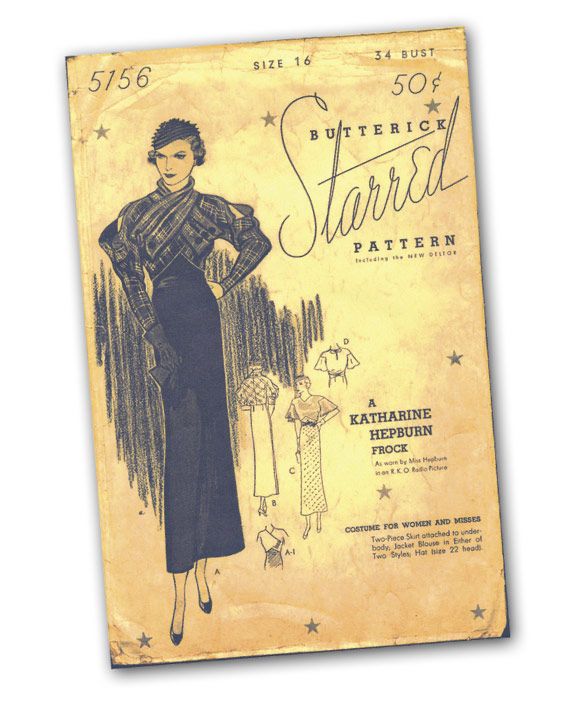
Pattern in action

To take you step-by-step through some of the common techniques that show up in vintage patterns, we chose this stunning Butterick Starred Pattern 5156, A Katharine Hepburn Frock, designed in 1933. This design was modeled after an actual garment worn by Katharine Hepburn in the film Christopher Strong.
Get in and out with placket closures
In the early 20th century, garment closures, designed to allow for ease in taking a garment on and off, were predominantly made of buttons, snaps, and hooks. Although the zipper was developed by the early 1930s, it didn’t become widely available to home sewers until after World War II.
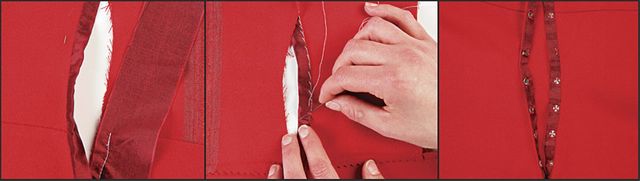
Here’s how to install a continuous lap placket closure, as seen in the Butterick Starred Pattern 5156
1. Stitch the left side seam leaving an opening between markings for the placket. Press the stitched section of the side seam open. Clip to the stitching through the seam allowances at each end of the opening. Cut a strip of self or lighter weight fabric on grain. In this case, the strip is 2-1/8 inch wide and 1 inch longer than two times the opening length.
2. With right sides together, stitch the strip to the unfinished opening edges, making sure to position the strip ends at the bottom of the opening.
3. Wrap the raw edge over the seam, turn in the edge and ends, and hand-stitch to the garment opening.
4. Close the middle of the opening (generally at the natural waistline) with a hook and bar and the remainder of the opening with snaps.
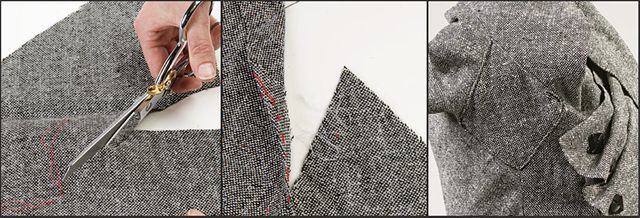
Add a gusset for range of motion
A gusset is a design element located at the underarm of a garment that enables the wearer to completely move her arm.Here’s how to apply a gusset at the underarm of a kimono-sleeve-style jacket, as seen in the Butterick Starred Pattern 5156 (above):
1. After stitching the side seam of the bodice and the underarm sleeve seam, slash the inner points at the underarm to about 3 inches into the garment to create the gusset opening. Then, overcast the edges.
2. Turn under the gusset opening edges along the marks and baste. Baste the edges of the gusset to the opening matching the perforated marks.
3. Edge stitch around the gusset, trim the seam allowances to 3/8 inch, and overcast.
Go for old-school hems and facings
These hemming and facing techniques crop up in many vintage pattern instructions. Here’s how to put them to work in your garment:
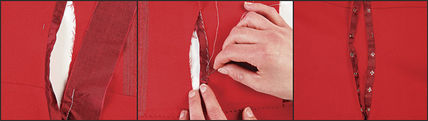
Bias facing
Bias facings provide a narrow finish to neck or armhole edges. To create a bias facing, cut a bias strip about 1-1/2 inches wide and, with right sides together, sew one edge to the garment opening. Make slashes in the curved edges so the material doesn’t pull. Turn the strip to the inside so the facing strip doesn’t show on the outside, then turn under the raw edge of the strip and whipstitch on the strip edge, catching the garment occasionally.

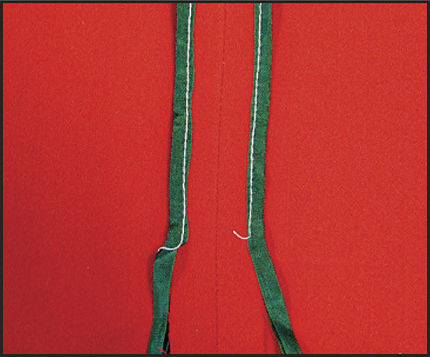
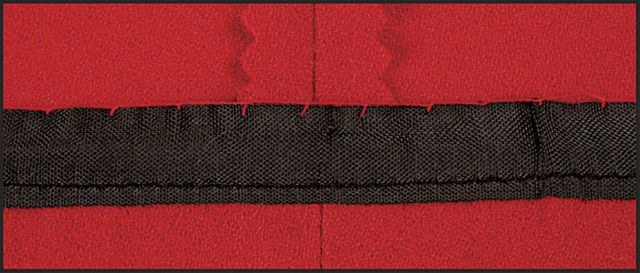
Rayon seam binding tape
Seam binding tape and rayon seam tape were used to finish the raw edges of hems on sleeves, jackets, trousers, and skirts before there were serging machines.
The tape is lapped over the raw edge, and machine-stitched along the top edge of the hem. The hem is then turned up, pressed, and hand-stitched through the tape to the garment.

This article, written by Alexandra Reynolds. was originally published in Threads #132, Aug./Sept. 2007, pp. 47-51. Alexandra owns the vintage pattern website EvaDress.com, which sells original and reproduction vintage patterns.
Model photos: Jack Deutsch. Hair and makeup: Christy McCabe using tarte cosmetics. Stylist: Jessica Saal. Process photos, except where noted: Scott Phillips.


This is a really great article! Although I'm quite familiar with using vintage patterns already there were a couple tid bits I hadn't thought of before. And this will be uber helpful to those starting out!
I'd like to point out one prissy detail though. The reason that some of the proportions of vintage patterns/garments are different from those of today has to do with undergarments, not the way women were built. Humans have been built the same way for about 2 million years now. What was different in the fashion periods up to the 60s were foundation garments - pretty much all women wore them. These modify the body's natural shape and did different things to it depending on the time period. 1920s foundation garments were geared towards creating the boyishly streamlined and angular silhouette then popular. In the 1950s it was the opposite: emphasizing and creating curves and hourglass figures.
So a note to people venturing into vintage patterns: don't expect it to look *exactly* like the envelope/illustration unless you're willing to wear foundation garments similar to those of the period, or at least those that will create a similar effect.
This doesn't mean it won't still look fabulous, it just may not have exactly the same silhouette.
Thanks again for a great tutorial!
Thanks for such a wonderful article. This was very helpful to me as I have quite an extensive collection of vintage patterns but had been honing my dressmaking skills on newer patterns before attempting the advanced techniques seen in vintage. I really think early patterns exemplify the height of dressmaking skill and creativity. It is hard to find anyone willing to explain some of the instructions and markings though, so thanks again and happy vintage sewing!
Thank you for this article. I've been following Alexandra Reynolds for many years, she's brilliant. Thank you for the great tutorial!
Would you please continue with this subject and talk about proper storage for vintage patterns.
Also, I want to learn more about grading patterns.
Thank you
Patty
Big thanks for the article, found quite interesting stuff there.
The declaration in the article that "women were built differently in the past" is rather silly, and made me guffaw out loud! No, of course, women came in all shapes and sizes just as we do now and have done for eons. I could not believe that statement got past the editors. And to brocadegoddess - thank you for your comment!
Of course, foundation garments changed throughout history to accommodate the fashions that were popular. Before the 1920s, corsets cinched the waist and emphasized the bust; in the 1920s, corsets and long line girdles flattened the bust and de-emphasized the waist by smoothing the waist and hips, as a straight line was more desirable (in addition, the 1920s was the first time suspenders were attached to girdles and corsets to attach to and hold up stockings. Prior to that, garters were worn around each individual leg - so we can thank flapper era fashion for today's garter belts!). The lines and styles of popular fashions of each era were also influenced in no small part the changes in modes of transportation and increased mobility for women of all ranks in society.
Personally, I prefer using patternless instructions to make vintage garments based on my measurements. I just mark the fabric and cut - no patterns needed!
Such an in depth look about vintage patterns. Nice job.
Really wonderful info!!
Vintage all the way!
this is amazing
Smart pattern.
Awesome
its amazing
very nice!!
amazing design
wonderful design
really so beautiful