Taper your pants for a custom fit.
I need to taper the leg width of a pants pattern that fits well otherwise. Is this more complicated than just trimming down the leg seams? Do I reduce front and back equally? –Judi Davies, Ellkford, BC, Canada
Karen Howland replies: If you simply taper the seams on an existing pants pattern or on ready-to-wear pants, you’ll typically find that there’s still more fabric below the seat and under the belly than you want. Here’s how to take out part of the width from the side and inseams and part from within the pattern, in both front and back.
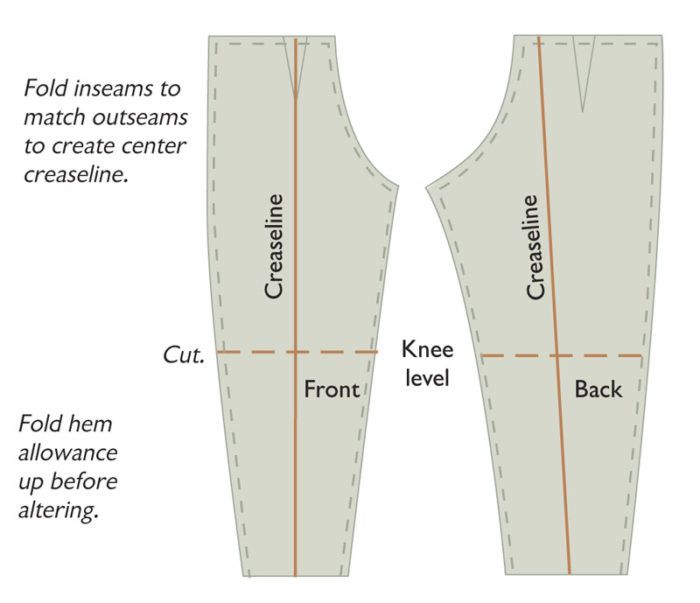
Start by noting the widths you want at hem and knee levels, then measure the distance from hem to knee line. Fold both front and back patterns in half lengthwise, matching the inseams and outseams. This establishes the creaseline and center on each piece, which should be parallel to the grainline. Correct the grainline if it isn’t.
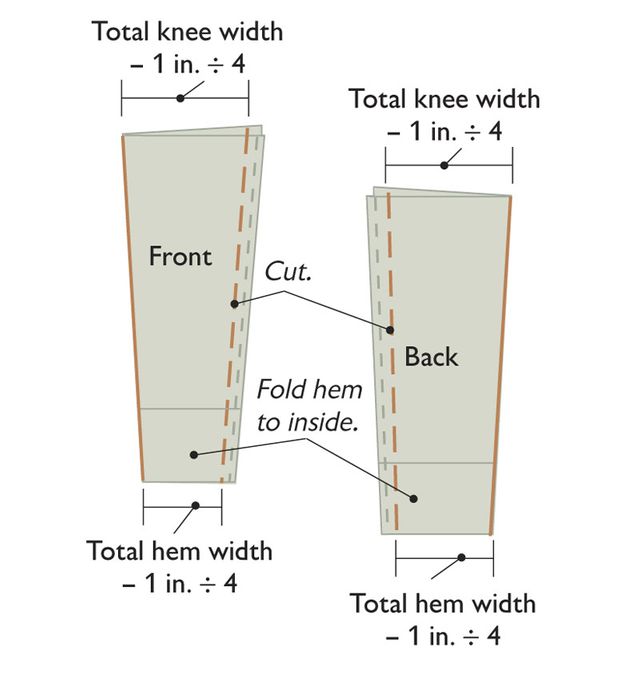
Unfold and cut both pieces horizontally at the knee. We’ll alter the lower-front pattern first. To make sure the hem allowance fits inside the tapered leg, fold the pattern on the hemline before marking and trimming. Refold the pattern piece on the center line, measure the total hem width you want, subtract 1 in., then divide the number by 4, and mark along the hem from the fold toward the seams. For example, if you want a 17-in. opening, subtract 1 from 17 to get 16 in., then divide 16 by 4. Do the same thing at the knee using the knee width you want (minus 1 in., then divided by 4), then connect the marks from hem to knee, add seam allowances, and cut away the excess.
Now, repeat the entire process for the lower-back pattern piece, this time adding 1 in. to the knee and hem widths before dividing by 4. Adding and subtracting 1 in. ensures that the pattern follows the usual ready-to-wear practice of making backs wider than fronts (which improves the hang of the garment).
Tapering Pants: Steps 1 and 2:
Step 1: Divide front and back at knee Step 2: Alter lower pieces
The only exception to this procedure is if your figure is so flat in front that you don’t need a front waistline dart. If this is the case, don’t separate the front pant pattern at the knee, just alter to the knee as described above, then true the inner and outer seamlines from the crotch level down to meet the knee. Split the back at the knee and alter as described below, checking the front crotch curve against the altered back to see if it needs any additional truing.
Next, we’ll reattach the upper patterns to their respective lower parts, starting with the fronts. Align the creaselines of the upper and lower sections.
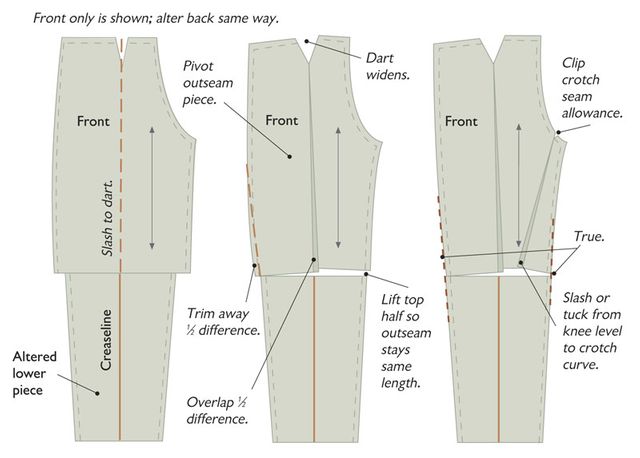
The top will extend beyond the corrected seamlines on both in- and outseams, and we’ll correct each side separately, starting with the outseam. First, slash the upper pattern along the creaseline from the knee to just below the waistline dart, then cut through the center of the dart to meet the creaseline slash, leaving a little uncut section at the dart point to pivot with.
If the front or back darts aren’t centered over the creaseline (the back darts probably won’t be), just angle the slashline(s) from the knee level to the dart. Because this is a temporary alteration line, it doesn’t matter if it’s not perfectly on grain.
Keeping the inseam/crotch side of the pattern stationary to maintain the grainline, pivot the outseam section so it overlaps the center line by half the excess width at the knee, then slide the top pattern upward slightly so that the outseam stays the same length, as shown at center above. Notice that pivoting opens the dart at the waist. This wider dart builds a portion of the tapering into the actual shape of the pattern piece, causing the pants to angle inward from the belly to the ankle when viewed from the side. Trim away the other half of the excess at the outseam after truing that seamline from the hipline down to match the lower, corrected outseam.
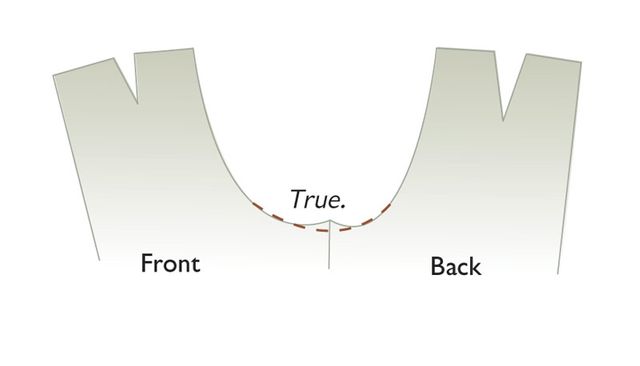
Now for the inseam. Slash (or fold a tuck) from the center of the unshifted knee line to the crotch seam until the excess width at the inseam lines up with the corrected inseam below. Notice that this straightens out the crotch curve, which you’ll want to clip opposite the slash to allow it to spread. This is an inevitable result of tapering the legs using any method. For instance, if you had just tapered the entire inseam front and back, the crotch curve would need to be trued back to a smooth curve, which flattens it similarly.
Tapering Pants: Steps 3 and 4
Step 3: Alter upper pieces
Front only is shown; alter back same way.
Step 4: True crotch curve
Tapered seams create a bump in crotch curve, which needs to be trued..
Repeat this process for the back pattern, which may require more or less tapering based on how much rear fullness is built into the pattern already, or because of other alterations. The widening that this builds into the rear dart will help the pants to cup under the rear, reducing fullness in proportion to the amount you taper the legs.
To increase the width of the leg, do the same thing in the other direction, expanding the lower leg, then spreading the upper pieces to match. This reduces the dart widths and increases the crotch seam curve, appropriate for pants with straighter, looser legs.
Karen Howland is a custom clothing maker in Chillicothe, IL.
Drawings: Carla Ruzicka
from Threads #67, pgs. 24, 26




I enjoyed the article about tapering or widening pants patterns.
I found what appears to be a discrepency. Your WRITTEN instruction in the 5th paragraph says to add 1" to the back leg width. However, your DIAGRAM below the written instructions says to subtract 1" from both the front AND the back.
Could you please clairify that for me.
Thank you, Sandra Taylor
I have wanted to know how to make aleration changes from a straight leg to a wide leg and vice versa. Thank you so much for the instructions.
The only thing that confused me in your instruction was in paragraph five where you said to add 1" to the back leg. However, in the picture diagram it says to subtract an inch. Which is it? add or substract?
Otherwise this was great information. I will be trying to do this with my favorite pants pattern.
Sandra Taylor
This is a good technique for altering a pattern, but can anyone explain to me how to alter flared legs on a pair of jeans? Because the back leg of a pair of pants is usually cut wider than the front, I'm not sure what to do with that wider back width when I'm slimming the leg. Does it just sit in the middle and get ignored while I line up the side seams? I assume that to alter the width to a straight leg I just take the width at the knee and measure it the same all the way down to the cuff, in the way you would to the pattern?
Thanks,
Ann Davenport
Great article- Could I see the answer to Ann Davenport's query? Want to change flare leg to straight leg on a pair of tweed slacks. thanks
Thank you for the clear explanation and good graphics.
I need to alter the legs of some store bought slacks from a wide leg to a slimmer flare. There is quite a bit more fabric on the back of the leg than the front. I really don't want to take them completely apart. I just want to do the best I can with opening the seams from the bottom of the pockets to the hem. Help would be appreciated:)
I have the same question as dmd0705 asked about tapering the legs on a pair of readymade pants. Do they have to be taken apart to slim the legs?
Thank you to those of you who noted a discrepancy in the illustration labels. You must ADD 1 inch to the back.
For those who are wanting to taper the legs on ready-to-wear pants, the instructions here don't really apply entirely, as you can't make separate adjustments above and below the knee. To taper pants, you can work from about 3 inches above the knee down to the hem. Determine how much you want to remove from the total hem circumference , and remove an equal amount from the side seams and inseams to make this reduction. Mark this at the hem, and taper to nothing about 3 inches above the knee.
I suggest pinning the approximate change in and trying on the pants to see how they fit. It's a little hard to see exactly what the final silhouette will look like, because you'll have bulky seam allowances in the way, but you should be able to tell if the alteration causes fit issues at the upper part of the pants. You may not be able to make an extreme adjustment (e.g., no skinny jeans from palazzo pants!), but a couple of inches should work fine.
Carol Fresia
Threads, Senior Technical Editor
So one more time. In order to reduce leg width I will reduce by one inch on the front piece and add one inch on the back piece? Seems to me that this cancels each other out.
Why add the 1" to an already drafted pattern - surely the original pattern already had an allowance on the back, wouldn't this add too much to the pant back?
Whould you recomend the same procedure for mens pants? (usualy without darts in front part)
Hi, Mu13. Yes, you can do the same to taper men's unpleated trousers.
Carol J. Fresia
Threads Senior Technical Editor