Sew Better with Staystitching Fundamentals

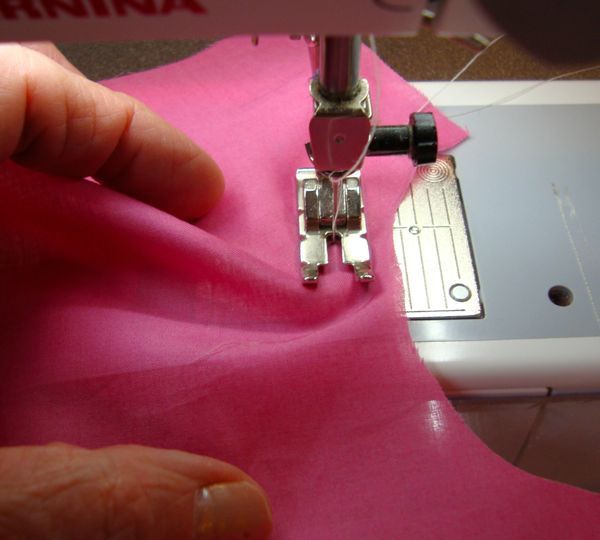
Be careful not to stretch or straighten a curve while staystitching.
Although one of my favorite parts of sewing is creating interesting surface design, I’m well aware that it’s the underpinning steps in the process that make a garment truly successful and wearable. One of those essential steps is staystitching — a row of stitches on a single fabric layer that prevents a curved or bias edge from stretching during the construction process. These stitches never show on the garment’s right side, but the overall appearance of the garment can be compromised if they’re overlooked.
Staystitches are regular-length stitches (2 mm) that are not removed like basting or ease stitches. A row of staystitching should be sewn about 1/16 inch to 1/8 inch outside the seamline, within the seam allowance. Be careful not to stitch across the seamline because the stitches will show on the garment’s right side.
Sew directionally, with the grain
This prevents distortion. Usually, sewing directionally means sewing from the top to the bottom of a neckline or sleeve.

Be careful not to stretch or straighten a curve while staystitching
Use staystitches to reinforce inside corners and points
This includes: on a square or V neckline; the opening for a continuous sleeve placket; a godet that is not set in a seam; curved edges, such as an armhole or neckline. All of these may require clipping to insure smooth seams. When an area is reinforced, it’s not always necessary to sew along the entire edge. At a corner, for example, you can start stitching about 1 inch away from the point and stop about the same distance on the other side.

V-necklines should be staystitched because of their bias seamlines, and reinforced because they need to be clipped at the V. The angle can be sewn in one operation, pivoting at the point.
Start your 14-day FREE trial to access this story.
Start your FREE trial today and get instant access to this article plus access to all Threads Insider content.
Start Your Free TrialAlready an Insider? Log in


How does one "finish" a clipped seam. Turn under the seam allowance of each little section? sew on bias binding? serge the edges? overcast?
Or does one serge or tape the edges of each seam allowance BEFORE clipping?
Often we clip a seam that has joined a facing or a binding to a curved edge of a garment. The next step is often to trim the seam and then to fold the facing or the binding over the clipped raw edge. Thus no clipped seam is exposed so no 'little sections' need to be "finished". On curved seams like a crotch seam in pants, the edges can be serged or zigzagged after trimming the seam allowances. Also see Mary Ray's comment below.
Great question! I look forward to seeing an answer as this is something I've wondered about for a very long time.
I am constructing a dress using couture techniques. The fashion fabric is embroidered linen; the underlining is a light cotton/linen; the linen is pure rayon. I've staystitched throughout and, as importantly, pressed as I go. The staystitched fabric unit, all seams, are catchstitched to the underlining. This is a great way to handle those clipped curve areas. Once the lining is in, all is unseen. But, I know it's there :-)
My comment should state the "lining" not the "linen" is pure rayon. Sorry about that!
Yes, catch stitching to an underlining is a good way to finish the seams.
The edges can be serged, zigzagged, or bound as well. Be sure that you allow the clips to open before finishing the edges. So you need to clip first, then finish. The point of clipping is to extend that curved edge so it fits the adjoining seam. I realize the seams don't look as pretty on the inside when they're clipped, but the results on the right side of the garment will be smoother.
For the picture starting with "Pivot around the corners...", there is a piece of thread that is sort-of at a diagonal coming from the clipped point. Is that a stay-stitch as well? I couldn't find mention of it in the text.
Do you advise stay stitches around the armhole as well? The arm hole is mentioned at the beginning of the piece, but not again.
Thank you MaryKay.
I noticed you did not clip through the stay stitching. I assume it would defeat the purpose of the stitching. On tight curves I've noticed my stay stitching seems to cause wrinkles on the front side, after pressing. Is this a tension issue with my stitches or something else? I ended up going in and making clips through the stitching up to the seam stitching to get rid of the wrinkles.
Thanks for any insight.
Janet
I have seen photos of couture garments (I think the one I have in mind was a DIOR dress) where the clipped seam was hand overcast. The stitches finished every inch of the seam edges, including the clipped portion. It looked beautiful -- and this was a garment that was lined in addition. Maybe chiffon unravels easily? I think I would tend to do the same, especially on an unlined garment where the seam edges would get a lot of wear.
I always was taught to sew down one side of the neckline to the middle and stop to begin again at the neckline come down the other side. This helps to eliminate the pull/tension that might result as you make the curve. The same would hold true for any rounded area that needs stay stitching.
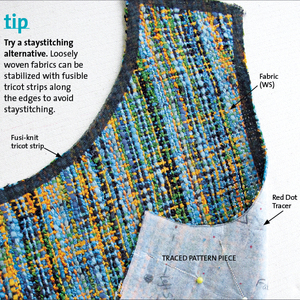
I was also taught to stay stitch halfway down each end of the neckline meeting at the bottom where you ended the last stitch. I have also used a strip of hem tape (not the sticky type) as you staystitch to give the neckline more stability. I had stitched a onsie's neckline and figured since it's a short neckline I didn't stitch half way down each end and I had puckers.
Thanks for all of your comments. Regarding the question about stay stitching at an armhole edge -- it depends on the fabric and shape of the armhole. As you know, that area needs to be somewhat flexible. However, if a fabric is very loose and the armhole is cut high, I might stay stitch the armhole. But, most of the time I don't.
And those of you who stay stitch to the point of a V are correct because that is the proper way to sew with the grain. But to reinforce the point before clipping, you really need to sew continuous stitches around the V. Using stay tape in some instances is also a good idea.
I am hopping to get some tips on sewing scallops that are easy to turn with a nice rounded curve. I have been having problems in this area. I made a dress with a scalloped bodice top and they scallops want to look almost more pointed then scalloped. Between each scallop are there any pointers that help that area. I clip to the seam but feel this doesn't look very neat. Is there a special way to clip this area or press it for better results?
Thank you
Trudy Medeiros
Hi Trudy,
Sorry to take so long to address your question. You're doing the right thing by clipping between the scallops, but here are a couple of additional tips.
Whenever you sew curves, it's a good idea to shorten your stitch length. That does a lot from smoother the curves. Then, instead of clipping along the curve edge you need to notch -- actually make some wedge-shaped cuts along the curve so there's room for the seam allowance when the scallops are turned right side out. Another way to accomplish this is to trim the seam allowance using a pinking shears.
Hope this helps!
When you're living alone you need all the sewing tips you can get. Thanks for posting this article, it definitely came in handy.
It's really useful
Can you please clarify that when stay stitching a v-neck, the stay stitches at the on of the “V” will NOT be slightly inside the seam-line (as the might on armholes or scoop necklines) but would instead line up exactly on the tip of the “V”, otherwise I would fear the the neckline would not lay perfectly flat when turned right-side out. Is this correct?
So I have no argument with "sewing with the grain", because I've done it both way and of course, "sewing with the grain" always works beautifully - especially on those pesky silk charmeuse gowns with the satin-faced chiffon over them. Nothing like sewing with the grain to make that seam sweet and straight as an arrow. BUT - I'm not sure I understand why sewing from large to small is "with the grain". For me what I've figured out is that I have more "grain" to hold onto (and the machine foot has more "grain" to hold onto when sewing from large to small, but not sure I understand how that's with the grain.
OK - getting a little detailed here, but this has always puzzled me!