
Gift Idea: Fabric Keepsake Box
Make a pretty fabric box with the included free downloadable PDF pattern.
This fabric keepsake box makes a wonderful gift or treat for yourself. It’s an opportunity to use gorgeous leftover fabric from your stash.
The box is ideal for organizing prized possessions, whether they are pieces of jewelry, sewing tools, or collectibles. You can customize this project easily: Add a button loop and button for a secure closure or embellish the lid with beads or iron-on patches for a one-of-a-kind look.
This project includes instructions on how to add a divider to section off the box’s contents. The possibilities are endless. So gather the supplies, and let’s get started.
Supplies
- 1/2 yard light- to medium-weight fabric for the interior and exterior
- Cardboard (or another thin structured material, such as plastic canvas)
Prepare the pattern
1. Print the PDF.
Begin by printing the downloadable PDF pattern (link at bottom) at full size, without scaling the images. Use the dimensions listed on the pattern as a guide to ensure the printed size is correct. This pattern results in a 5 1/2-inch-square by 3-inch-deep box and includes 1/4-inch-wide seam allowances. If desired, adjust the pattern dimensions.
2. Assemble the pieces.
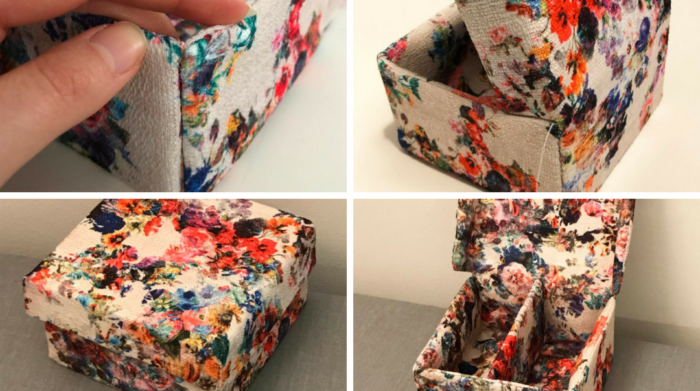
Cut the pattern pieces along the edges. Then, tape them together by matching the corresponding icons. Note that there is no reason to separate pieces 4 and 5. Simply tape pieces 1, 2, and 3 to piece 4, and join piece 5 to piece 6. The result should resemble the image in step 1 below.
Create the box
1. Cut the fabric.
Use the paper pattern to cut two pieces of fabric. You may use the same fabric for the interior and exterior (as shown) or choose two different fabrics.

2. Stitch along the edges.
Align the two fabric pieces, with right sides together, and sew around the edges with a 1/4-inch-wide seam allowance. Make sure to leave the left and right side edges unsewn (as shown below) so you can insert the cardboard later. Next, trim and clip into corners where applicable without cutting into the seams.

3. Turn and press.
Turn the fabric right-side out. Use a point turner to neatly push out the corners. Press the entire piece flat.

4. Make the inserts.
Cut the cardboard using the following dimensions as a guide. Depending on the fabric’s thickness, these dimensions may vary slightly. It helps to measure the fabric surrounding the cardboard sections before cutting each cardboard piece. Make sure to leave about 1/8 inch of fabric on each cardboard side for ease.
- 1 piece- 3″ x 5 1/4″
- 2 pieces- 2 3/4″ x 5 1/4″
- 1 piece- 5 1/4″ x 5 1/2″
- 1 piece- 3″ x 5 3/8″
- 2 pieces- 1 1/4″ x 5 3/8″
- 1 piece- 5 1/2″ x 5 3/4″
- 1 piece- 1 1/4″ x 5 3/4″

5. Add the structure.
Insert the cardboard through the unsewn ends one piece at a time. Start with the sides before adding the center pieces.

6. Secure the ends.
Once all the cardboard pieces have been inserted, turn in the seam allowances on the open ends, pin, and hand-stitch the openings closed. Optional: Stitch a straight line between the cardboard sections to ensure the pieces stay in place (not shown).

7. Build the sides.
Fold up the base sides until they form a corner. Discreetly hand-stitch them together.

Repeat with the top sections.

8. Finish the box.
Place the back upright so it aligns with side pieces 1 and 3. Hand-stitch the corners together in the same manner as the sides and top. The box is now complete.


Optional: Add a divider
1. Cut a piece of fabric 6 3/4 inches long by 6 inches wide.
With right sides together, fold the fabric in half lengthwise. Sew around the long side and one short side using a 1/4-inch-wide seam allowance.

2. Trim the corners.
Then turn the rectangle right-side out and press.
3. Cut a piece of cardboard 2 7/8 inches by 5 1/4 inches.
Insert the cardboard into the opening. Turn in the fabric on the open end, pin, and hand-stitch the opening closed.

Finally, place the divider inside the box to create compartments.

Threads Insider members might also enjoy How to Embellish a Gift Box, which shows how to cover a ho-hum box in fabric, then “frost” the top.
For expert sewing technique videos, articles, projects, and more, become a Threads Insider member.

What would you store in your fabric box? Would you decorate it in a special way? Please share your comments below.
More Sewing Ideas
12+ Projects for the Winter Holidays
View PDF


This is a lovely gift idea. It's perfect for keeping everyday jewelry handy. Thank you!
This is adorable! Will definitely make at least three for Christmas. Thanks for the instructions.
Great idea for a gift box, I would even keep such a jewelry box for myself.