
Streamlined Tailoring
Smart techniques for nonraveling fabrics

For colder weather, lofty wool fabrics that have been felted, fulled, or boiled are cozy and comfortable. They are thick enough that you can use them as a single-layered, unlined garment, and they’re classier than polyester fleece. However, eliminating bulk along seamlines and edges can be a challenge. These textiles call for sewing methods that reduce thickness and take advantage of the fabric’s resistance to raveling. The techniques aren’t difficult, but they are different from standard garment assembly. The result is a garment with a structured appearance, but without needing all the steps or inner layers used in traditional tailoring.
I found a dense, charcoal gray, fulled wool (I’ve heard it called “carriage cloth”) that was perfect for a frock coat I designed, inspired by an 18th-century model. It has a collar on a high stand, vents in the back skirt, shaped pocket flaps, and wide sleeve cuffs. To keep all the edges flat, and to give body to the garment edges and hem, I devised some special techniques. These methods are suitable for any jacket or coat made from a thick, double-sided fabric that doesn’t ravel. With these construction methods, you can give a tried-and-true jacket pattern a new look in boiled wool. The seam allowances are 5/8 inch wide throughout; some edges are trimmed during construction. Before cutting the fabric, plan a sewing sequence that enables you to construct and finish the garment easily.
Sew lapped seams
1. Mark the seamlines
On the fabric’s wrong side, draw the seamlines on both sides of the seam. On the overlap side, draw an alignment line 5⁄8 inch from the seamline.
2. Trim the seam allowance
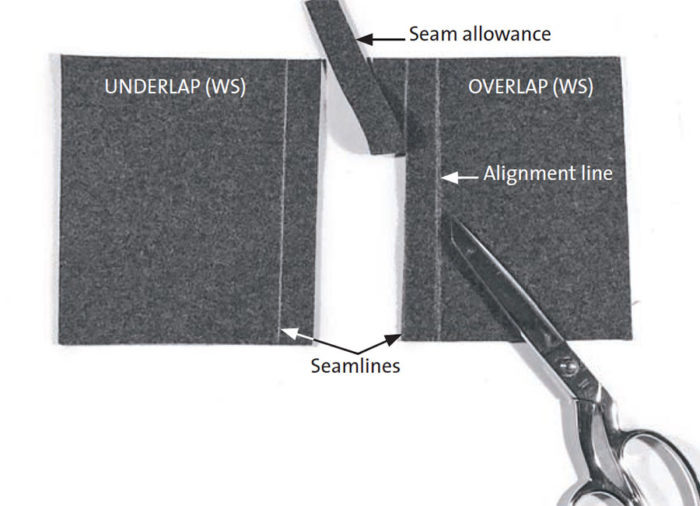
On the…
Start your 14-day FREE trial to access this story.
Start your FREE trial today and get instant access to this article plus access to all Threads Insider content.
Start Your Free TrialAlready an Insider? Log in


Stunning