Sew Sturdier, Better-Placed Thumbholes Into Sleeves
Try this design for more comfort than the in-seam version.
When thumbholes in tops became a trend in workout clothing, I was delighted. It wasn’t because I wanted to stick my thumbs through the seams of my shirt sleeves, but it was because sleeves were made longer in order to accommodate the thumbs.
You see, I have extralong limbs and have a nearly impossible time finding ready-to-wear clothes that are long enough. Shirt cuffs have never made it all the way to my wrists, and the hems of my pants have ended too far north of my ankles. This is one of the reasons I started sewing my own clothes.
Better thumbhole design
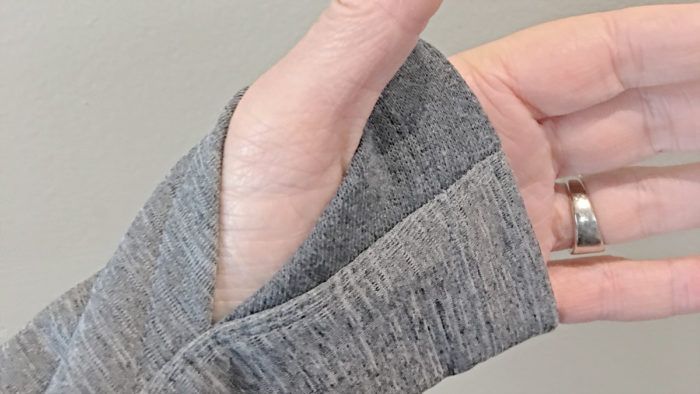
Now that I have had a few tops with the thumbholes feature, it turns out that I do like to stick my thumbs through the seams of my shirt sleeves. The extra coverage over my wrists and the top of my hands is perfect when I head out for my walks on cool fall days. When I decided to make a top with a thumbhole in each sleeve, I realized I could probably do better than simply leaving part of each seam unsewn.
I devised thumbholes that are sturdier than simple holes in the seam and more forward from the underarm seam, which puts each more in line with my thumbs. Try my instructions for making holes for thumbs.
Create a pattern for thumbholes
1. To get the sleeve hem closer to the thumbs, add 1 1/2 inches to 2 inches to the sleeve length somewhere between the hem and the elbow on the sleeve pattern. This gives the length needed without changing the size of the sleeve opening at the hem.


2. To make the thumb opening, on the front of the underarm seam, measure along the hemline from the underarm seam 2 1/4…
Start your 14-day FREE trial to access this story.
Start your FREE trial today and get instant access to this article plus access to all Threads Insider content.
Start Your Free TrialAlready an Insider? Log in


Absolutely wonderful tutorial! Last week I sewed two athletic tops with performance fabrics that included thumb holes. I love the longer sleeve giving more coverage to the arm but the unfinished thumb holes left something to be desired. I will be referring to this tutorial for all future projects!!! Thank you!
Thank you for this tutorial, I will be using it in some projects I have planned for the winter.
This is quite helpful but I wish I could print it out to use next to my machine.