
A cape is a fashion superhero. It can project any attitude and rescue any look, depending on the fabric and length you choose. Think traditional (menswear), dressy (brocade), evening (chiffon or velvet), sporty (French terry or fleece), functional (ripstop or Gore-Tex), funky (leather with rivets), casual (plaid blanket wool), military (melton), elegant (bouclé), and many more.
You’ll also find a cape to be figure-friendly, when hemmed to a flattering length, and comfortable. Unlike a jacket or coat with set-in sleeves, a cape accommodates bulky layers, complex draped styles, and deep dolman sleeves without crushing your clothes. If you have a jacket pattern that fits well and has a collar style you like, you can convert it to a cape pattern with little effort. I’ll show you the steps for the pattern conversion and give you tips for constructing the cape with a full, machine-sewn lining.
Sewing a cape is faster and easier than assembling a coat because you skip the tailored sleeve and shoulder details. It’s instant outerwear with style. Toss it on and go—no phone booth required.
Convert the pattern
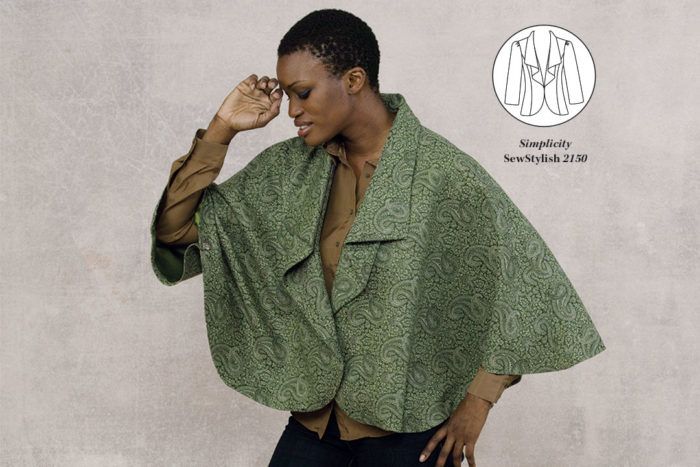
For the cape shown, we used a pattern with a set-in sleeve and princess-seam bodice, Simplicity SewStylish 2150, View B. The collar construction won’t differ from the original jacket, so any collar type will work. These instructions result in a flared shape.
1. Establish the center front. Cut the pattern front, side front, and sleeve. Draw a vertical line about 12 inches from the right side of a large sheet of paper. Position the front pattern piece with its grainline on the vertical line. Weight the pattern, and trace everything except the princess seam.

2. Draft the overarm seam. With a long ruler, draw a line out from the shoulder point, approximately parallel to the shoulder cutting line. Label this line A. Fold the sleeve pattern along its vertical center, and align this fold on line A, aligning the sleeve and bodice shoulder points (overlap the seam allowances where the sleeve meets the shoulder). Place a dot on line A at the sleeve hem cutting line.
3. Determine the side-front area. Align the side-front pattern piece hemline and vertical seamline with the front piece, matching the notches. In this pattern, the front piece has a 5/8-inch-wide hem allowance and the side-front piece has a 1 1/2-inch-wide hem allowance; keep the mismatch at the bottom edge. It will be used for the hem and facing. Place a dot at the lowest side-seam edge. Draw a line from this dot to the shoulder point. Label this line B.
4. Square a line from the dot at the side hem to the side. Label this line C. Square a line from the line A dot toward line C. Label this line D. Make a dot where lines C and D intersect. Draw a line from the intersection dot to the shoulder point. Label this line E.
5. Curve the side hem edge. Measure line A from dot to dot. On line E, measure this distance down from the shoulder point and make a dot. Connect the lower dots on lines A, E, and B with a curved line; use a curved fashion ruler as a guide. (This pattern has three-quarter sleeves, so the curve is steep. If the original pattern had a long sleeve, the curve shape would be more gradual.)
6. Shape the shoulder seam. Find the middle of the original shoulder seam. Make a dot 5⁄8 inch below the cutting line, and label it 1. Measure 1 1/2 inches down line A from the shoulder point. Make a dot 1/4 inch above line A, and label it 2. Measure 8 inches down line A from the shoulder point. Make a dot on the line A, and label it 3. With a French curve as a guide, connect dots 1, 2, and 3 with a smooth, slightly curved line. Draw a 5/8-inch-wide seam allowance on the overarm seam.
7. Convert the jacket back pattern. Repeat the same steps for the jacket back. Note that the overarm seams of the front and back must match exactly; compare the back to the front, and adjust as needed. Add a center-back seam if the back pattern is too wide to fit on your fabric; consider using a single-layer layout for the most efficient use of your fabric.

Tip
Square a line like a pro: Place a grid ruler perpendicular to the line, and draw through the dot.
Construct the cape
If you’re used to sewing jackets, you’ll be pleasantly surprised by how quickly a cape goes together. If you are not planning to line the cape, choose an attractive seam finish, as the seam allowances will show at times when you are wearing the cape. Then use these instructions, in conjunction with the pattern guide sheet, to sew the cape.
1. Cut the cape, lining, and interfacing. From fashion fabric and lining, cut one cape back on the fold, two cape fronts, as well as the back belt and facings included in the pattern. From lining, cut the same cape pieces, but make them 1 inch shorter. Interface as directed in the pattern.
2. Assemble the outer cape. Appliqué the back belt to the cape back. Join the front pieces, and form the collar, sewing the cape overarm seams in place of the jacket’s shoulder seams.
3. Assemble the facing/lining. Press under the unnotched facing edges. With the facing wrong side against the right side of the lining front pieces, align the notched edge of the facing to the notched edges of the lining. Topstitch the facing to the lining on the unnotched facing edge. Join the front lining pieces to the back lining, and then sew the overarm seams to join the lining front and back.
4. Join the outer cape unit to the facing/lining unit. With right sides together, pin the lining/facing unit to the cape. Sew around the outside of the facing. Trim and grade the seam allowances, press them open as far as possible, turn the cape right side out, and press again.
5. Tack the shoulder seams and back-neck seam. Turn the cape right side out, and align the back-neck and overarm seams of the fashion fabric and lining layers. Partially separate the layers and loosely hand-tack the shoulder seam allowance of the fashion fabric to the lining seam allowance for about 10 inches, to prevent the lining from slipping during wear.
6. Join the layers at the hem. Press the hem up, easing or crimping the fullness from the hem allowance as needed to create a smooth, flat curve. If you’re not lining the cape, finish the hem allowance edge and sew the hem by hand or machine. If you are lining the cape, apply fusible web tape to the cape’s wrong side, as shown, leaving a 3⁄4-inch-wide allowance above the fusible tape. Turn the cape inside out, and, with right sides together, pin the lining hem edge to the cape’s hem raw edge. Machine-sew along the entire hem edge, and leave an 8-inch opening for turning.
 |
|

7. Complete the cape. Turn the garment right side out. Then, for a lined cape, reach through the opening in the hem and tack the seam allowances together at the overarm seam hem. Slipstitch the hem opening, and press the cape. For a lined version, fuse the hem in place. Add closures as desired. On the sample cape, one button was placed at center front, 7 inches above the hem. Additional buttons, joined as shown at right, connect the cape layers at the sides.

Tip
Substitute a great pair of cuff links for the buttons. Alternatively, simply sew the buttons in place through all layers of the cape, without buttonholes.
Jacque Goldsmith has many years of experience in design and product development in the fashion industry. She lives in Seattle, Washington, and teaches apparel design at the college level.


Log in or create an account to post a comment.
Sign up Log in