

In my home-based sewing business, I shorten more than 50 full-length prom, wedding, and wedding attendant gowns each year. Over time, I’ve developed a hemming technique that is efficient and yields smooth, even results, even on the challenging fabrics typical of formal dresses.
I use key tools and supplies that make it easier to handle lightweight and slippery fabrics, so the finished hem is uniform and smoothly sewn. I like glass-head pins; Schmetz universal needles or universal nonstick needles, in size 70; Pellon Lite EZ-Steam II fusible tape in 1/4-inch width; and Dritz Sewer’s Aid lubricant. You’ll also need sharp scissors or a rotary cutter and mat, an iron and ironing board, an adjustable dress form, and a sewing machine. With these basic items, you can confidently hem a special-occasion dress.
Mark the hemline
Have the client put on the gown and the shoes she intends to wear with it. Then pin the desired hemline.
1. Pin-mark at the floor level. Ask the client to stand with her arms at her sides. Pin the lining a few inches above the floor to keep it out of the way as you mark the outer layer. Pin a line where the gown’s outer layer touches the floor, around the entire hem circumference. Pin a second line 3⁄4 inch above the first row of pins.

2. Pin the hem up along the upper row of pins. Have the client remove the gown.
3. Press up the hem allowance. Press along the upper row of pins. Then place the gown on a dress form and check to make sure the hemline is even and parallel to the floor. Adjust if needed.
Fuse and stitch the hem
Narrow fusible tape helps you fold an even hem and secures the hem allowance for neat stitching.
1. Adhere the tape to the hem allowance. Mark a line on the gown’s wrong side, 1⁄2 inch below the pressed hemline. Lay the 1⁄4-inch-wide fusible tape along this line and press with the iron to fuse it. Trim the excess hem allowance below the tape.

2. Fold the hem allowance. Remove the tape’s backing paper, about 12 inches at a time, and fold the taped edge in so its cut edge is aligned with the hemline crease. Finger-press. Work in short intervals, removing about 12 inches of backing paper at a time. Fold the edge in again along the original hemline crease, creating a double-fold 1⁄4-inch-wide hem.

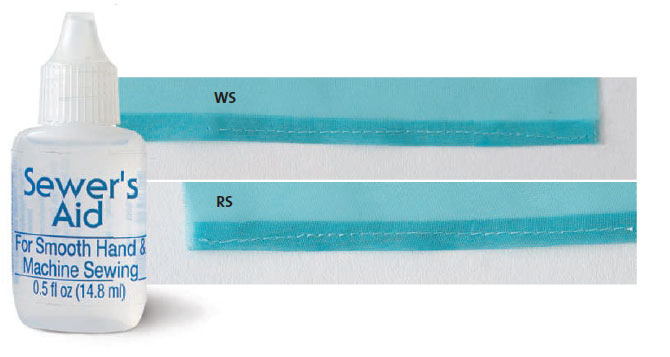
3. Stitch the hem in place and press. With a straight stitch, sew the hem. If the needle gets sticky from the hem tape’s adhesive, rub a bit of the Sewer’s Aid on the needle, or switch to Schmetz universal nonstick needles.
Complete the lining

This method works well whether there is one layer or more of lining.
1. Mark the lining hemline. Hang the gown on the dress form and unpin the lining. Raise the dress form to a height that allows the lining to hang without touching the floor. Pin a line on the lining along the outer layer’s finished hemline.
2. Press and sew the hem. Remove the gown from the dress form and cut the lining along the pin line. Mark a hemline 1⁄2 inch above the cut edge, and press the hem up along this line. Fold the cut edge to the hemline crease to form a double-folded 1⁄4-inch-wide hem. Press, then stitch in place. Repeat this step for any additional lining layers. If the lining is slippery, you can use fusible tape to secure it for stitching, as you did for the outer fabric layer.
3. Complete the hem. Press the dress and hang it on a dress form. Check that the lining does not hang below the outside layer of the gown. Create thread chains at the side seams and center back to hold the layers of the gown together.
Kathy Healey has a custom-sewing business in Rochester, New York, and is president of her local American Sewing Guild chapter.


Log in or create an account to post a comment.
Sign up Log in