
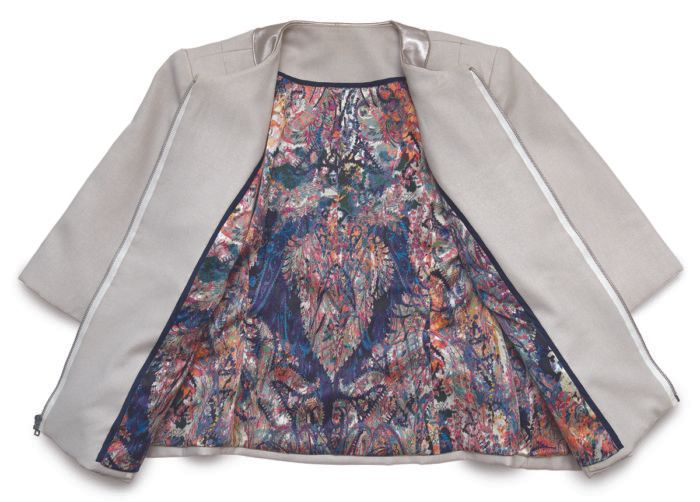
In Threads #211 (Oct./Nov. 2020) author Rachel Siegel explains how to draft a lining pattern, based on the outer garment pattern. Here, she offers tips on lining installation.
Lining installation options
The most traditional method for installing a lining is to attach it entirely by hand. This approach offers control, so you know the lining will fit perfectly.
A more contemporary approach, based on ready-to-wear manufacturing processes, is to “bag” the lining. A bagged lining is sewn almost entirely by machine. Only a few hand stitches are needed to close small openings. (It’s even possible to sew a lining completely by machine. Insider members can find out how in “Line a Jacket Like a Pro.”)
Rachel Siegel prefers a hybrid method, with some parts sewn by machine, and others by hand. Read on to find out why and how.
Lining installation advice
You can attach the lining entirely by hand, entirely by machine, or with a combination of methods. Working by machine and by hand offers the best of both worlds, providing speed, accuracy, and durability.
Start by machine
For the greatest efficiency, attach the lining to the facing by machine. If necessary, clip the lining seam allowances at the back-neck facing edge. Pin, then machine-sew up one front edge, around the back-neck facing, and continue down the opposite front. Leave the lining loose for 4 inches at the hem. If you plan to hem the lining by machine, leave a 10-inch opening on one side for turning.
Sew the outer hems
Before attaching the lining to the garment at the hem, sew the outer garment’s hems in place. You may sew the outer garment’s body and sleeve hems by hand or with a machine blind-hem stitch. If you plan to attach the lining by machine, place the stitches 3/4 inch below the hem allowance edge. This ensures there is adequate seam allowance to sew the hem seam.
Attach the lining at the hems
Depending on the garment and its fabric, you may complete this step by machine or by hand. For long coats or those made of heavier fabrics, Rachel recommends sewing the lining to the hem allowances by hand. It’s difficult to turn a bulky garment through a small opening, and the turn of cloth can complicate the process. Build in a jump pleat along the sleeve and bottom hems as you hand-sew the lining.
If the garment fabric is midweight, machine-sew the lining to the hem allowances, building in the necessary drop.
Tip: Before closing the last bit of hem, tack the lining seam allowance to the garment seam allowance in the underarm area, between the notches.
Threads Insiders can learn award-winning lining techniques from Rachel in “Precise Interior Finish.”


Log in or create an account to post a comment.
Sign up Log in