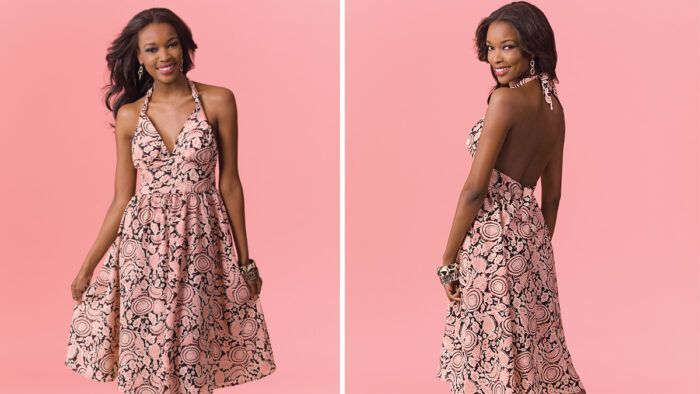
Being chic is so much better when the design you’re wearing doesn’t produce scraps to add to a landfill. I designed this classic halter dress as part of a challenge for the Association of Sewing and Design Professionals, or ASDP (SewingProfessionals.com). The assignment was to create a garment without producing any waste fabric. This is a design method used by zero-waste advocates, who seek to eliminate discarded fabric from garment factories. It’s a fun puzzle to solve because, to eliminate waste, all the pattern pieces in your design have to abut on the fabric.
This lovely dress will catch summer breezes with its semifull A-line skirt, shaped waistline, and ties in back at the waist and neckline. If staying cool and comfortable on the patio is a high priority for you, a lightweight printed cotton is perfect from brunch to lunch and beyond.
Read more about zero waste below, and I’ll show you how I turned less than two yards of fabric into this flattering sundress, with no scraps left behind.
|
Tools and materials • 1 7/8 yards fabric, 45 inches by 64 inches • 7-inch zipper • Pattern paper • Sewing machine and basic supplies
|
How to draft a no-waste pattern
To prepare your pattern, start with a piece of pattern paper 45 inches wide and 64 inches long. Fold it in half lengthwise to represent the folded fabric. Draft the pattern following the directions below. If you are small to medium size (up to a 32-inch waist) these proportions will fit, because you gather the sections to your size when constructing the dress. If your circumference measurements are greater, use 60-inch-wide fabric (and pattern paper) instead of 45-inch-wide fabric.
1. Fold the paper in half lengthwise with the fold on the right side.
2. Measure and mark these points from the bottom up:
On the selvage edge:
- Measure up 2 inches and mark B;
- Measure up 28 inches, mark C;
- Measure up 28 inches again, mark D.
- On the fold edge:
- Measure up 6 inches, mark G;
- Measure up 28 inches, mark H;
- Measure up 28 inches, mark I.
3. Draw a straight line between D and G. Mark K in the middle, 28 inches from each end.
4. Define one halter and the skirt back waist. With D as a pivot point and 28 inches as the radius, draw a curved line between C and K.
5. Define the other halter and the skirt front waist. With G as a pivot point and 28 inches as the radius, draw a curved line between H and K.
6. Draw the skirt front hemline. With G as the pivot point and 56 inches as the radius, draw a curved line between D and I.
7. Draw the skirt back hemline. With D as the pivot point and 56 inches as the radius; draw a curved line between B and G.
8. Cut out the paper dress. Tape it together temporarily, overlapping seams 1⁄2 inch, and check the proportions. Use a dress form or tissue-fit the pattern on your body for approximate measurements. Make sure there’s enough width at the base of the halter to give modest coverage at the bust after gathering for shape.
9. Check the length of the halter to make sure you can tie a knot. Measure yourself from center front just below the bustline to center-back neck. Add 5 inches to 6 inches to that measurement; compare it to the length of the halter piece sides, which should be at least that long.
10. Mark for fit. Measure your waist; divide by 2 and mark that distance on the midriff piece to the left of F and right of E, and label L. This is the center-back point.
11. Mark half of that distance for the side-seam point, and label M. Place a mark 1 inch longer than M from the center front on the curved edge for halter placement. Label it N.
Construct the dress
After checking your pattern for fit, cut it from fabric. Remember, the pattern pieces abut at every edge just as they did when you were drafting the pattern. You will have no leftover fabric when this project is finished. Use 1⁄2-inch seam allowances throughout, except on the center-front midriff lining, and always sew with right sides together.
1. Sew the skirt together at center back. Install a 7-inch zipper from the waist down using your preferred zipper-insertion method.
2. Join the front and back skirt pieces at the side seams. Sew two rows of long stitches around the skirt waist within the seam allowance for gathering later; set it aside.
3. Sew the two long sides of the halter and their lining pieces together. One set was cut on the fold: Sew a seam along that edge so both sides of the bodice are identical and behave the same. If the selvage edges are drawing up, clip along the seam allowance so the edge lies flat.
4. Turn the halter pieces right side out and press. Sew two gathering rows across the unfinished curved edge, and gather to fit your bust.
5. Watch the grain. One of the long sides on each bodice piece is on the straight grain. Use this as a side edge. Use the other long side as the center-front edge of the bodice. With right sides together and raw edges aligned, pin the halter pieces to the midriff so their center-front edges meet, or overlap slightly, at the midriff center-front point. Their side edges meet the midriff at the N points. Align the raw edges, and sew the gathered halter pieces to the midriff.
6. With right sides together, join the center-front seam of the midriff lining using the narrowest possible seam allowance. It will be inside the garment, so it’s OK if markings from the selvage edge show. Split the midriff lining ties where they were cut on the fold.
7. Sew the midriff lining to the midriff on the curved edge, sandwiching the halter pieces between the layers. The lining will be slightly shorter when you get to the ends because of the seam allowance used at the center front. Just make up for the difference in the seam allowances, or shorten the ends. Sew around the tie ends from point L to point L on the other side.
8. Gather the skirt to the midriff. Match the center front (F), side seam (M) and center back (L) marks and sew. Attach the skirt to the outer midriff section only, and take care not to catch the halter sections in the waistline seam. The rest of the midriff band becomes the waist ties that meet above the zipper. Turn and press the ties.
9. Fold under the lining seam allowance at the waist and blind-stitch by hand, or machine-stitch in the ditch, to finish the seam. Hem the dress as desired. For an extra kick, add some ruffled lace.

Mechiel Whitmore has sewn professionally for more than 30 years. Mechiels.com
Zero Waste, an Exciting New Design Approach
The traditional approach to fashion design is “out” and creatively designing the pattern with little or no waste is “in.” How did this happen? Preventing waste, whether on the factory floor or in our homes, is becoming more important as we learn new ways to stretch our resources during uncertain economic times. The effort influences manufacturing and recycling industries, as well as fashion design. This growing movement, aimed at designing without waste, has added an exciting twist to garment creation. It has appeared in the high-fashion world recently, propelled by designers informally known as the zero-waste crowd.

Design the pattern, not the clothing
These designers are the latest graduates emerging from design schools and even university PhD programs. They are not asking professional and home sewers to ration fabric, just to keep it out of landfills.
They focus on the pattern design, not the clothing design. They start the design process with the pattern instead of a sketch. Here’s the surprise: The resulting garments are not ill-fitting, odd, or skimpy. Zero-waste designers are creating clothes that are dramatic, interesting, and luxurious. And anyone can try out zero-waste design—no fashion degree required.
Not-so-new thrift
Zero waste is not a new concept. Throughout history, when fabric was simply too rare to waste, too culturally prized, or its manufacture too labor intensive, eliminating fabric waste was planned into the design and became just as much a point of pride as the resulting garment.
Early weavers in every culture designed garments to efficiently employ each cut in the cloth; small triangles became gussets and pockets, selvages became edges, warp ends became fringed trim.
Manufacturing makes zero waste its goal
Today, setting up and capitalizing on green practices is admirable and often attainable for the studio designer, but it is still an elusive industry goal. Here are some reasons that zero-waste designs are becoming increasingly important.
Of the fabrics used to produce clothing, leftovers end up in landfills or are discarded. Besides overloading landfills, scrap fabric wastes expensive resources, such as fuel and labor used to manufacture, pack, ship, collect, store, and truck it away.
The good news is that the sustainable fashion industry is steadily building the infrastructure it needs to source and process without waste, to ultimately create zero-waste production lines.
The point isn’t to save fabric but to eliminate waste. That’s the culprit that runs up costs for everybody, from the manufacturer to the consumer, and it threatens our planet.
Abridged from “Zero Waste” by Sandra Ericson, Threads #149 (June/July 2011). Sandra is the founder of the Center for Pattern Design, CenterForPatternDesign.org.
Photos by Jack Deutsch, except where noted. Illustrations by Rosann Berry.


...is it just me or are 1 & 7/8 yds not the same as 64 inches... is it a size difference or just a typo?