
Zero-waste design is a fun and fascinating way to make fabric go further and to avoid dumping scraps. In Threads #219 (Fall 2022), author Lindsay Ostlie shared an almost zero-waste top pattern she’d developed for her winning outfit in the 2021 Threads/Association of Sewing and Design Professionals “Salvage & Selvage” design challenge. This top is easy-fitting, with deep dolman armholes. Depending on the fabric you choose, it can be a floaty summer blouse, or an unstructured jacket or layering piece.
Lindsay’s original design took advantage of a fringed selvage, which she featured along the top’s front placket edges. You can follow suit, or—if your fabric doesn’t have an attractive selvage—tuck the edges under to conceal them. Below, we offer the option to print the yoke piece at full scale, in either of the two sizes noted in the sizing section.
Follow these step-by-step directions to draft the pattern. The main drafting instructions are for size B; you’ll make minor adjustments for size A after drafting the main pattern. You can find instructions for sewing the top here. The pattern results in small scraps, which you can turn into creative pockets, bias trim, loops, tabs, or other custom additions to your blouse or jacket.
Sizing options
The zero-waste top shown has two size options. Size A has a finished hem circumference of 47 inches, and size B finishes at 53 inches. Opt for a size that offers at least 3 inches of ease at the high hip. The dolman sleeve style offers additional room for the bust. If needed, the fit can be further adjusted by taking in the side/underarm seams, or adding a side/underarm panel to increase the overall circumference.
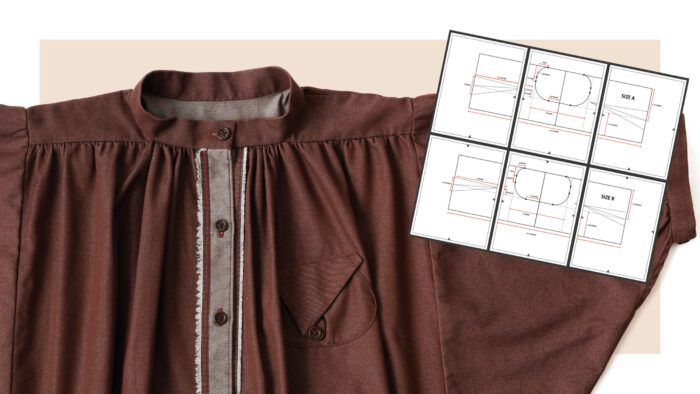
Refer to the Size B and Size A diagrams below as a guide when drafting your pattern.
Zero-Waste Top Pattern, Size B

Zero-Waste Top Pattern, Size A

Front, back, and collar
1. Draw line AB. Along the top, short edge of the paper, draw a line perpendicular to the long edge and 43 5/8 inches long. Mark its ends A and B.
2. Establish the bodice length and hemline. Draw perpendicular lines down from A and B, 25 inches long. Label the point below A point C, and the one below B point D. Draw line CD
3. Delineate one front. On AB, measure 17 1/2 inches and mark point E. Repeat on CD and mark point Y. Draw line EY. Label the left rectangle “Front.”
4. Outline the back. On AB, measure 23 inches to the right of E and mark point F. Repeat on CD and mark point Z. Draw line FZ. Label this rectangle “Back.”
5. Measure the base of the wearer’s neck. Add 2 1/4 inches to this measurement. Measure down BD this amount and make a mark. Square a line from this point to FZ to define the collar’s end. Label this strip “Collar,” and note that the short ends have a 1/4-inch-wide seam allowance.
Front, yoke, and cuffs
1. Extend AC and BD. Measure 36 1/4 inches down from C and D, and mark points G and H. Draw lines CG and DH, and draw line GH.
2. Delineate the second front width. On CD, measure 17 1/2 inches to the left of D and mark point I. Repeat on GH and mark point J. Draw line IJ.
3. Draw the sleeve cuffs. On IJ and DH, measure up from GH by 2 5/8 inches and mark points K and U. Draw line KU. Draw line WX parallel and 2 5/8 inches above KU. To determine the cuff length, measure the wearer’s arm just above the elbow, and add 1 1/4 inches to this measurement. On GH, measure this amount to the right of J and make a mark. Square a line from this point to WX. This defines the cuff length, with 1/4-inch-wide seam allowances on the short ends. Label the resulting to strips “Cuff.”
4. Outline the yoke. Draw line LV 6 inches above and parallel to WX. Label the rectangle below LV “Yoke.” Refer to the yoke diagram to draw the back neckline and darts. Label the rectangle above LV “Front.”
Sleeves and pocket pieces
1. Draw the sleeve underarm seams. Mark the midpoint of IJ and label it M. Draw diagonal lines CM and GM. On CG, mark the midpoint and label it N. Draw line NM.
2. Draw the sleeve cuff edges. Measure up from N by 11 [11 1/2] inches and mark point O. Measure down from N by the same distance and mark point P. From each of points O and P, square a line ending at CM and GM, respectively. On IJ, measure down from I by 11 [11 1/2] inches and mark point Q. Measure up from J the same distance and mark point R. From each of points Q and R, square a line to CM and GM respectively. Label each trapezoid “Sleeve.” The 11 [11 1/2]-inch edges will be joined to form the sleeves’ overarm seams.
Size A adjustments
1. Narrow the fronts. Draw a line parallel to and 1 3/4 inches to the right of IL. Draw a line parallel to and 1 3/4 inches to the left of EY. Mark a notch 1 3/4 inches from the top of each line.
2. Narrow the back. Draw a line parallel to and 3 inches to the right of EY. Mark a notch 1 3/4 inches from the top.
Notches
Add match points as noted.
Size A
Line AE: 7 1/4 inches to the right of A.
Line ID: 7 1/4 inches to the left of D.
Line NM: 3 3/4 inches to the right of N on both sides of the line.
Line CI: 3 3/4 inches to the left of I on the sleeve.
Line GJ: 3 3/4 inches to the left of J.
Size B
Line EY: 2 inches down from E on both sides of the line.
Line FZ: 2 inches down from F.
Line IR: 2 inches down from I.
Line AE: 9 1/4 inches to the right of A.
Line ID: 9 1/4 inches to the left of D.
Line NM: 4 inches to the right of N on both sides of the line.
Line CI: 4 inches to the left of I on the sleeve.
Line GJ: 4 inches to the left of J.
Yoke diagrams
The yoke rectangle for the zero-waste top pattern is cut the same size for sizes A and B, but the neckline and shoulder darts are different. Follow the diagrams in the pdf to draft the neck opening and darts, or download and print the full-size patterns.

Photos: Mike Yamin. Diagrams: courtesy of Lindsay Ostlie.


Log in or create an account to post a comment.
Sign up Log in