
Couching by Machine
Apply narrow trims accurately with dedicated presser feet
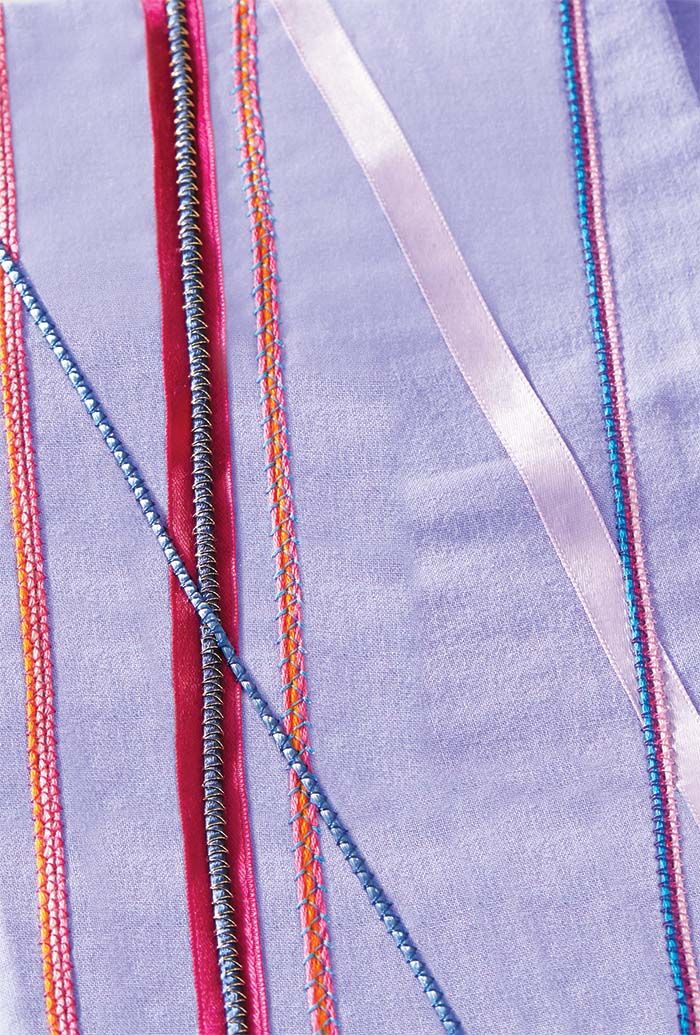
One of the most enjoyable aspects of sewing is selecting threads, yarns, and trims to make one-of-a-kind embellishments. Many specialty threads or trims don’t fit through the eye of a sewing machine needle, however. So how can you incorporate beautiful fibers into your machine-sewn projects? That’s where couching comes in.
Couching is the process of stitching light- to heavyweight threads to fabric with a finer thread. Some heavier materials suited to being couched include embroidery floss, trim, cord, and yarn. The choices are almost endless. To easily couch decorative strands, all you need are the right tools and stitches. I’ll introduce two types of presser feet that are used to create couched designs.
If you plan to couch one or more narrow threads to fabric, the cording foot is the way to go. This foot has tiny channels that separate and guide multiple threads on the fabric surface as you sew over them.
If you’d like to couch a thicker material, try the braiding foot. This foot’s name is misleading: It doesn’t braid anything. Rather, it guides a length of braid, trim, cord, ribbon, or thread as you stitch over or on top of it. Since the foot is designed for couching a single length of material, it is better than the cording foot at twisting and turning thread into complex designs. It can accommodate thicker threads than the cording foot, too.
Once you’ve mastered the techniques shown, take your skills to the next level by experimenting with variegated, invisible, and elastic thread for even more possibilities.
The cording foot

The cording foot guides three or more strands of thread, while the needle stitches decoratively over them. A clamp with narrow channels on top of the foot accommodates each thread separately, keeping all the threads aligned for a neat application. Experiment with decorative stitches for easy, ornamental results.
Couch with an embroidery stitch
1. Prepare to sew. Select three strands of embroidery floss and a contrasting sewing thread color. Thread the machine with the thread and insert the corresponding machine needle.
2. Secure the floss. Slide the embroidery floss under the thread bar and beneath the foot to secure each strand in place. Be sure to leave enough length (at least 1 inch) trailing behind the presser foot so the strands don’t pop out of the channels as you begin stitching. Attach the foot to the machine.

3. Couch the design. Place the fabric under the presser foot. Then select the embroidery stitch of your choice and adjust the stitch width according to the width of the embroidery floss strands. Lower the presser foot and begin sewing. As you sew, be sure to keep the strands separated in front of the foot so they don’t tangle. When finished, clip the threads and the floss.

Create a twin-needle effect
1. Thread the machine. Install a twin needle. Follow your machine manual’s instructions for threading a twin needle. If your manual doesn’t explain how, use this method: Place one thread spool on the machine’s spool pin so it feeds toward you. Then, orient the second spool in the opposite direction on the same spool pin (if it fits) or on a second spool pin. Take both thread ends at the same time and thread the machine as usual. Finish by inserting one thread through each needle. For a video tutorial on twin-needle threading, visit ThreadsMagazine.com.

2. Couch the threads. Follow steps 2 and 3 in “Couch with an embroidery stitch,” page 23. Hand-crank the flywheel through at least one full stitch sequence to be sure the twin needle fits through the openings in the presser foot and stitch plate.
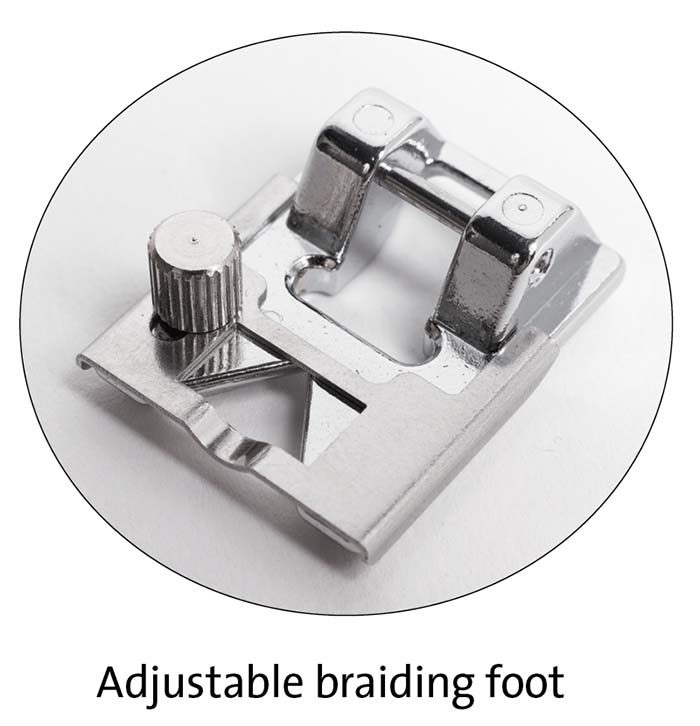
The braiding foot
The braiding foot has an adjustable opening through which the couching material is fed. It accommodates round, flat, or textured trims. Loosen the sliding plate’s adjustment screw, insert the material, slide the plate to fit the material, and tighten the screw. This foot steers cord nicely around curves.
Zigzag over a thick cord
1. Prepare to sew. Thread the machine with the thread of your choice. Metallic thread yields a subtle sparkle; if you choose this, install a needle for metallic thread.
2. Secure the cord. Slide the cord through the foot’s opening, adjust the sliding plate, and tighten the screw. Pull the cord slightly to test that it can slide smoothly. Leave enough length (at least 1 inch) trailing behind the presser foot so the cord doesn’t pop out as you begin stitching.

3. Couch the design. Attach the braiding foot to the machine. Place the fabric under the presser foot. Select a zigzag stitch and adjust the stitch width according to the cord diameter. Lower the presser foot and begin sewing. When finished, clip the threads and the cord.

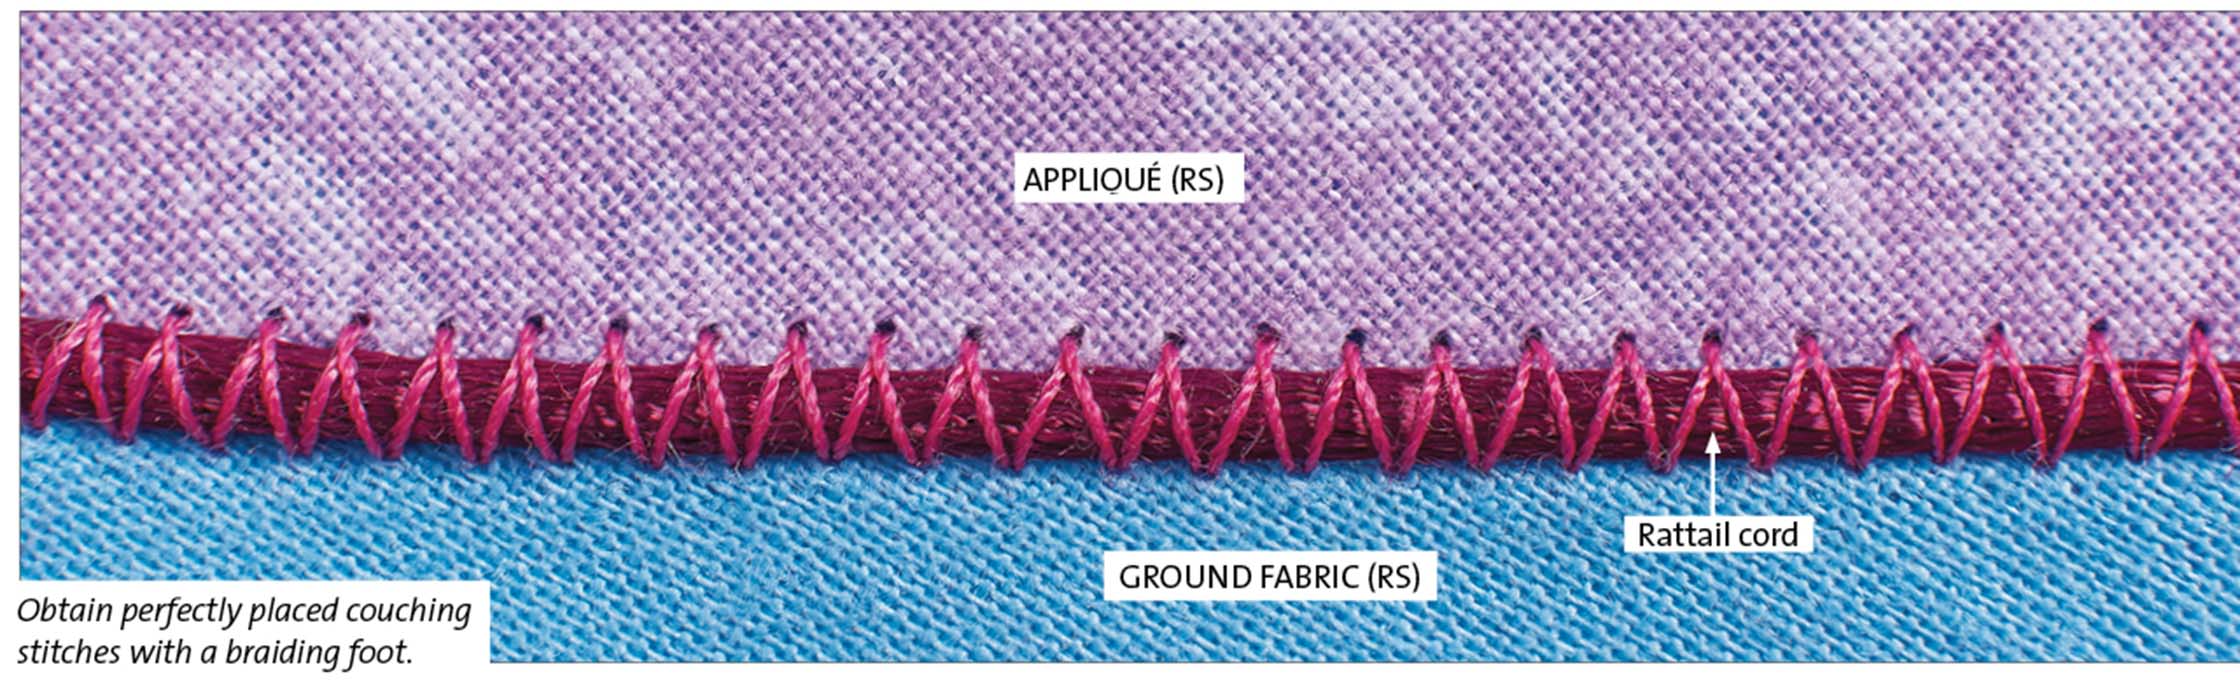
Outline an appliqué
1. Fuse the appliqué. Following the manufacturer’s instructions, apply paper-backed fusible web to a fabric motif’s wrong side. Remove the paper backing and fuse the appliqué to the fabric’s right side.

2. Couch around the appliqué. Thread the machine with the thread of your choice; be sure to select a needle style appropriate to the thread. Next, repeat steps 2 and 3 under “Zigzag over a thick cord” on the facing page. As you sew, be sure to go around turns slowly and to loosely hold the yarn or cord in front of the machine so the presser foot can guide it as you move the fabric. When you finish outlining the motif, lock the stitches in place by sewing a few stitches past where you began.


Log in or create an account to post a comment.
Sign up Log in