1. Best Tip: Retractable belt loops
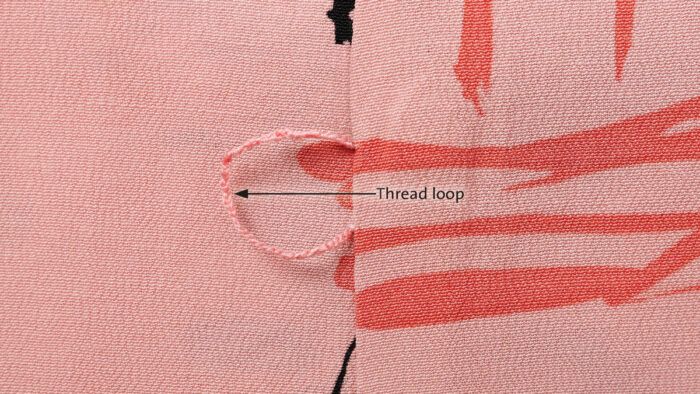
Sometimes you make a dress that you plan to wear with or without a belt, depending on the occasion. Loops or carriers are helpful when you choose to include a belt, but they look silly when you don’t. I added retractable chainstitch belt loops to a dress.
Here’s how: Instead of anchoring the loops’ ends to the garment on the wrong side, knot them together. The result is literally a loop that passes through the garment’s seam. When you don’t wear a belt, pull gently on the knot to retract the loop; only a short length of chain is visible along the garment’s side seam. Pull the loop out again to use it.
—Gail McKay, Penfield, New York
2. Baking mat for fusing
I bought a silicone baking mat that is useless in my kitchen but works great for iron-on interfacing. I no longer have fusible glue stuck to my ironing board cover. I just put the material and interfacing on the mat and press away.
—Eleanor Gibson, Netanya, Israel
3. Upcycle button plackets
I have been making baby quilts for the Linus Project, and have tried to source fabric inexpensively and sustainably by buying extralarge men’s woven cotton shirts at Goodwill. I cut off the collars, cuffs, and button bands and use the flat fabric to piece the quilts.
I realized if I cut the button bands off with a fabric allowance of 1/2 inch to 1 inch, I could reuse the bands as closures on duvet and pillow covers, without having to measure and make buttonholes. This is a great time-saver. I also sewed several buttonhole bands together horizontally to make a holder for earrings.
—Charlotte Laslo, Westminster, Maryland
4. Clean your rotary cutter
I would like to share a tip that improves a rotary cutter’s performance. I placed a new blade in my rotary cutter before starting a new project. I noticed the rotary cutter was not cutting the fabric as easily as I hoped. Since I always clean my sewing machine (bobbin case, feed dogs, and so on) before starting a new project, I thought I would see if my rotary cutter needed cleaning. I disassembled my cutter and was amazed—and dismayed—to see the buildup of lint and dirt. I cleaned all the parts, except the blade, with tap water and a cotton swab. I pay extra attention to all holes and threaded parts. After drying the parts with a paper towel, I reassembled the cutter. I could not believe the improvement. Now, I plan to clean my rotary cutter each time I change a blade.
—Peggy Markland, Dayton, Ohio
5. Piece and match
In order to accommodate a wide, semi-circular skirt pattern on fabric with a directional print, I needed to turn a fold into a seam, which required adding a seam allowance. I marked the foldline on the fabric with tailor’s tacks. To mark the seam allowance I needed to add, I pinned 5/8-inch-wide ribbon along the foldline and cut outside that. The fabric’s motifs now flow in the same direction and line up properly.
—Louise Sankey, Hereford, Herefordshire, England
Send us your tips
We pay for every tip we publish. The best tip winner receives a gift of Taunton Press products.
Threads Tips • PO Box 5506 • Newtown, CT 06470-5506 • or via email: [email protected]


Log in or create an account to post a comment.
Sign up Log in