
Construction Techniques for Peaked Lapels

Jacket-making may be daunting for some, but once you learn how to break each step into smaller tasks, it’s not so intimidating. In fact, the construction of many jackets can be straightforward. Details on how the collar and lapels join can be a little tricky, though. There are a few collar-lapel join methods that work well. This is one way to get a smooth transition, plus I will show you one additional technique to help jackets with peaked lapels look finished.
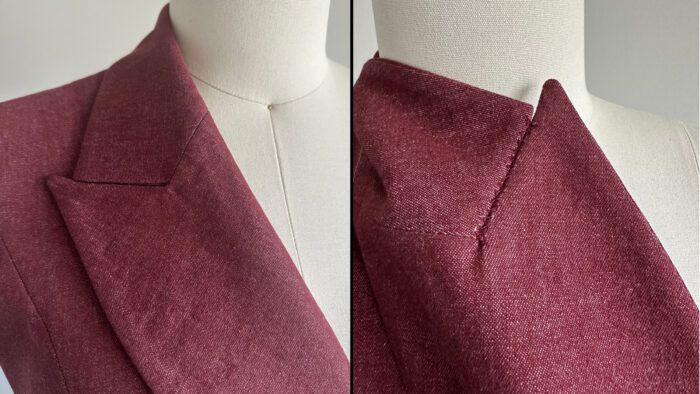
While many patterns are designed to have the jacket front and lapels as one pattern piece, my jacket pattern (out-of-print Vogue 2749 Montana Paris Original) happens to have a separate lapel sewn onto the jacket front and onto the front facing to complete the front piece. Take a look at another pattern with a similar separate lapel sewn to the jacket front and front facing.
Mark carefully
I’ve stitched tailor’s tacks at all pivot and match points to make sure the sections match as I sew them. You can do the same and will see all the dots, triangles, and markings on the pattern pieces to indicate these locations.

Many jacket designs come with separate pattern pieces for the upper collar and undercollar. They have corresponding match points to mark, as well.
Start stitching the collars and collar band
This pattern has a separate collar band attached to the upper collar.

1. Pin and stitch the upper collar and undercollar together, pivoting at the outer corner of the collar and starting/stopping at the markings.

Make sure to sew all seams as indicated on the pattern instructions, with a 5/8-inch-wide seam allowance in this case.
Very important: Be as consistent as possible with the seam allowance widths. This ensures that pattern pieces match accurately.

2. After joining the…
Start your 14-day FREE trial to access this story.
Start your FREE trial today and get instant access to this article plus access to all Threads Insider content.
Start Your Free TrialAlready an Insider? Log in


Log in or become a member to post a comment.
Sign up Log in