
Differential Feed
Take the mystery out of this serger function and let it work for you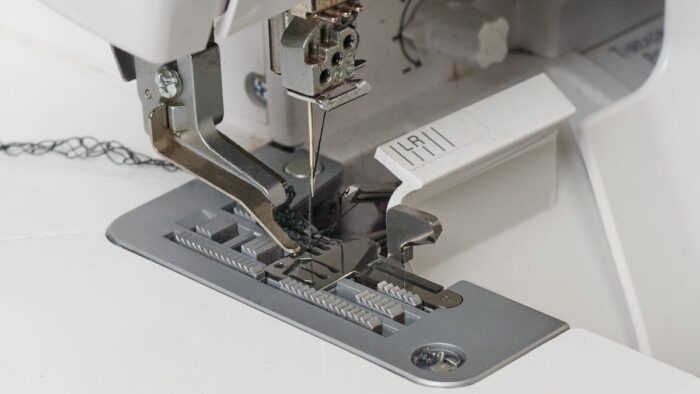
Differential feed (DF) is one of the most useful functions of a serger and probably its least understood. It isn’t available on any domestic sewing machine and it’s what makes the serger a knit fabric’s best friend. It helps control bias or unstable grainlines while stitching woven fabrics, too. Knowing how and when to adjust the differential feed setting can be the difference between professional results and a dud.
Many experienced, highly proficient sewists tell me they’ve never touched the differential feed setting on their sergers because they don’t understand how it works. And if you’re new to serging, you may still be getting to know your machine and its potential. There are so many ways to use differential feed in utility sewing and for decorative effects. Understanding how this marvel works will give you the skills to tackle any challenging fabric and build your knowledge bank of decorative serger techniques.
DF Defined
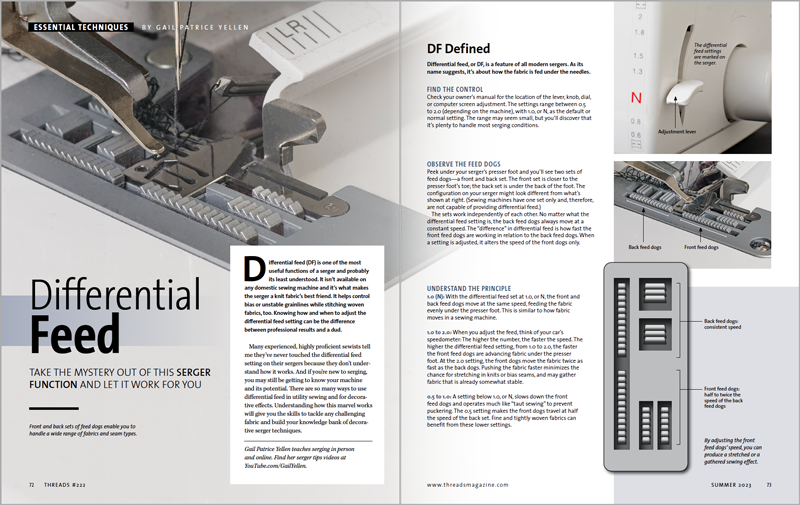
Differential feed, or DF, is a feature of all modern sergers. As its name suggests, it’s about how the fabric is fed under the needles.
Find the control
Check your owner’s manual for the location of the lever, knob, dial, or computer screen adjustment. The settings range between 0.5 to 2.0 (depending on the machine), with 1.0, or N, as the default or normal setting. The range may seem small, but you’ll discover that it’s plenty to handle most serging conditions.

Observe the feed dogs
Peek under your serger’s presser foot and you’ll see two sets of feed dogs—a front and back set. The front set is closer to the presser foot’s toe; the back set is under the back of the foot. The configuration on your serger might look different from what’s shown at right. (Sewing machines have one set only and, therefore, are not capable of providing differential feed.)
The sets work independently of each other. No matter what the differential feed setting is, the back feed dogs always move at a constant speed. The “difference” in differential feed is how fast the front feed dogs are working in relation to the back feed dogs. When a setting is adjusted, it alters the speed of the front dogs only.

Understand the principle
1.0 (N): With the differential feed set at 1.0, or N, the front and back feed dogs move at the same speed, feeding the fabric evenly under the presser foot. This is similar to how fabric moves in a sewing machine.
1.0 to 2.0: When you adjust the feed, think of your car’s speedometer: The higher the number, the faster the speed. The higher the differential feed setting, from 1.0 to 2.0, the faster the front feed dogs are advancing fabric under the presser foot. At the 2.0 setting, the front dogs move the fabric twice as fast as the back dogs. Pushing the fabric faster minimizes the chance for stretching in knits or bias seams, and may gather fabric that is already somewhat stable.
0.5 to 1.0: A setting below 1.0, or N, slows down the front feed dogs and operates much like “taut sewing” to prevent puckering. The 0.5 setting makes the front dogs travel at half the speed of the back set. Fine and tightly woven fabrics can benefit from these lower settings.

Set for Success
There isn’t a one-size-fits-all formula to determine correct differential feed settings. Each fabric has its own personality, but it won’t take long to know when to start your test with a setting of 1.0, or N, or initially jump to a higher or lower setting.
Prepare swatches
Cut sample swatches that are at least 10 inches long on one edge; a shorter length doesn’t give an accurate read on how the fabric will behave. Make swatches with the 10-inch edge on the straight and cross-grain, as it is essential to test serging in both directions. The samples should match the serging you plan for your project, so if you’ll only be finishing edges, a single layer is all you need. If you plan to serge seams, make a two-layered sample.
Test and adjust
The variety of knit fabrics continues to expand almost exponentially. Fiber content as well as the presence and/or percentage of spandex dictate the correct differential feed setting. Set the serger for the desired stitch type and make any tension adjustments needed for a balanced stitch. With the differential feed set at 1.0, or N, serge the edge. If the seam stretches or ripples, increase the setting, one click at a time, until the edge maintains its original length. If at the highest setting, 2.0, the edge has puckered to between 9-3⁄4 inches and 10 inches, simply cover the fabric with a press cloth and steam-press the edge.
If the seam or edge puckers, gradually reduce the differential feed setting until you achieve a smooth result. With some experience, you’ll learn how different textiles perform, and you’ll feel confident in setting the feed up or down for your first test pass.

 Gail Patrice Yellen teaches serging in person and online. Find her serger tips videos at YouTube.com/GailYellen.
For more photos and details, click on the “View PDF” button below.
View PDF


Log in or create an account to post a comment.
Sign up Log in