

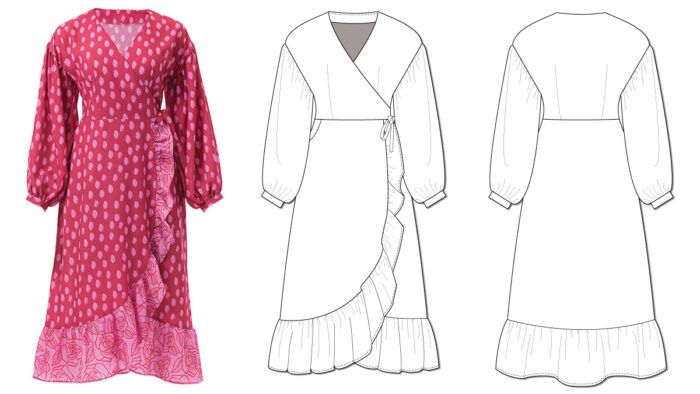
Trimmed with a Ruffle
Skill Level:
A project appropriate for anyone with basic sewing skills. The design is easy to sew, and there are good illustrations in the instructions.
Size Range and Fitting:
UK sizes 8 to 26 [US sizes 4 to 22] will fit busts 33 inches to 50-1/4 inches, waists 26-3/4 inches to 44 inches, and hips 36-1/4 inches to 52-1/2 inches.
Fabrics:
Lightweight fabrics such as viscose, twill, four-ply silk, crepe de Chine, georgette, and chiffon are ideal. This is an all-season, wear-everywhere style contingent on your fabric choice.
Style and Sewing Details:
This elegant midi-length dress is reminiscent of 1970s’ looks, yet updated with contemporary details. It is a wrap-style dress with a faced neckline, waistline seam, front and back bodice darts, and dropped shoulders. Make it sleeveless with narrow-hemmed armholes, or include the gathered long sleeves finished with narrow cuffs at the wrist. The skirt has angled side-seam pockets and curved front edges trimmed with a ruffle.

- The tapered ruffle is 3-1/4 inches wide at the waistline and gradually widens to 7-1/2 inches wide at the hem. The pattern piece is not a flounce; it’s a contoured ruffle cut in the shape of a J.
- The dress closes with waist ties; on the left (overlap) side, the ties are made from self-fabric. On the right (underlap) side, the ties are ribbon.
- Pay attention to the steps where the ties are added, such as step 16. The belt addition is not illustrated, but it is written in the instructions.
- Up to step 9, the illustrations show the garment’s left front. Step 10 moves on to constructing the back. For clarity, our tester thought it would be helpful if the instructions repeated steps 1 to 9 to complete the right front before moving on to the back.
- If you are new to sewing, our tester recommends first reading the directions carefully, as not every step is illustrated. Seek help, if needed, online or from friends who sew.
- The thorough instructions also share a useful glossary of basic sewing terms.
- Check the length of the bust darts against your measurements, as they are particularly long.
This review was originally published in Threads #223, Fall 2023. Have you made this pattern? If so, be sure to share pictures in our Readers Closet gallery.
Photos: Jack Deutsch. Illustrations: Kelly Keenan.


Log in or create an account to post a comment.
Sign up Log in