
My Favorite Trouser-Making Details, Part 4: Waistband Finishes

I am sure there are few people like me who find sewing the waistband their favorite part of trouser-making. It’s often the step I leave for last, and I just love how it pulls the whole garment together. Over the past three years while sewing many pairs of trousers, I experimented with different construction and finishing techniques for waistbands and waistline facings. In this article, I’ll walk you through a few of the techniques I like best and explain when I prefer to use which technique.
Two Categories of Waistband Finishes
Let’s split the waistband finishes I use into two groups, based on whether the bottom edge of the waistband’s inside/lining layer is secured to the trousers.
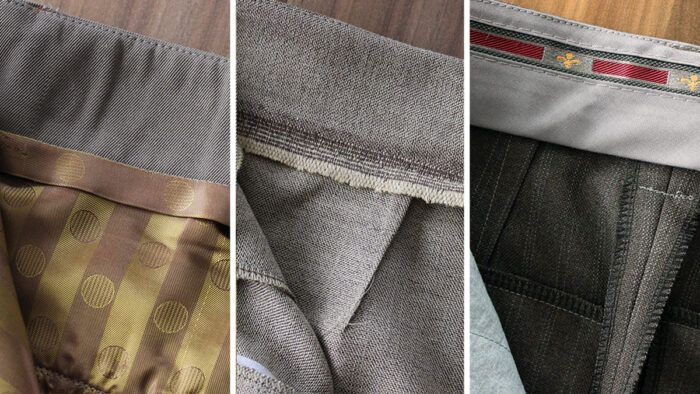
Group 1: Waistbands with free-hanging bottom edges
The first group features waistbands with free-hanging bottom edges, meaning the bottom edge of the waistband’s inside layer or the facing is not sewn shut. The waistband’s inside layer is often a little deeper than the outside layer so that it completely covers the seam allowances at the waistline. This technique is often used on the top facings of Hollywood waist trousers (trousers with a grown-on or cut-on waistband rather than a sewn-on, separate one) and in menswear.
When used on trousers with a sewn-on, separate waistband, this technique allows you to press open the seam between the trousers and the waistband’s outer layer. It results in a flat finish. The main drawback: Because the raw edges aren’t enclosed, they are prone to fraying. I like to finish the raw edges that are hidden behind the waistband with my overlocker as a little insurance, so that the fraying never gets out of hand.
The individual techniques I’ll cover from this group include bias-bound edges, selvage edges, and ready-made…
Start your 14-day FREE trial to access this story.
Start your FREE trial today and get instant access to this article plus access to all Threads Insider content.
Start Your Free TrialAlready an Insider? Log in


I am another who loves planning and making waistbands! They determine the comfort of a pant, for me, and I like that it is an unseen, unique detail. After putting the work into tailoring pants, a decorative and comfortable waistband puts the proper finish on them. For linen or any lightweight pants, Petersham is my go to. For heavier pants, I combine petersham with facing material. It results in a strong facing that curves with my body. I will try the unanchored facing too. Thank you!