
4 Steps to Sew Tiny Bias Tubes
Use this handy technique to sew small bias tubes for embellishment and garment structure.
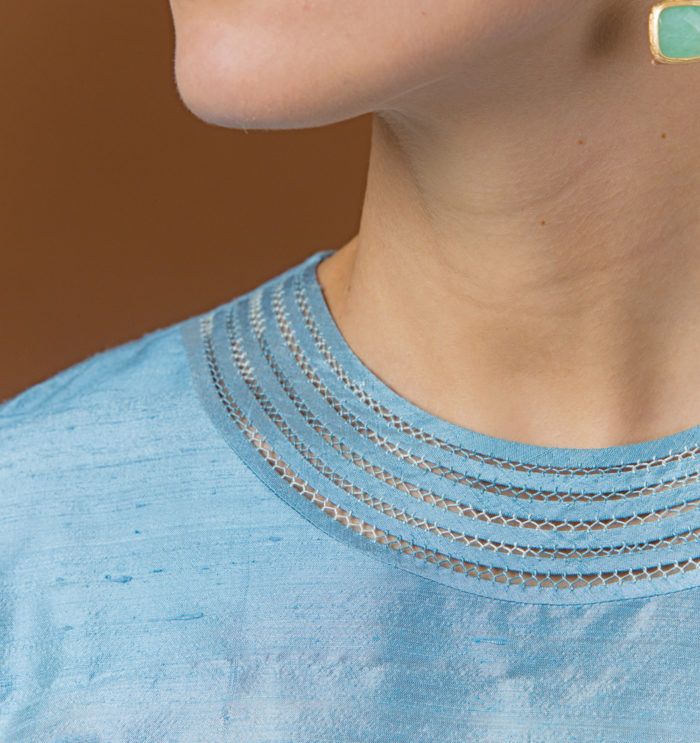
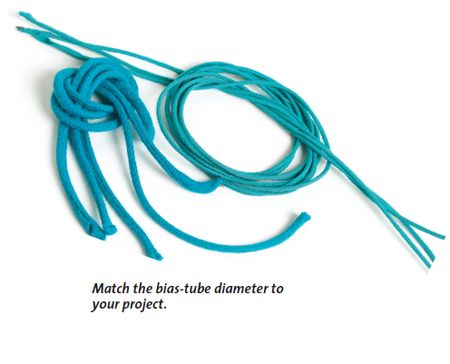
With this technique, you can create round bias tubes or flat bias tubes as pictured here. For more on the bias rouleau seen in this photo, pick up Threads #177 (March 2015). If you're a Threads Insider, click here to read the full story.
Use the steps below to create tiny round bias strips with this excerpt from “Embellishments: Fabric spirals adorn a belt,” Threads #124, by Anna Mazur.
Four Steps:
You’ll need at least two bias tubes to make spaghetti straps for a dress, and more to create decorative straps. It’s easier to achieve uniform results if you complete each step for all of the tubes before moving to the next step.

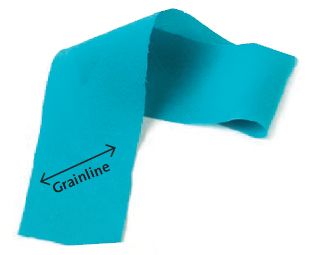
1. Cut fabric strips on the true bias. Bias strips stretch 10 percent to 30 percent. For most straps, cut strips that are 1 inch to 2 inches wide and 12 inches to 24 inches long. The seam allowance provides the filler for your turned tubes, or cord, so the size of the finished cord and the weight of your fabric play a role in how wide to cut your bias strips. Experiment with bias scraps to establish the perfect width.
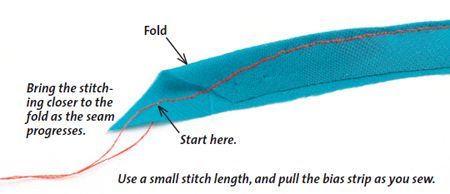
2. Fold a bias strip in half, right sides together. Using a 1-mm to 2-mm stitch length, start with your needle positioned two times the width of your finished tubes, or cord, from the folded edge. As you sew, taper immediately toward the fold into the intended cord width for the length of the strip. For ultrathin tubes, stitch 1⁄16 to 3⁄32 inch from the fold. Keep the strip taut by pulling both ends in opposite directions as you sew, intentionally stretching the strip.

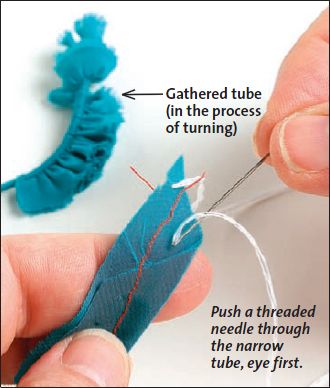
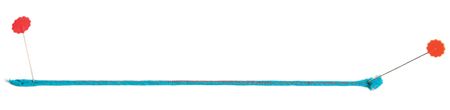
3. Turn the tube. Anchor a sturdy, doubled, knotted thread, which is cut longer than the tube, in the “funnel” end of your strip. Then push the eye end of the needle into and through the tube to turn it right side out and into a cord.


4. Stretch the tube. This is a method used by couture expert Claire Shaeffer. Wet the turned tube and stretch it to eliminate bumps and further reduce its diameter. Keep the cord taut, and position the seam straight along the top. Pin both tube ends to your ironing board, and let dry overnight.

To smooth and narrow bias tubes, spray them with water, then stretch and pin them until dry.
Will you try this technique for creating delicate bias tubes? If so, how do you plan to incorporate them into a sewing project?
For more on bias tubes, become a Threads Insider to read “Airy Rouleau,” Threads #177 (February/March 2015), in which Jane Conlon shares her techniques for embellishing garments with tiny bias tubes that are held together in curved designs by decorative stitching.


Question, will the tube shrink when washed again?
How does that huge, wide seam allowance fit into the tube? And, how do you estimate how wide it will be? Thanks
Providing the thread used to sew the seam is strong enough then a more fool-proof way is to begin with the top and bottom threads of the machine drawn out behind the needle as long as the bias strip. Then it is simple to thread one of these through the eye of the neeleaving you with a half turned piece of tube that is extremely difficult to re-claim.
dle and then knot to the other, making the knot slightly 'off' the actual 1/2 way of the two threads. Thus when you push the needle through the tube the thread is part of the stitching rather than a loop through the bias. There is nothing worse than having the tip of the beginning of the bias fraying away whilst being turned;
SuperiorLiz: Very good tip. Anything making construction easier and faster is blessed info. Thank you.
LenSew: Since the tube is cut on the bias, that wide seam allowance will easily work it ways through the tube, I promise. Seems almost impossible, but it does work. Width: Follow Jane Colon's instructions. After wetting the tube, pin one end to the ironing board and pull the bias piece until you get it to the width you desire, then pen that end. Also, give the wet tube a slight finger pressing to even out the tube and let it dry. Try a practice piece about 12" long from a scrap material, but the practice piece, of course, needs to be a big enough scrap to be cut on the bias.
user-3220369: Once the bias tube is dried and a slight pressing, then sewn into the project, and knowing what the actual fabric is, i.e., cotton, silk, rayon, etc., you should either hand wash and flat dry or cold wash on delicate cycle and lay flat to dry, in my opinion since the tubing in this article is used in a curving postion sewn to the project, especially in the way the bias tubes have been attached to each other.
This garment with the bias attached is absolutely beautiful and, in my case, I would use it for a blouse and adding long sleeves. At the bottom of the sleeves, I would add the same bias tube design. Having lost a lot of weight at an older age, to be blunt, my arms, even slightly below my elbows have some unsightly sagging. This gorgeous design with the bias tubes would allow my to wear my long sleeves, and yet, make it as spring like or summer wearing as any short or 3/4 sleeves. I am definetly going to use it as demonstrated and try to use the idea to change up a little for other much needed summer blouses. Thanks to Jane for sharing this beautiful treatment.
Hi. What stitching have you used to join the bias strips around the neck in the photo? it looks very pretty.
From my experience I'd say you better check your fabric to see how easily it frays before you try this technique. I've used similar methods to turn fabrics only to have that tiny point unravel halfway through the tube with no means to go after it from either end.
I was wondering the same thing as LrnSew asked. There seems to be way too much of a seam allowance to fit in that small space.
Oh my god, it is so amazing. Thank you, it's the best sewing guide ever.