
Create an Elegant Draped Cowl Neckline
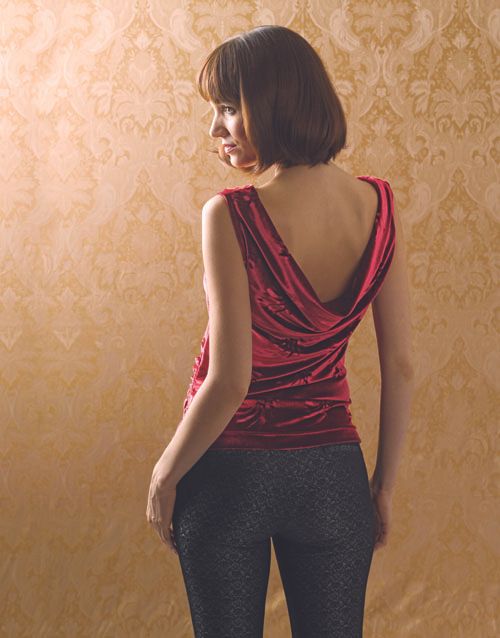
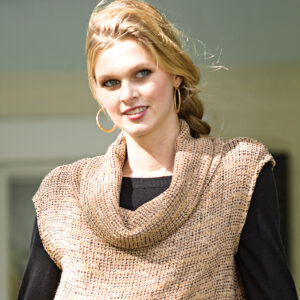
A deep cowl at the back neckline transforms a basic tank into a party-ready top.
A deep cowl at the back neckline transforms a basic tank into a party-ready top.
A draped neckline is always graceful, and it flatters many figures. You can transform any basic knit T-shirt or tank design for daytime looks or eveningwear by adding this lovely element.
All it takes to create a cowl neckline are a few pattern changes and some special-but simple-construction techniques. Add a cowl to the front or back neckline of a top, or to both for double the elegance.
In this quick to make project from Threads #170 (December 13/January 14), Londa Rohlfing shows you how to establish the cowl depth and make the pattern changes, and offer tips for sewing and finishing. For a single or double cowl-neck knit top, start with a crewneck T-shirt or a tank pattern that fits well.
Determine the cowl length and depth
First you must decide on the finished cowl’s depth, which determines how low the neckline falls and how much the cowl drapes. Front and back cowls can be made using the method described on the following pages.
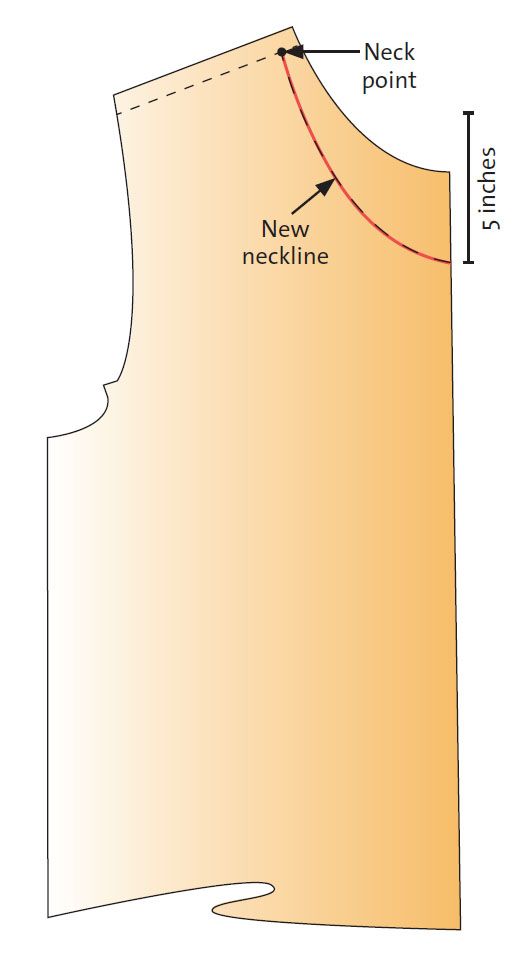
1 Trace any pattern for a basic knit top, such as a T-shirt. Mark the pattern’s original neck point at the shoulder seam (at the base of your neck where it joins the top of the shoulder) with a large dot.
2 Lower the pattern’s neckline, if it is a high-jewel or crewneck. The neckline shown was lowered at center front to sit 5 inches below the collarbones, and the curve was redrawn. Cut away the original neckline.
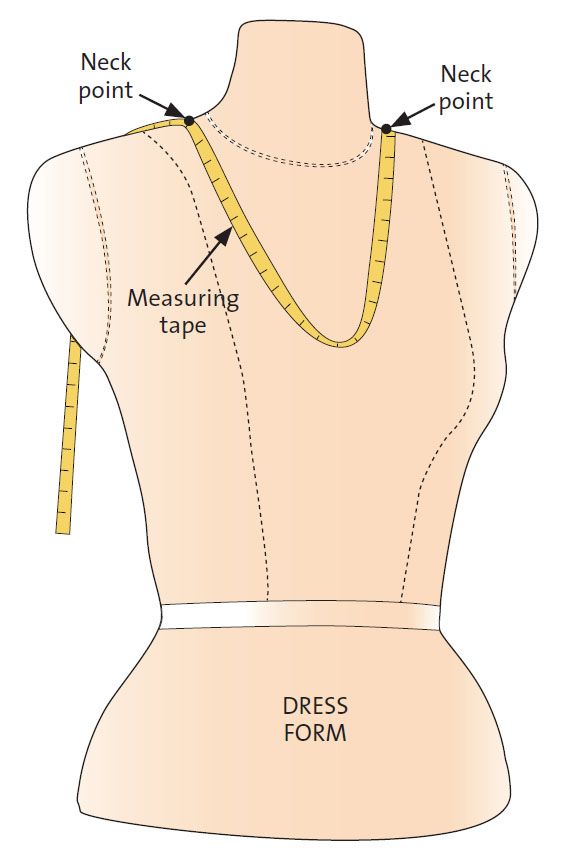
 3 On your body, drape a measuring tape with each end positioned at your neck points. Loosen or tighten the tape measure’s drape to determine your preferred cowl depth. Note the measurement from neck point to neck point, and divide it in half. This is the amount of change applied to the pattern in the next steps. For example, if the total desired measurement is 20 inches, then the amount of change to the pattern is 10 inches. The front cowls of the red velvet top, at left, and the blue top, on page 24, are each 20 inches long; the red top’s back cowl is 24 inches long. Check out this Teach Yourself to Sew article for more pointers on obtaining accurate measurements.
Alter the Pattern
Using the slash-and-spread method, extend the pattern’s neckline and add drape for a cowl.
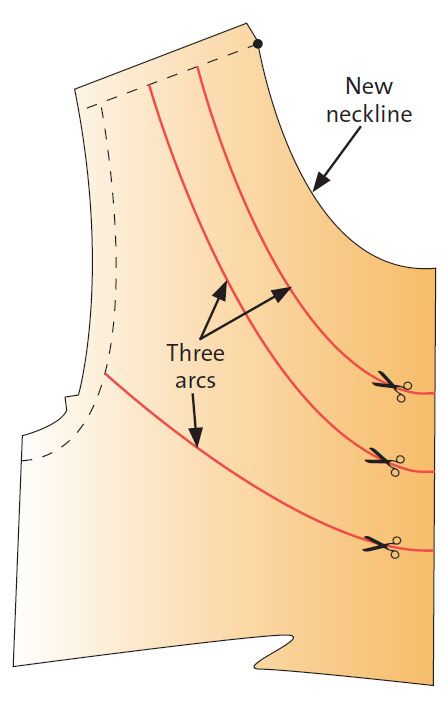
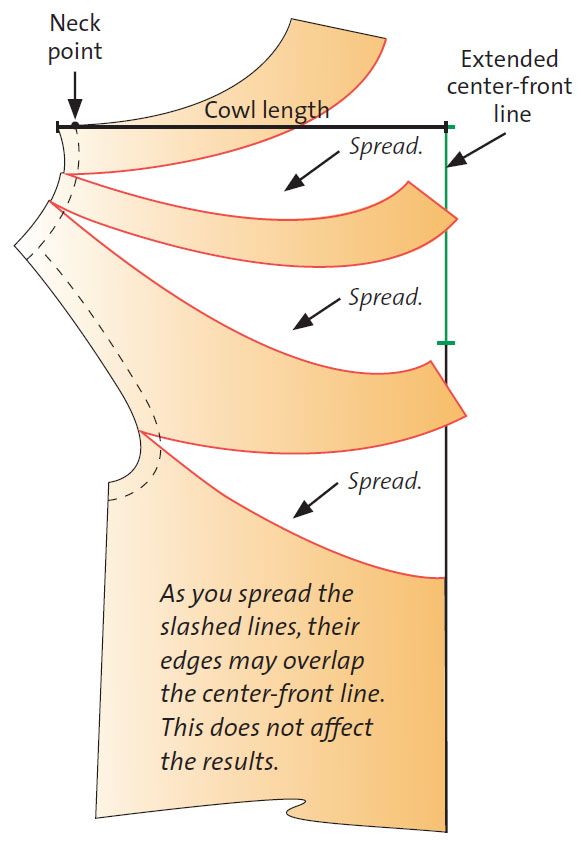
1 From the pattern’s center front, draw three arcs. End the two uppermost arcs at the shoulder seam and the lower arc about two thirds down the armscye. The exact position isn’t critical, but each arc must intersect the center-front line at a 90-degree angle.

Threads Insider:
View this knit top in 360-degrees
2 Cut along all three arcs from center front to, but not through, the seamlines. Also, snip from the cutting line to the seamline, leaving a hinge at the seamline. Back the pattern with a large sheet of tissue or pattern paper.
3 Draw a vertical line from the centerfront neckline edge upward and about 8 inches long. Anchor the pattern’s bottom center-front corner to the tissue with a pin or piece of transparent tape.
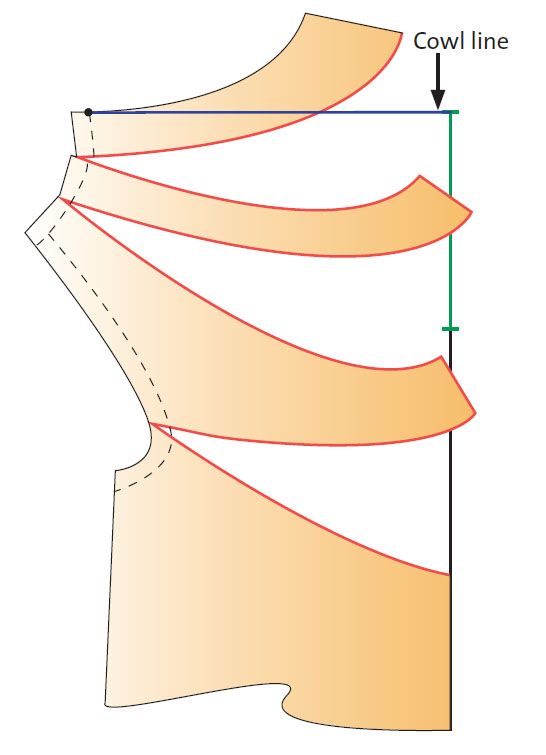
4 Spread the pattern along the three slash lines. Spread the sections equally, swinging the neck point away from center front, until the distance between the neck point and the extended center-front line equals the cowl length established in step 3. (For more voluminous, longer cowls, swing the entire pattern away from center front as you spread the slashed lines.) Tape the spread pattern to the backing tissue.

TIP: ADD A COWL WEIGHT. Keep cowls hanging gracefully and prevent them from flipping inside out by sewing a fabric pocket for a drapery weight and attaching it to the cowl facing’s center on the garment’s interior.
5 Draw a straight line from the pattern’s neck point to the center-front line. It should create a 90-degree angle at center front. Mark it “Cowl line.”
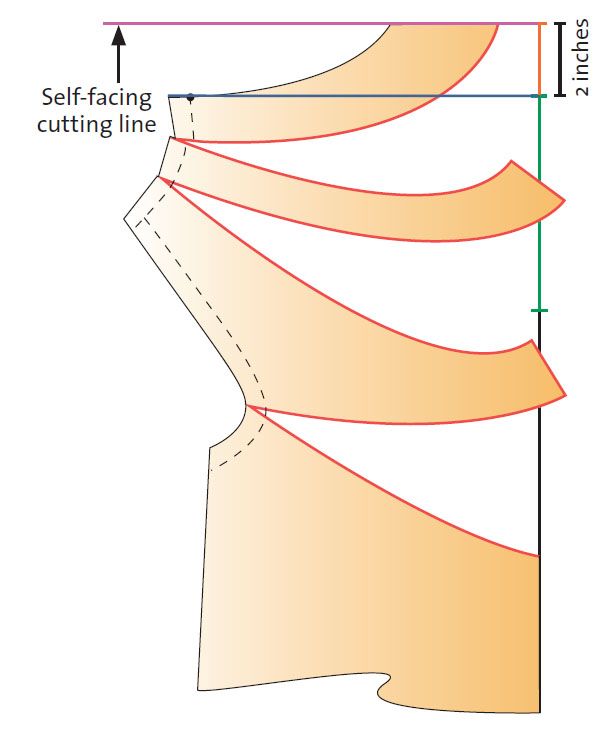
6 Create a self-facing. Measure 2 inches above the cowl line at center front. Draw a line parallel to the cowl line, extending it beyond the shoulder point.


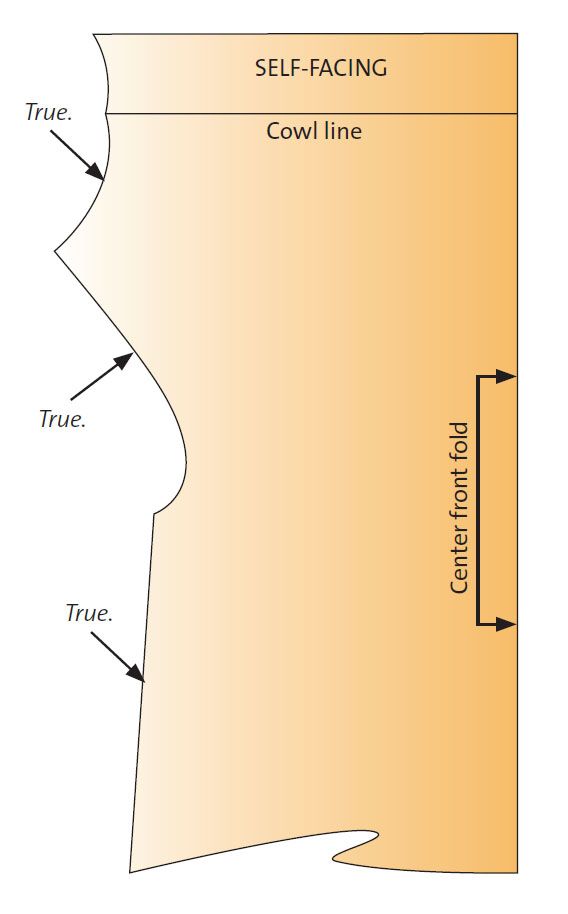
7 Cut along the facing’s edge. Fold the pattern along the cowl line, and transfer the shoulder shape onto the cowl facing section. True the shoulder line and armscye curves, as well as the centerfront line and the side seam. If necessary, true the hem by drawing a gently curved horizontal line from the side seam to center front, creating 90-degree angles at the side seam and center front. CONSTRUCTION TIPS
Sewing a cowl top is straightforward, but here are some tips for handling the cowl and its facing:
- When cutting the fabric, make sure to clearly mark the cowl line on the fabric’s wrong side.
- For a single-cowl top (a frontcowl, for example): Finish the back neckline as desired (facing, binding, or turned edge). Align the front and back shoulder seams, right sides together, fold the self-facing along the cowl line, wrapping it over the back neckline so that the facing’s right side is against the garment back’s wrong side. Pin and sew the shoulder seam, catching the facing in the shoulder seam allowances. When finished, turn the facing over the seam allowances to its finished position, enclosing the shoulder seam allowances.
- For a double-cowl top, sew the front and back together at the shoulder seams, matching the front self-facing to the back selffacing. Fold the self-facings in along the cowl line, wrong sides together, covering the shoulder seams. Either tack the edges to the seam allowances or stitch in the ditch of the shoulder seam from the right side, catching the facing.
- Add lingerie guards to the interior shoulder seams of a double-cowl top to prevent it from slipping off your shoulders.
Do you plan on adding a cowl neckline to any of your garments? If you have any tips, leave them in the comments section below!


Wow! Just when I needed this tutorial for a wedding dress I was making!,
Hi,
great, thank you. But I don´t understand.. when I see the 360degree photo, it is a cowl on the front, too.
Where can I see the Tutorial for the front?
Thank you.
The instructions actually show how to create the front cowl; the back cowl is made the same way, only with a deeper cowl.
Carol J. Fresia, Threads Senior Technical Editor
After looking at the 360 deg. view of this top, I am disappointed. The back drapes beautifully. The front does not and there is an annoying horizontal 'drag' or 'pull' line at the bust level.
Cowl necklines are much more beautiful cut on the bias.
REALLY Really fabulous fabulous
Where does one view the 360 view? And I think the drape on this cowl is fabulous. Thank you so very much!
Hi: Thanks very much. I think these instructions are great. I intend to try this. This kind of neckline falls beautifully if you use a lightweight, fairly thin knit fabric.
H.
Why not cut the resulting pattern on the bias? It would probably hang more beautifully. If you did, can I assume you must cut both front and back on the bias even if the back did not have the cowl neckline.
Also where would you put lingere guards? It seems they would be visible from shoulder seams across the front (or back) to prevent slipping off the shoulder.
This top is made in a fluid knit, so cutting the pattern on the bias is unnecessary.
The lingerie guards are simply short thread chains, attached by snaps, placed along the shoulder seams on the wrong side. These shouldn't show during wear if properly installed.
Carol J. Fresia, Threads Senior Technical Editor
I have vogue pattern V1218 and rather than have the neckline featured, I want to add a cowl to it. This is my first dress I have made and have never sewed a cowl... Any suggestions on best way to approach this?
Thanks
Great tutorial! I'm running a Design Your Own Dress course soon and wanted to see if could find a simple way of explaining how to do a cowl.
Much appreciated.
Kat, Sew In Brighton sewing school
http://www.sewinbrighton.co.uk
Hi, I think I've done everything correctly, but I'm struggling with step 7. I don't understand what I need to do to true the seams. Can anyone help please.
Hi, Karen74. In step 7, the illustration is showing the "after" view--after the pattern has been trued, and I think this is where your confusion lies. If you follow the instructions through step 6, you'll have a pattern that's got jagged edges where the cut-and-spread sections extend beyond the center front line, and the shoulder and armscye seams won't have smooth curves, either. All you need to do is use a ruler (straight or curved, depending on the line you're drawing), and redraw those edges to make them either straight (for the center front), or smoothly curved (for the shoulder and armscye). After this, your pattern should look pretty much like the one shown in step 7.
Be sure to fold down the cowl facing on the fold line before doing this, so the facing shape matches the cowl portion exactly.
I hope this helps! We'd love to see your top when it's completed--I encourage you to post a photo in our gallery.
Carol Fresia
I am trying to create low cowl for the back of a wedding gown for my daughter. the pattern is pretty much backless, so the back bodice is very narrow. She wants the cowl to sit at the back waist (about 18" from her neck bone. I'm not quite sure how much of an arc I need. Any pointers would be appreciated.
Nice & beautifully made. I’m so impressed with the back neckline pattern!!
I have the opposite probelm...I am trying to redesign a cowl neck dress. It's a great black dress, I can wear from work to dinner, but it's got a cowl neck that does not fit under a jacket for the work part. Any suggestions? Should I take out the extra arcs and dart it? (It may be okay--and fairly hidden, or I can make seams a design element.)
I'm confused as to why the shoulder seam is trued up with a curved line when the original is straight. Is there a specific reason for this? Thanks so much, this is a very helpful tutorial.
Hi, Kim,
The front shoulder seam becomes a curve during the spreading of the upper center front. If you true it by drawing a straight line from one end to the other, that seamline will be shortened and will no longer match the back shoulder seam.
Carol Fresia, Threads Senior Technical Editor
Ah, thank you, that makes sense!
In this case, you need to true any seamline that has been changed by the pattern adjustments. For curved seamlines, either use a curved ruler as a guide to redraw the lines, or draw freehand. The goal is to create a smooth line that more or less follows the slightly angular or jagged line that results from cutting and spreading the pattern.
Carol J. Fresia, Threads Senior Technical Editor