
The term pattern grading may conjure visions of complicated measurements and fancy rulers, but once the concept is understood, the process of grading is easy, especially using this method. You—the home sewer, custom dressmaker, or independent designer—can do just as good a job as Vogue, BurdaStyle, Calvin Klein, or Donna Karan.
Pattern grading 101
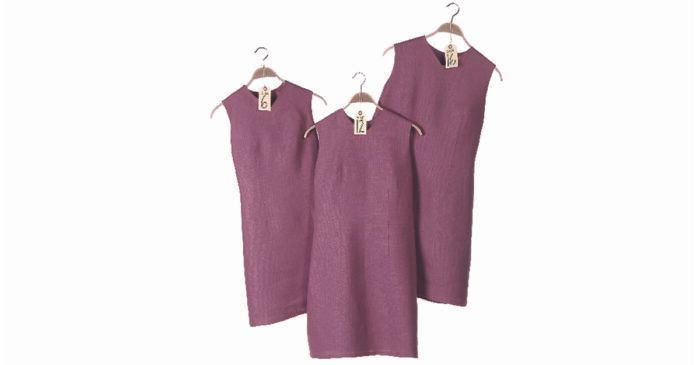
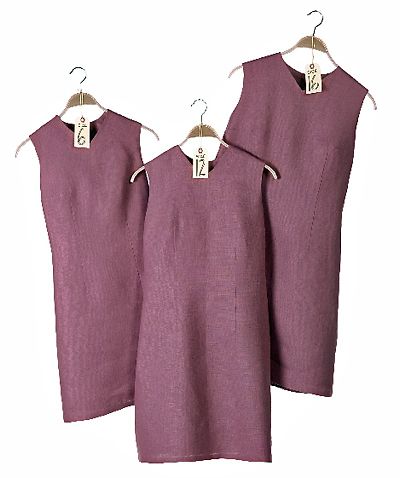
Why grade? The purpose of grading is to proportionally increase or decrease the size of a pattern, while maintaining shape, fit, balance, and scale of style details (dresses shown are an original design).
I’ll explain the thought process behind grading and touch upon the three different methods used in the industry today. Then I’ll take you step-by-step through a simple cut-and-spread grading method and provide the measurements and formulas you’ll need to get started. Whether you want to take a beloved pattern up (or down) a size or two or you want to create a small line of clothing, pattern grading is an important tool. Once you understand it, you’ll be able to take your sewing to the next level.

The basic concept
Historically, the science of grading went hand-in-hand with the advent of commercial patterns and the mass-production of pattern-built clothing some 150 years ago. To properly fit a pattern to a range of sizes, each pattern piece needed to be graded, or systematically increased or decreased. Today, pattern companies and apparel manufacturers take a middle-sized pattern (typically a size 12) and grade it up for larger sizes and grade it down for smaller sizes (see One pattern, three sizes).
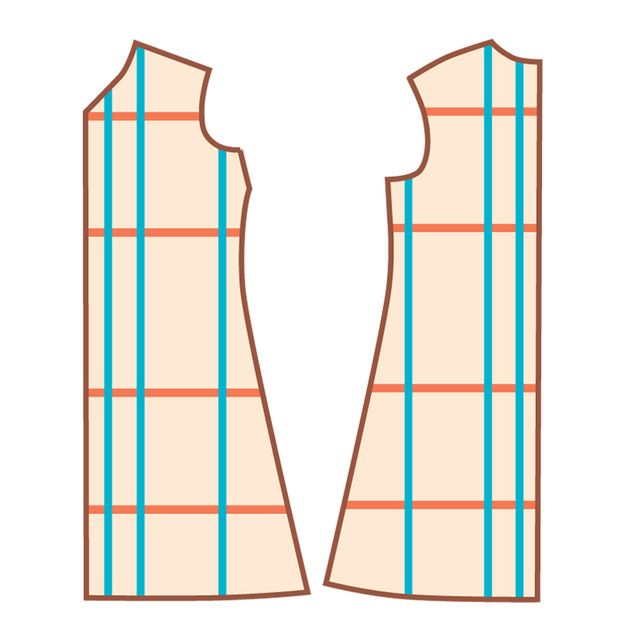
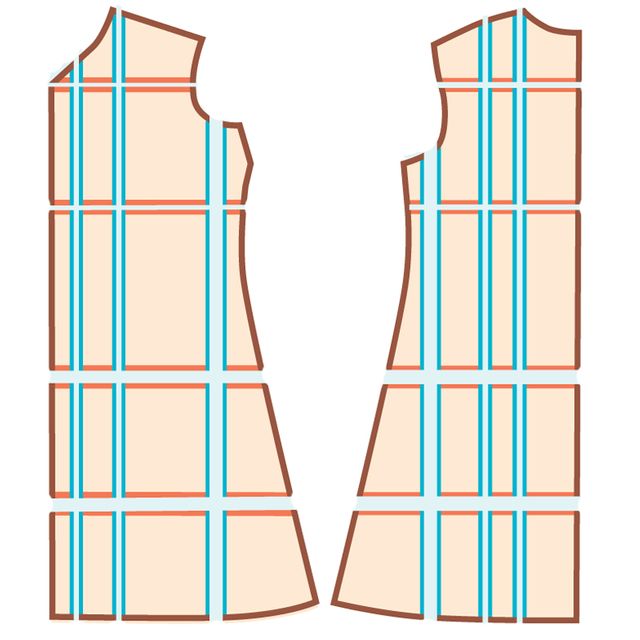
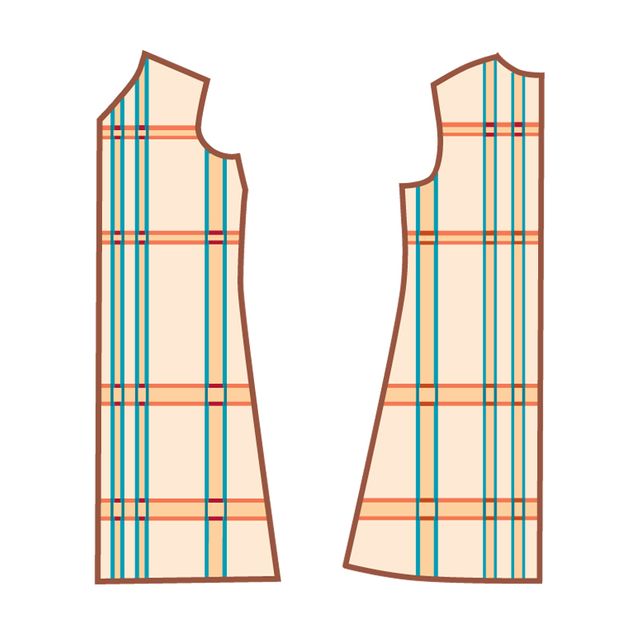
One pattern, three sizes
|
|
|
|


A base size 12 pattern (left illustration) can be graded up to a size 16 (center) using the cut-and-spread method, and similarly graded down to a size 6 (right) by cutting and overlapping along specified cut lines.
Methods of grading
There are three basic methods of grading: cut and spread, pattern shifting, and computer grading. No one method is technically superior and all are equally capable of producing a correct grade.

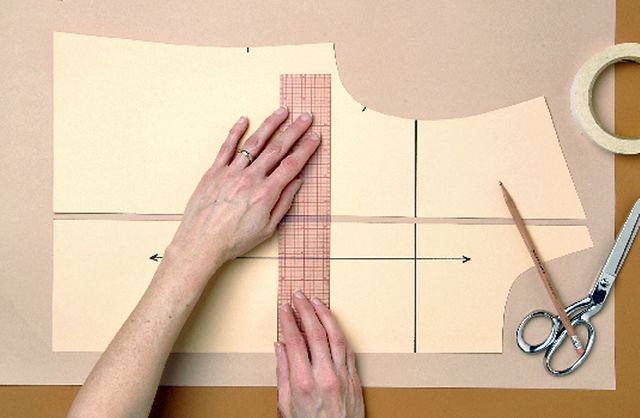
Cut-and-spread: The easiest method, which is the basis of the other two methods, is to cut the pattern and spread the pieces by a specific amount to grade up, or overlap them to grade down. No special training or tools are required—just scissors, a pencil, tape, and a ruler that breaks 1 inch down to 1/64.

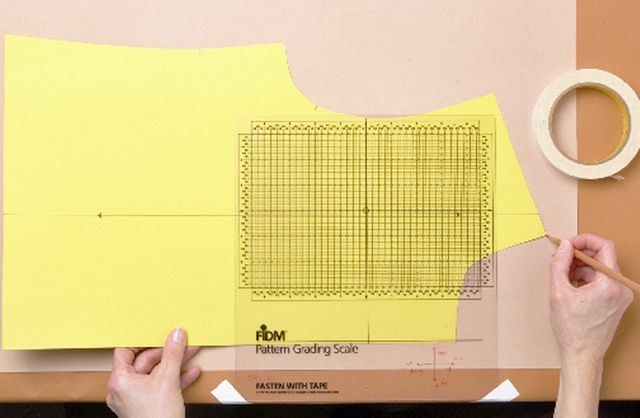
Pattern shifting: Pattern shifting is the process of increasing the overall dimensions of a pattern by moving it a measured distance up and down and left and right, (using a specially designed ruler) and redrawing the outline, to produce the same results as the cut-and-spread method.
Computer grading: The most recent development is the fastest method, but it tends to be an investment only larger manufacturers can afford. However, sophisticated home computer software is becoming affordable.
Grading vs. alteration: What’s the difference?
Grading is used to increase or decrease a size, based on an average difference between sizes. Alteration is used to make a particular size conform to an individual’s figure.
It’s important to remember that grading only makes a shape larger or smaller and isn’t intended to change a shape. Grading also reflects the fact that individuals of different sizes are proportionately different, not uniformly different. When we grade up or down, we don’t merely make everything equally larger or smaller. Instead, we take into account that different body parts increase at different and proportional amounts.
Pattern vs. body measurements
The first step in any grading exercise is to accurately measure your base pattern. Sometimes you can find the key measurements you need (bust, waist, and hip) on the pattern envelope. Or you can measure the pattern itself.
To determine the actual measurements of the sewn garment rather than the size of the paper pattern, keep two things in mind when measuring a pattern. First, account for all design details. If a garment has a bust dart that extends to the waist, then omit the dart area when you measure the waist; similarly, omit the volume given to pleats and gathers. Second, measure the pattern from seamline to seamline, not cutting line to cutting line.
Once you’ve gleaned the key measurements from the pattern, you can address the difference between the pattern measurements and body measurements. To establish your body’s bust, waist, and hip measurements, you can measure yourself or refer to the Quick reference for cut-and-spread pattern grading. To measure yourself, wear undergarments that fit well, and hold a measuring tape snugly (but not tightly) around your waist, the fullest part of your bust, and at hip level (9 inches below the waist). Before you record your measurements, be sure to add the amount of ease the pattern includes (or the ease you’d prefer for that style of garment).
Establish the grade
Once you have the bust, waist, and hip measurements from the pattern and your body, you can address the basic grading dilemma: “How much do I grade up if the pattern is too small? Or, if it’s too big, then how much do I grade down?” To establish the overall grade, or the total amount needed to make the pattern larger or smaller, simply calculate the difference between the pattern and the body measurements. There are two types of overall grades: an even grade and an uneven grade.
An even grade means that the bust, waist, and hip measurements change the same amount from one size to another. For example, if a pattern measures 35-27-37 and the body measures 37-29-39, then the difference between each measurement is 2 inches, and the overall grade is an even 2 inches. Sizes of commercial patterns and apparel always follow an even grade.
If the differences between these measurements aren’t equal, then it’s an uneven grade. This changes the shape of a garment, as well as its size, so strictly speaking, uneven grading isn’t really grading. “Uneven grade” is synonymous with “pattern alteration.” An even grade is the type of grade I will discuss because it’s straightforward and easy to understand. Once you master the even grade, applying the methods to the uneven grade is the next step. See “Four ways to address an uneven grade” below for more information.
Grade the pattern using the cut-and-spread method
After you’ve determined that you have an even grade, the mechanics of cut-and-spread grading are easy. You will use your measurements to do some easy calculations, create the cut lines on your pattern, then spread/overlap at each cut line the calculated amount. I’ve provided step-by-step instructions for this process, and listed the necessary formulas in the grading chart, as well as precalculated values (no math needed) for three different overall grades (1 inch, 1-1/2 inches, and 2 inches).
The cut-and-spread method can even be used when grading large amounts up or down, for example a size 4 to a size 18. The large gaps at the cut lines tend to be awkward, so I recommend grading incrementally instead (first grade the size 4 to a size 12 and then the size 12 to a size 18).
Insider tip (industry secrets and know-how)
There are no standard sizes in the garment or pattern industry. Each manufacturer sets its own base pattern measurements and grading conventions based on a specific customer base.
Size-to-size grades for patterns or garments usually differ within a company’s product line. Smaller grades, 3/4 or 1 inch, are associated with smaller numerical pattern or garment sizes. That is, a size 4 may only be graded down 3/4 inch to produce a size 2. Intermediate grades, 1-1/2 inches or 2 inches, are typical of middle numerical sizes. Larger grades, 3 inches or more, separate larger sizes. This is why one company’s size 8 can be different from another’s (i.e., different base pattern measures) and why the difference between a size 8 and 10 vary from one company to the next (i.e., different grading rules).
Four ways to address an uneven grade
When you have an even grade, the process of grading is straightforward. Home sewers and dressmakers often, however, encounter uneven grades, when, for example, a dress needs to be graded up 2 inches at the bust, but 4 inches at the hip. If the grade is uneven, there are four ways to use grading to alter the pattern:
1. If the grade is uneven and you’re sizing up, then you can use an even grade equal to the value of the largest measurement difference. If you’re sizing down, then use an even grade equal to the value of the smallest difference. This will get the pattern close to the general size you need, then you can make minor adjustments as needed.
2. My favorite method allows for a more exact fit and is the best way to address fit problems for pear- or triangle-shaped women. Just separate the pattern at the waist, and grade the top and bottom individually. Then rejoin the pattern, and blend the new lines at the waistline.
3. You can address an uneven grade based solely on the difference between the bust measurement of the pattern and the body. Because the bust is the hardest part of the body to fit, many patternmakers evenly grade the pattern to fit the bust, then alter as necessary at the waist and hip.
4. This method is specific to a common grading challenge that occurs when a body has changed in width or height, but not both. With a client who’s gained weight, for example, just grade for circumference and forget about grading for length. Or for a teenage daughter who’s grown 6 in. taller but hasn’t filled out otherwise, ignore circumference and only grade for length.
Take it to the next level
When you first try grading, start with a basic bodice front and back, skirt front and back, and sleeve, then graduate to more complicated designs. Remember that any pattern, no matter how “designed,” is based on one or more of the five basic pieces. Even a strapless top began life as a basic bodice, so place the strapless bodice pattern over the basic bodice pattern and transfer the cut lines. A dress is simply a bodice joined to a skirt, so the cut lines and spread/overlap amounts remain the same. Just match up the vertical lines on the bodice with those on the skirt.
Grading can be as complicated or as simple as you want it to be. So when you first approach any pattern, always start with these basics. Figure out your needs as a sewer, dressmaker, or designer; then map out your course, and grade, one step at a time.
This article was excerpted from Threads #101, June/July 2002, pp. 66-70. It was written by Terry Horlamus, founding director of Seattle’s New York Fashion Academy. She teaches grading, pattern design, illustration, sewing, and construction.
Photos: Scott Phillips; illustrations: Linda Boston


interesting, i'm boolmarking to read it well when i have time :)
Thanks I am making bridemaids dresses in sereral sizes. great help!!!!
Please,Please,Please do a youtube video of this, I have read it but want to see it done!It would be so helpful to hear and watch the process for me. Thanks!!!!!
This has helped me out alot
plz give more information abt grading...i want know abt nested grading
seems to me everything is clear! I read in one custom essay about this technique and it is the same!
Wouldn't mind getting a hold of one of those FiDM Pattern Making Scales she has.
I just would like to get one of those FiDM Pattern Grading Scale rulers in the second photo.
Good information!
I am a professional patternmaker. I have been creating designs and patterns for a variety of items for women, men, and children since 1990. I just created a discussion list on LinkedIn for Patternmakers and Graders. I hope all of you join! http://www.linkedin.com/groups/Patternmakers-Graders-4355152?gid=4355152&trk=hb_side_g
Does this method work for grading on jersey blocks or is it just for woven/non stretch garments?
Grading for knits can be a bit different, as there may be less ease, negative ease, or different amounts of ease based on the percentage of stretch in the recommended fabrics. You can certainly grade up or down a size or two, following this method, and see how it works for you, but changing a pattern by several sizes may work less well.
Bear in mind that this method only changes the pattern's basic size. You'll still need to do some fitting for your individual figure.
Carol Fresia, Threads Senior Technical Editor
Clever and interesting technique.
I always struggled with the paternmaking. Thanks for this article!
Nice info , however what about us who are a large plus size . There are many of us who are a size 30/32 . Help
Bookmarked! Thanks.
There are a lot of patterns in the Internet, but I guess it's never too late to make some unique ones for yourself.
Smart and interesting technique
Inspiring and clever. Thank you.
Thanks really interesting.
I really like it.
fascinating
wow very nice thanx for share
this is very nice and thanks for share
It's Awsome!
It's Wonderful!
Good One!
No connection at all to this company, but for people who are a large size that isn't covered by Big 4 or Indie pattern makers , I have found the Sure Fit pattern making system very good so far. I made up a pair of basic pants and they fit me perfectly the first time. Taking your measurements very accurately is important-my husband did a good job! Once you have your basic pattern (pants,shirt,dress etc) the owner has made many videos/instruction blogs on how to alter to suit a commercial pattern.Customer help seems to be outstanding, from what I have read. Hope this is helpful.
like it