


Learn how to choose the correct pattern size for a well-fitting garment.
The first step to making a garment that fits well is to choose the correct pattern size. This may seem obvious, but it’s surprising how many sewers start with the wrong size, then end up making a lot of adjustments to get a good fit.
Measurements are key
When choosing a pattern size, you need to know some basic body measurements (see Personal measurement chart). I’ll tell you how to use these measurements in a moment, but first let me explain why you can’t simply rely on your ready-to-wear size when it comes to choosing patterns.
![]()
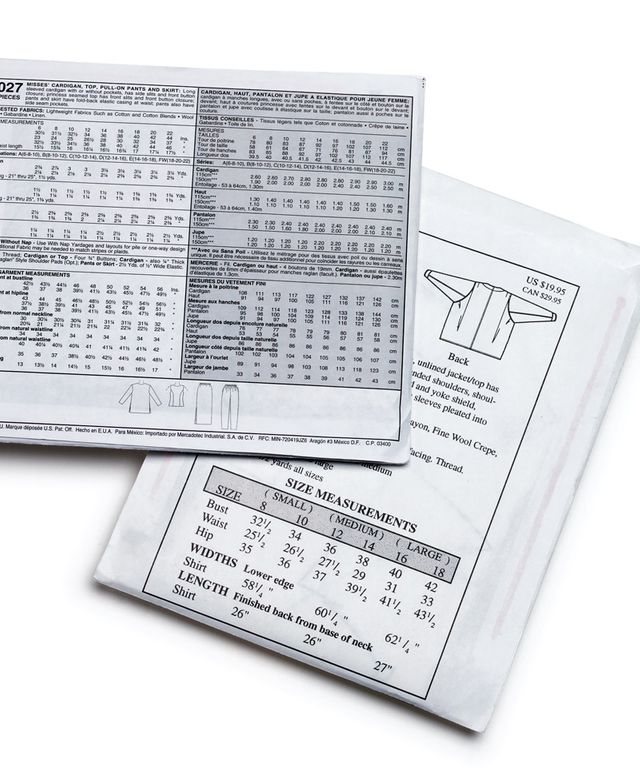
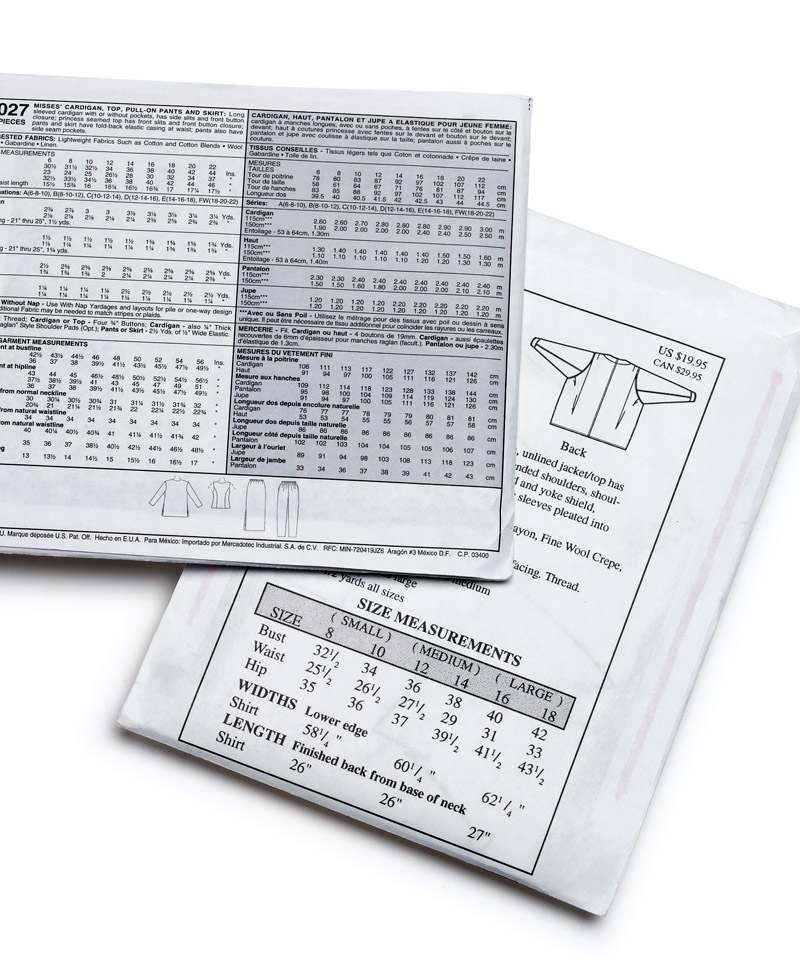 Compare your measurements to those on the back of the pattern envelope. Each pattern company bases sizing on a standard set of body measurements.
 ![]()
As I’m sure you’re aware, sizing in the ready-to-wear industry is not consistent and most of us fit into a wide range of sizes, depending on the designer or manufacturer. Designers frequently use what’s called vanity sizing, which adds inches to each size. What might have been a size 16 a few years ago, for example, is labeled a size 10 or 12 today.
Among the major pattern companies (see Pattern companies online), however, sizing is based on a standard set of body measurements, which are provided on each pattern envelope and at the back of the pattern catalogs. Once you’ve determined your pattern size by comparing your measurements with these standards, you can purchase that size for any of the company’s patterns. But because very few figures will match a pattern company’s standard measurements exactly, below are some guidelines for choosing a pattern size.
Comparing measurements
First if you’re unsure of which size category your body type fits into, such as misses’, women’s, or petite, check your height and back-waist length measurements (see the Personal measurement chart below), and compare them to the measurement charts provided on the back of each pattern catalog. Then take your full-bust, high-bust, waist, and hip measurements, and compare them with the standard measurements within that figure category.
When you choose a blouse, dress, or jacket pattern, compare your high-bust measurement with the standard bust measurement on the chart to get the best fit in the shoulder area. It’s important to fit the shoulder area first, because this area is harder to alter on a pattern than the bust cup, waist, and hip.
When choosing pants and skirt patterns, compare the waist and hip measurements: Your choice will be determined by your hip measurement. If the skirt is full, use your waist measurement to select a pattern size.
If your measurements fall between two sizes, consider your bone structure. If you’re small-boned, buy the smaller size; conversely, if you’re large-boned, buy the larger.
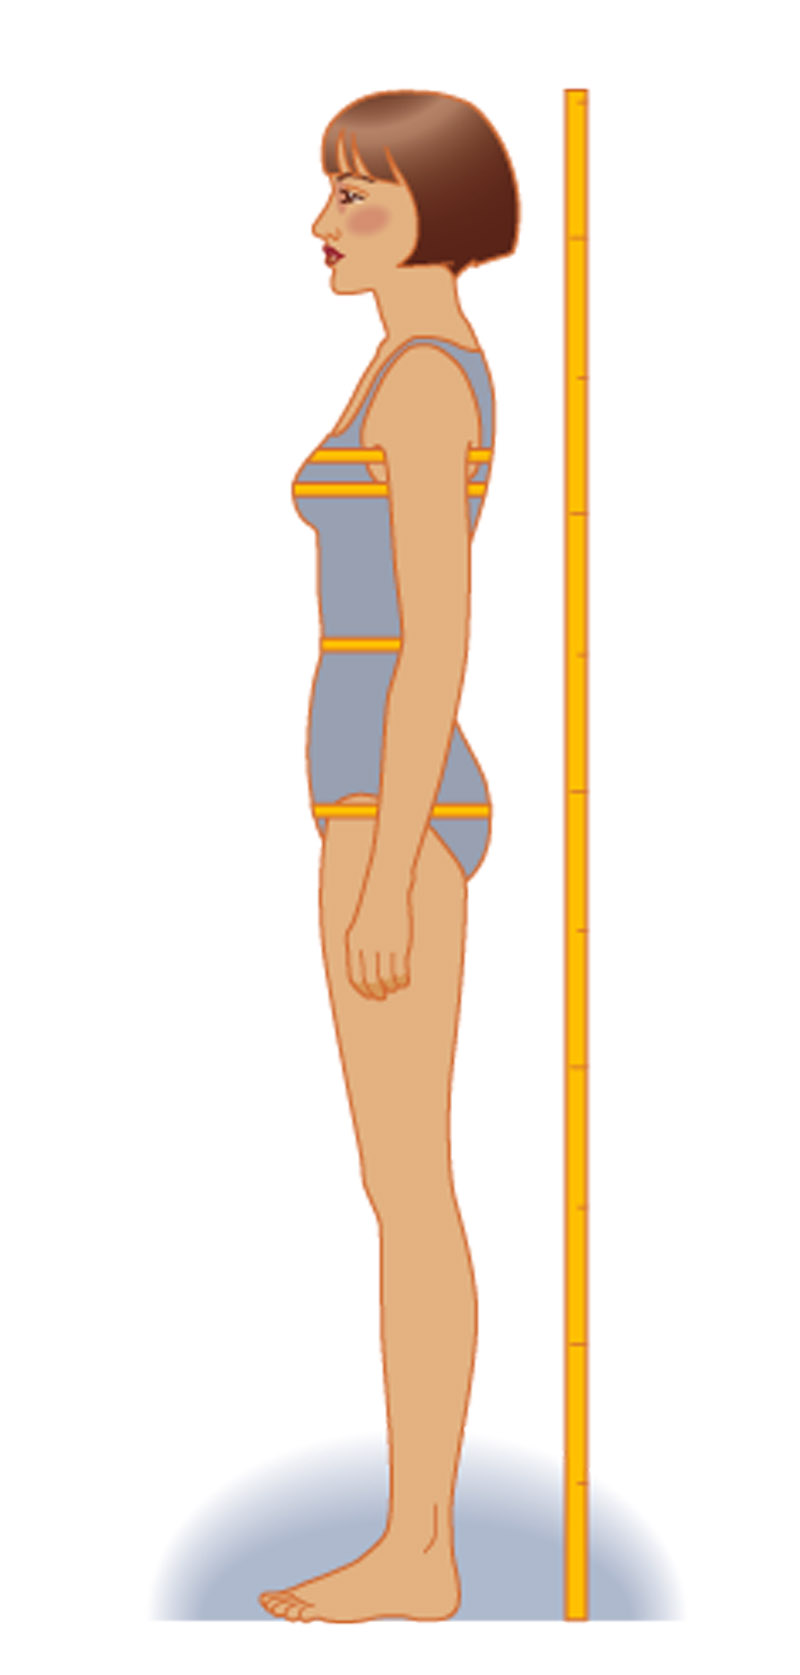
Take and record your basic body measurements wearing well-fitting undergarments. Tie 1/4-in. elastic around your waist to find exact placement. Hold the tape measure snugly, but not tightly.
1. Height: Without shoes, standing against a wall
2. Back-waist length: From prominent bone at base of neck to natural waistline
3. High bust: High up under arms across chest and back
4. Full bust: Straight across back and around fullest part of bust
5. Waist: Around body at natural waistline
6. Hips: Around body at fullest part of hips
![]()
Consider garment ease
Pattern companies online Butterick
www.butterick.com
McCall’s
www.mccall.com
Simplicity
www.simplicity.com
Vogue
www.voguepatterns.com
Kwik Sew
www.kwiksew.com
Style Patterns
www.simplicity.com
New Look
www.simplicity.com
Stretch and Sew
www.stretch-and-sew.com
To fit comfortably, a garment must have ease built into it: Wearing ease is the minimum amount of inches added to a pattern so that you can move in the garment, and design ease is the amount the designer added or subtracted to create a particular silhouette. Ease allowances, found at the back of the pattern catalogs, may vary slightly from company to company and in some cases the ease allowed may affect the size pattern you choose. For example, if a style is loose-fitting with a large amount of ease and you prefer a closer fit, you might decide to choose a smaller size.
So get out a tape measure to find your correct size. In most cases, your pattern size will probably be larger than your ready-to-wear size, but when you start with the right number, fitting is so much easier.
Susan Andriks sews and teaches in Canterbury, New Hampshire.
Photos: Sloan Howard; drawings: Karen Meyer
by Susan Andriks
from Threads #86, pp. 14, 16


A question if I may. The sizing of patterns is really getting to me! According to my measurements I would wear a size 12. I am 5'2", apparently that's called petite. Now, I generally wear a size 2, so it's odd that the pattern would put me in a 12. However, when I cut it out and baste the body parts together it's HUGE! The amount I wind up having to adjust would take it down to a size 6. Could someone help me understand how all this works? I have been sewing for many years and it seems to be worse now than when I was a teenager (I'm in my 50's). Do each of the pattern makers do their sizes differently? Hoping to hear from you!!!
Thank-you.
Having worked in a fabric store, your complaint is familiar. It sounds about right that your measurements really are closer to size 6, when you purchase a 2.
One part of a pattern envelope that's frequently overlooked is the part that charts the actual garment measurements. The chart usually is on the back of the envelope, beneath the yardage requirements. If it's not there, it should be on the first page of your instruction sheet. I've faced that sizing frustration many times -- I haven't been able to figure out why commercial manufacturers and pattern companies can't coordinate their standards.
When you're selecting a pattern size, choose first (but don't buy it yet!!) on the basis of your body measurements. If they fall in different sizes, keep in mind that the bust measurement is the hardest to alter, so choose what's closest to your measurement. Loose-fit, semi-fitted, etc. affects the actual garment size. Once you've chosen a pattern size, look at the actual garment measurements and change your size accordingly. Check this Threads article again for ease standards -- the actual pattern size you need may be closer to the measurements of a purchased garment.
Each pattern company uses slightly different slopers (original basic patterns from which they create the new designs). For example, I've found Butterick has a relatively high bust point -- they gear their patterns for younger, slenderer (if that's a word!) bodies. That's good news -- lets you know how you need to adjust the pattern if you absolutely fall in love with one of their designs.
I hope this helps! It's made a big difference for me.
I have a question too...I got a Simplicity pattern for pants that comes with Slim, Average, and Curvy fits for each size. My measurements were between a 14 and 16, so I went with the 16. Then, to choose the right fit, I measured my crotch length and back crotch length. They were both way too big for my size, even for a Curvy fit, but I just made a 16 Curvy. The pants are too big all over. I'm suspicious of the mismatched crotch length measurement. I measured the total length to and from my natural waist, and the back length from where the seams meet in a pair of pants to my natural waist, all while standing. Does any of that sound wrong? And is it better to choose the smaller size when you're between two pants sizes?
I totally agree with germanmom. I have sewn for years, had my own business for 15+, and have always struggled with sizing. I am getting ready to make a coat for my daughter for Christmas, and am really hesitant to start for fear of ruining the fabric. She wears a size 6-8 in ready-to-wear and according to pattern sizing, I would sew a 14-16. I am not as interested in the numbers as I am the continuity and reliability of the sizing/fitting. It is very frustrating, to say the least.
I am totally frustrated with this pattern. I'm a tall woman (5'9") and my weight is withing normal limits (155). I don't look fat or out of proportion. However, according to my measurements, I would be a size 10 on the hips and a size 18+ on the waist. My waist does not look huge or weird, so what's the deal. Do I really cut a skirt to try to match these huge discrepancies? I always wear a size 12 in commercial clothes, and the waist is never too small. Am I the only person with this problem?
try this site for resizing.
http://www.sensibility.com/pattern/resizepattern.htm
and read
http://www.fashion-incubator.com/archive/drafting-to-measure-pattern-book-recommendations/
"Learning to grade is easier than learning to make patterns. The more important point is that it is less work to grade a pattern than it is to create an entirely new draft for another size. They’re looking for a book to draft in all the various sizes when their time is better spent in learning how to grade. Put more to the point, drafting takes much longer, grading is 1/10th the time (estimated)."
At 40+ i embarked on first attempt to sew from a pattern ! i wear a UK size 16, i got a simplicity pattern in the range 10-20.
I recently lost 3 stone (was a size 22) imagine my horror to find according to Simplicity i am indeed still a size 22 !! (I have a 37" waist) i am very confused that they can be so wildly different. I cannot use my pattern as it only goes up to size 20 it seems !!
Recently we purchased an It's So Easy pattern to make a simple skirt for my daughter's first sewing project. She normally wears a size 10. The measurements for this pattern put her at a size 18. I figured it was best to go with the pattern measurements, so we cut for an 18. Once we had the side seams sewed, I had her try it on and it was ridiculously huge! I ended up taking up two full inches off the waist, and it still is quite loose. We may be taking it in again after we put the zipper in.
It is one thing to have the sizes be so different from store bought clothing. It is unforgivable that the pattern does not conform to the measurements listed on it. In a more complicated pattern, it may have been extremely difficult to take in.
I am just frustrated, and so is my daughter. I wanted her first sewing experience to be a good one.
http://sensibility.com/tips/how-to-resize-a-pattern/ This is a wonderful website for resizing information! Please check it out!!
I was wondering if anyone was answering these questions. I bought a pattern that said size 6-8-10 on the cover. Body measurements were not listed on the back, the chart was inside the package. I wear size 8 and the chart says I am size 16. I was looking for information on how to alter the pattern to make it size 16. I found these posts with the same question and I was surprised to see that the finished project was always huge and needed to be cut down. My pattern states that 1.5cm seam allowance is built into the pattern. So before I adjust the pattern I laid it out and measured the waist because there was an obvious waist line on every piece. It is exactly 12cm longer than my waist measurement. (4 pieces x 1.5cm is 12cm) So if I cut out the pattern right on the edge without seam allowance it is exactly the right size I need. I don't have to adjust the pattern to be size 16 after all. Maybe this will help someone.
I am trying to alter a pattern to fit a 2 year old. She is tiny and the 2yr old pattern is too big. I see all the advice on how to alter a pattern by measurements, cutting, redrafting, etc. Why can't you just take the pattern to a copy store and resize on the copier to a smaller size?
Thank you
I was horrified to learn that according to the chart I am size 18! Then I measured myself and the paper pattern - it was really huge for me.
There are some patterns that are true-to-the-size and some that you need to take upper bust measurements and adjust the bust line later.
Would anybody know the list of those pattern-makers?
Apparently I have the opposite problem of everyone else. Every pattern I make turns out too small although my measurements correspond to what's on the pattern envelope. My experience is that when I actually measure the pattern pieces, they are always smaller than the stated finished garment measurements. When I sewed years ago, this was never a problem.
The main problem is that when they first came up with this idea of sizing, they measure a whole bunch of GIRLS in their late teens and early 20s. The span of small to XL is based upon essentially being a 20 year old! I'm sorry, but what does that have to do with WOMEN?
And so, because the sizes get so large so fast, it make it so they can ignore anyone with a bust larger than 40, as the charts just don't go that big. My teeny daughter has a 36" bust! None of it makes sense.
What I don't understand is why don't they all just use size 36 for someone with a 36" bust... maybe include both high bust and full bust... just make all dress/top/coat/etc patterns according to that... That way, if I know my bust/chest sizes it should be at least a bit easier, especially if they ALSO include just how much ease is in the design. It would be much easier to figure out if you need to go up or down a size. Do something similar with waist & hips for sizing pants.
Just use the measurement numbers! No conversion tables, no needing to know if a Vogue 14 is different from Simplicity, or McCalls...
I think the european sizes are kind of like this, only a woman with a 42" bust buys a 48? What is that? bust plus ease?
I wish they could just get it together... this is NOT rocket science!
I agree with everyone here. The pattern sizing has become ridiculous. I bought a nightdress pattern recently (size 14/16) and got as far as making up the yoke when I realised it was meant to fit a horse to drag a cart!
I have re-drawn the pattern but am now afraid to buy another pattern as the directions for how to translate my measurements on to the pattern I want to buy just isn't making any sense.
Oh please, would someone go back to the old sizing and leave us, seamstresses, alone.
I don't ever rely on a pattern more than to give me a general guideline of the shape of the pieces required to give me the basic silhouette of the garment. Before my pattern is even cut, I will take my measurements, and with a pen or pencil I will draw cutting lines, dividing my plus or minus between how many pieces are along certain line (for instance my waist is 36" so if the pattern waist is 34" at seam lines, and has 4 seams through the bust, I will basically add 1/2" to each piece, a 1/4" on each side of each piece. If the waist had 4 seams and 2 darts, I would be dividing that 2" difference by 6 instead of 4, and adding a third of an inch to each seam and dart (divide that 1/3rd of an inch by two - small fractions I know, which is why I usually measure in centimetres rather than inhes. But you can eyeball it pretty well).
My point is, adjust the paper pattern before you cut it out.
Older post that came up in my search for more info on pattern sizing, but I found the comments very illuminating.
I guess the article is pretty much what one would expect from inside the industry ... a magazine that is dependent on advertising dollars from industry suppliers isn't likely going to do a forthcoming critique on their products. Fortunately, they do give readers the ability to post comments.
I retired a couple of years ago and revisited sewing for myself ... although I had made many items over the years, I was mostly using tried and true patterns from my pattern stash for career wear, and when I had time to sew, I sewed for others more than I did for myself - but again, I had a collection of patterns for basics from which to design and I most often made muslins for clients. But, I wanted to get more creative with a wider variety of styles when I found myself with more time to sew. So, I started adding to my collection of patterns.
I have to agree with the commenters ... what happened to sizing consistency!? Printed pattern measurements on the envelopes are fairly standard from one company to the next, but the actual sizing inside the envelope is all over the place. I have learned to measure the pattern pieces and tissue fit before I put the first pin into the fabric. I might fit into a garment made from any of 4 different sizes, even within the same brand! I initially found that Vogue, Simplicity and Kwik Sew fit my mature shape better than New Look, Butterick or McCalls. However, it's obvious Simplicity recently shifted their focus to a younger demographic, and it shows in their patterns!
Next on my list ... make slopers for myself to compare pattern pieces to so that I am getting something that comes close to fitting.