

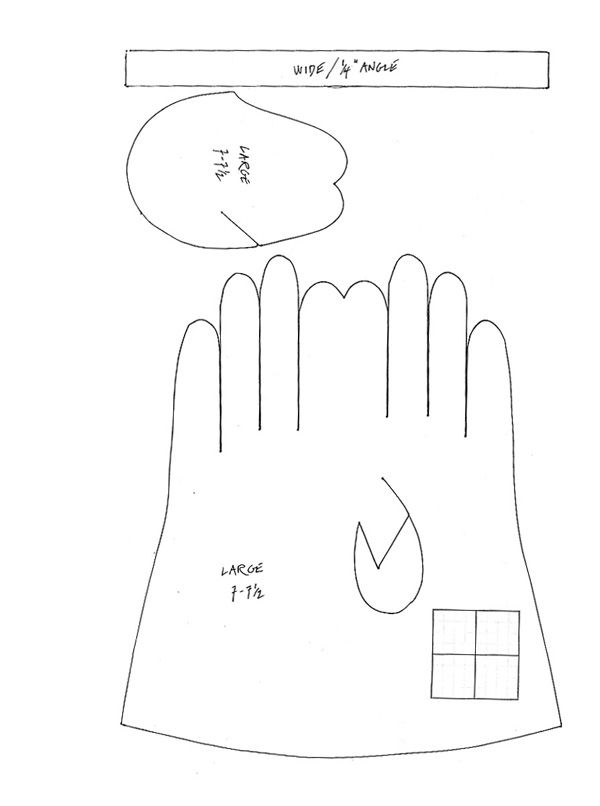
For the large size pattern, download pattern 1
In “Gorgeous Gloves” in Threads #145, John Koch demonstrates how to sew custom gloves. This is the glove pattern shown in the article. The original pattern was reduced 64 percent, so to get full size, enlarge the pattern so the set of 4 squares shown is 4 square inches. Measure the width of the pattern right below the finger cuts. Compare this measurement to your hand circumference at the base of your fingers to determine the correct size. Lengthen or shorten the fingers as needed.
Discover the stitches you need to know when sewing gloves, and don’t miss John’s gallery of gorgeous gloves.
Download the large size pattern
Download the medium sized pattern
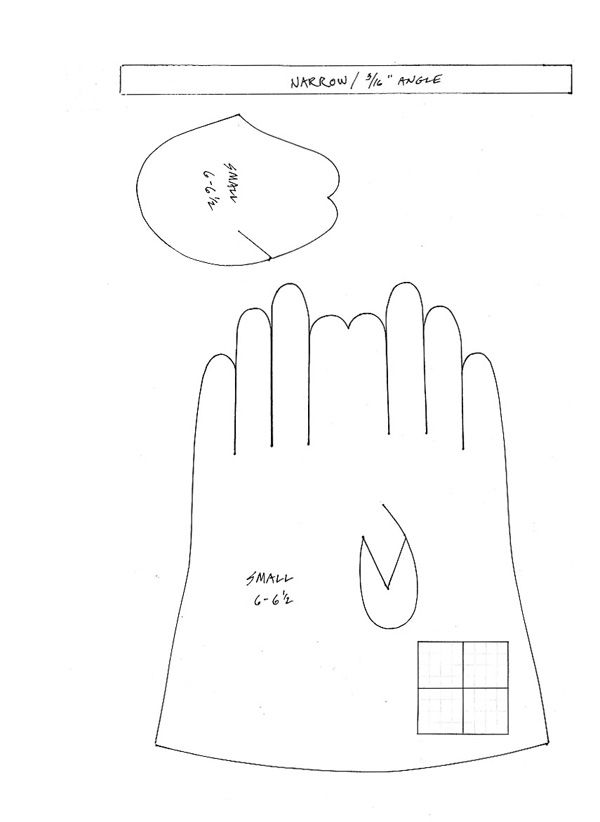
Download the small sized pattern


This site is protected by reCAPTCHA and the Google
Privacy Policy and
Terms of Service apply.
See all newsletters


I LOVE the gloves, but cannot correctly download and print the pattern-in any size!
If I had to get my magazine subscriptions down to only one, this would be it!
How do you enlarge this pattern? I have tried, when the 4 squares equal 2 inches the pattern is huge.
After multiple tries, I too am unable to get the glove patterns to the correct size. Would it be possible to just provide us with the correct size patterns?
What is the point of offering something that is not deliverable?
The large gorgeous glove pattern does not download and print.
There is nothing wrong with my computer, server or Internet connection
Seems that others have had the same problem
I have successfully downloaded the large size. Is your Adobe software up to date?
To enlarge - have you tried adjusting the PDF display size to 100% and then printing?
Hmm. I have to wonder if maomac isn't on to something. I had no trouble at all downloading the patterns but I know that my Adobe software was just recently updated. At any rate, there doesn't seem to be anything wrong with the site, as far as I can tell.
I can download the patterns with no problem.
Could someone just tell me what size to enlarge the patterns on the printer -- 300 percent, 400 percent -- this would help me better than trying to draw it longer by the squares.
I'm sorry some of you are having problems printing the patterns. John Kock, the author of the glove article, sent me these suggestions:
Dear Judy,
I just saw the Threads website and read the comments. I am so sorry everyone is having such trouble with the patterns. It's difficult to transmit something so technical and expect it to come out correctly, however, I printed out all three patterns and think I have the solution. I found that by reprinting each at 173% increase, the pattern is as close to the original as one could hope. I am certain that not every one that tries this will get the same results. In that case they may have to experiment to find the exact percentage to use. In order to do this the correct final small pattern should measure 9 7/8 inches from the tip of one of the double finger tips to the cuff, the medium 10 1/2 inches and the large 10 11/16 inches. To get a full pattern one must print on 11 x 18 paper. Since most people don't have this ability I found by printing the downloaded pattern in quadrants and taping them together I was able to create a full pattern. Some people may find it just easier to go to a photocopy store and do it on a copier with this capability.
I hope this makes sense and is of some benefit.
Best wishes,
John
Most people are not having a problem printing the pattern and enlarging it to the correct proportion. We know the finished pattern won't fit on an 8 1/2X11 paper. If you can't print it at all, try going to a public library to print the pattern. Then take it to a photocopy machine to enlarge it appropriately. They have proportional scales and can help you. Each of the four squares in the lower right corner are 1 inch square. Measure the square on your printed version and determine how much you need to enlarge the pattern to make the squares the correct 1-inch size. Check the size after you've enlarged it. Remember, these are standard sizes, expect to alter the glove, that's one of the benefits of making your own.
Enjoy!
j
To know the correct percentage to enlarge visit:
http://www.copyitmailit.com/p.htm
Thanks for the information re enlarging the pattern. I have successfully enlarged the large size (I played with it a bit and found that 150% gave me the exact fingertip to cuff measurement that John refers to). Now I just have to find the appropriate fabric! Unfortunately, the city I live only has two fabric stores so finding specific fabrics can be a bit of a challenge. I gather that the doe suede referred to in the article is a synthetic suede with a bit a stretch.
Was able to download and print the patterns. Had Staples enlarge by 173% as suggested above and it worked perfectly!
I can hardly wait to play with this pattern!
If the original patterns were reduced by 64% then the correct increase should be 1/.64 = 156%. However, I noticed that on my print window, the printer was reducing the page further to fit the printing on the page. That would explain the 173% enlargement scale.
To get the correct scale for whatever reduction your printer did, measure the squares then divide this into 2. Multiply by 100 to get the percent enlargement.
e.g. my medium squares printed at 1 5/32 inches (1.15625)
so 2/1.15625 = 1.73 or 173%
Adjusting the PDF display will not affect the size of the printing. It is the print window that is further reducing the size.
Having the newest Adobe Acrobat Reader is also critical. Those of us who creat PDF files usually have the newest and I have found that the older readers will not read the files created by the newer writers.
When you go to the Print Menu there is an option for Page scaling, choose None and your pattern should print correctly.
Kind regards, Jessie
Hi - Brilliant to see glove patterns again.
I made leather gloves years ago with Pittards gloving leather which I bought from a now defunct supplier called John P Milner in Wales. They supplied everything from leather punches all the rivets, eyelets threads, needles beeswax & anything else to do with leather work. I've never found a comparable replacement so haven't made any gloves since. I loved making them & still have all the patterns - which look just like the ones supplied. The stitching I used was simple stab stitch - with silk thread, and looked really good when completed.
Maybe I can make them a tight fit and fingerless.......
Thanks for the pattern! Looking forward to trying this out!
To make things easier, couldn't the pattern be posted at actual size, marked for taping together?
Loved edition, just renewed!
Ok yes I have had a couple of problems with the downloading of the pattern.........but that's the least of my problems!!!!!
No seriously, do you have any suppliers for the fabric used in the article?
I have searched the internet and all it comes up with is doll fabric...and boring colours...I realise it's would be advertising or qualifying one set of fabric suppliers..but I'm really frudtrated now...there's nothing worse than using the wrong type of fabric for a project...
So please please please can you give some clue where to get the knit doe (faux) suede and in such gorgeous colours...
@Snikwas. My gran raised two girls making gloves and hats in the UK and then in Canada. I'd love to chat sometime about that supplier and other glove gab...but how? sigh.
excellent!
special thanks to those with comments re: enlargement.
This is especially helpful for those of use with long fingers.
Anxious to try with some lycra fabrics too.
Which direction should the stretch fabric run? Crosswise or lengthwise? I made a pair of small with extra long fingers for my daughter-in-law, but they came out way too big for her. I wear a large glove and they fit me (except the fingers were too long.) Nessler
Dear All: I had trouble with fitting my gloves, so I tracked down John Koch at his website and asked him a few questions. Frankly, I didn't expect to hear from him, but I decided to try anyway...well not only did he get back to me inside of 24 hours, he had GOOD ADVICE to offer, and LOTS OF IT. He also offered to send me a NEW PATTERN with a diffent style of thumb, since I am making my gloves with the seams INSIDE.
I asked him if I could post his fitting advice here and he said sure! As it turned out, the problem was only with the FINGERS. Once I made them LONGER, the fitting problem went away! Also, one must note and allow for the proportions of one's own fingers relative to the pattern; f'r instance my forefinger and ring finger are only marginally SHORTER than my middle finger, but in the pattern,you can see how the forefinger is MUCH SHORTER than the middle finger! The glove will not "seat' properly on your hand if the fingers are too SHORT, or if ANY of them are too short!
Anyway, here is what he gave me:
"Thank you for your kind words. I will do what I can to help you with your dilemma. Often the problem with fit is either the fingers are too short, the thumb is too short or the gouch is improperly located. In adjusting a glove pattern it's the same as making a muslin before constructing a dress. It allows you to correct the fit first. To lengthen a finger or thumb I first draw the entire pattern on a piece of paper.
I then determine which finger(s) need to lengthened/shortened. Generally, I increase in 1/4" increments. Make a mark 1/4" above the finger(s) to be adjusted, slide the pattern up to meet the mark and re-draw the tip of the finger(s). Remove the pattern and blend the lines into the side of the original finger. Be sure to scratch out the old lines to avoid confusion and don't forget to adjust the opposing finger on the other side of this trank. To shorten, I try on the sample glove and pinch the tip to see how much to shorten. Don't forget to leave the seam allowance.
Say for example, you can pinch 5/16" excess. You would not shorten it 5/16" but rather 5/16" less 1/16" (or so) seam allowance or 4/16". Does this make any sense? It sounds as though you have already determined that the fingers are too short but in addition to that your thumb is located farther down on your hand. I would retrace the gouch approx. 3/8" lower to start, make a sample glove basting it together and try it on. From this adjustment you will see if any more corrections need be made. Often it's a trial and error effort.
Remember that in glovemaking you are dealing with minutiae. The smallest adjustment can bring about big changes. I'm sure there are people out there that could do all this mathematically, but I was self-taught and just learned the hard way. You learn a lot more. It may take you a few times but in the end you will have a great pattern. It becomes easier in time."
Are there directions for this?
Greeting
I discovered this site while looking for gloves pattern.
I'm working leather since 2005, and a frien of mind ask me to make her a falconry glove.
I had never made a glove pattern. So, i would like to know if this pattern can be altered for a falconer?
Please lest me know. She don't need a glove in near future, but if someone here could hel me providing a set of pattern(small, med, large x-large) pattern for male and female, i would be gladly buying this set.
Many thanks.
I am new at sewing and just got a consew industrial machine for leather working. I am hoping someone will know if this pattern will work to make leather opera gloves
So tell me, I see no article here. Where can I see the article that went with this pattern? I have been using the Jan Faulkner-Wagoner pattern, which is pretty much the same as this one, but it has the points on the back of the hand. It's form Oct/Nov 1988, #19. The article was brilliant, and with gloved you NEED the instructions. Threads, please give us a place to see the article. I promise that no beginner can manage this without directions.
Hello All!
Thought I would add some print-at-home instructions for people finding the pattern still a bit too small. I downloaded mine with adobe PDF, probably printed this thing six times and the fingers still weren't wide enough. I tried enlarging by 173% as I saw in the comments and my printer didn't print the whole thing and it was MASSIVE! So I enlarged mine to 110% and the fingers are just wide enough for my hands but some of the pattern got cut off. I figured I could alter it because not all of it got cut off. If you are having problems, TRY THIS!