

When I took my boots out of the closet this past year and saw the crease damage they sustained, I knew the only way to save my future cold-weather shoes was with boot stuffers. These padded forms, sometimes called boot shapers or boot trees, are a breeze to sew and require only two starting measurements.
There are a variety of boot stuffer designs. This ribbon drawstring option, lets you store the stuffers on hangers when not in use and enables you to leave the top open in order to replace the cedar chip stuffing, if needed. Similarly, you could simply hem the top edge as described below (omitting step 2 under “Create the boot stuffers”), leave the top 3 inches unstuffed, and tie a ribbon right above the stuffing. Furthermore, if you desire a fully enclosed cushion, finish the top in the same way as the bottom, being sure to leave a 3-inch-wide opening for turning and stuffing. The choice is yours.
Materials
1/2 yard light- to medium-weight fabric
1/4-inch-wide ribbon, 40 inches
4-quart bag cedar chips and/or polyester fiberfill
Note: While polyester fiberfill is ideal for stuffing, cedar chips are a great natural alternative. They have odor-fighting properties and provide a fresh scent.

Measure the boot
1. Determine the width.
Use a tape measure to measure the narrowest part of the boot. This measurement becomes the width of the fabric and is calculated by subtracting 1 inch for ease and adding back two 1/2-inch-wide seam allowances. This leaves you with the original measurement.

2. Find the height.
To determine the fabric height, measure the boot’s height (starting above the heel) then add 2 inches for the box bottom and 2 1/2 inches for the drawstring top. Here, the boot measured 15 1/2 inches + 2 inches + 2 1/2 inches = 20 inches. Cut two rectangular pieces of fabric using the width and height measurements.
Create the boot stuffers
1. Fold the fabric.
With right sides together, fold one fabric piece in half lengthwise.

2. Mark the edge.
On one corner, measure 1/2 inch in from both edges and mark a dot at this point. Mark a second dot 1/2 inch beyond the first dot along the long edge, as shown.

3. Sew around the piece.
Stitch along one short and one long edge of the fabric. Backstitch when you get to the first dot. Leave the space between the two dots unstitched. Then backstitch at the second dot and continue sewing to the fabric’s edge. This unsewn section is the opening for the ribbon channel, or casing, in step 7. Finish the edges as desired, and press the seam allowances open.

![]()
4. Box the corners.
With the stuffer wrong side out, push the bottom corners out and away from the seam. Align the side seam or foldline with the bottom seam to create a point. Pin together and press. Next, measure 1 inch down from the corner along the bottom seam, and draw a line perpendicular to the seamline. Stitch along this line. Trim the seam allowances to 1/4 inch wide. Repeat for the remaining corner.

5. Finish the top edge.
With the fabric still wrong side out, fold the entire top edge down 1/2 inch and press. Repeat this a second time and pin in place.

6. Stitch the hem.
With the right side up, sew the hem close to the inner fold. This should be about 3/8 inch from the top edge.

7. Secure the drawstring.
Cut one 20-inch-long, 1/4-inch-wide ribbon. Attach a safety pin to one end and insert it through the ribbon channel’s side-seam opening. Feed the ribbon through to the opposite side.


8. Finish and stuff.
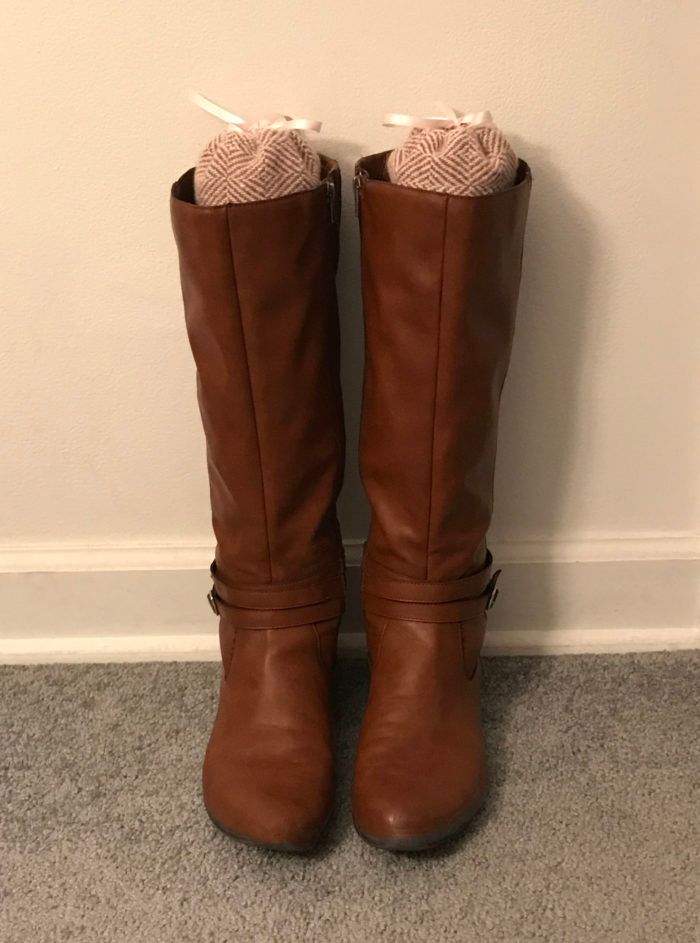
Turn the boot stuffer right side out and give it a final press. Fill the opening with your stuffing of choice. If using cedar chips, consider placing a small ball of polyester fiberfill at the top to prevent the shavings from falling out. Finally, pull the ribbon taut and tie it into a bow.

9. Sew the matching stuffer.
Repeat the entire process a second time so both of your boots stand tall and proud year-round.


Have you ever made boot stuffers? Which technique do you prefer? Please share your comments below.


Log in or create an account to post a comment.
Sign up Log in