
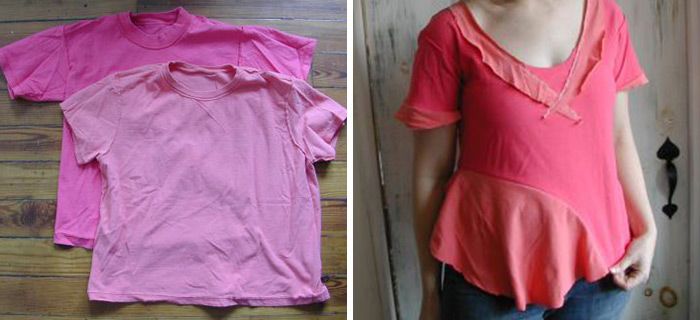
I like ruffles. But the classic gathered-type ruffle isn’t always flattering, especially near the waist or hips. By cutting ruffles out of circles, curves, or spirals, you get a fluttery ruffle that’s flat at the seamline and gently drapes at the outer edge. This top reminds me of something a modern-day flapper would wear.
Supplies
• Two T-shirts in similar or complementary colors
• Scissors
• Tape measure
• Pins
• Thread.
One of the tees (the one that will be the body of the shirt) should fit you, and the other can be any size.
Create the flirty flapper T-shirt
1. Trim the T-shirts. For the main body shirt, fold so that the center front is at one side and the center back at the opposite, with the shoulder seams stacked (see photo).
|
|
|


Cut a low V or scoop-neck; you may want to draw it with chalk if you’re new at this.

2. Cut the bottom. Open up the shirt and cut a free-form quarter-circle from the hem to the side seam/fold, as shown. Ideally, the top edge of the curve is near your waistline.
I also unpicked the hemstitching on the remainder of the bottom edge to maximize the length, but this is optional. Measure the length of the curved edge you just cut. Mine measured 13-1/2 inches. Jot this number down.
|
|
|


3. Cut the circular ruffle. With the other T-shirt, find the biggest seamless area (usually the back) and fold it into quarters.

Cut the largest quarter-circle you can from fold to fold, yielding a big circle of T-shirt fabric.
|
|
|


Make sure the diameter of the circle is at least 3 inches to 4 inches bigger than the measurement you wrote down; if not, you’ll need a bigger tee or to piece together a bigger circle. This will become the ruffle at the hip. Now make a cut from the edge of the circle toward the center (past center is fine) that measures the length you wrote down.
Open up the circle along the cut and you’ve got your drapey ruffle.
|
|
|
|


Cut a few extra curved strips from around the edges of where you cut the circle. These will be your sleeve and neckline ruffles.

4. Sew the ruffles on. With right sides together, pin the center-cut edge of the circle to the curved edge of the body tee, matching the end of the slit (which is the center of the ruffle) to the side seam/fold of the shirt. Seam with a stretch or tiny zigzag stitch (1.5 x 1.5 mm) at a 1/4-inch seam allowance. Pin the sleeve ruffles, right sides together as shown (trim to fit or overlap two if you need to), and stitch as before.

Finally, lay the neckline ruffles on top of the shirt (appliqué style) and pin in place. I stitched mine on with a decorative stitch my machine has, but you could use a zigzag here as well.

Now you have one pretty blouse-style top instead of two ugly plain shirts. Think of all the new storage space you’ll soon have once you’ve refashioned all those old tees.
|
|
|


Yuck.