

When I worked in the costume shop at the Guthrie Theater in Minneapolis eons ago, we had ironing stations that consisted of 4-foot by 2-foot tables with padded surfaces. They were the bomb. I’m not sure why it took me until I retired five years ago to actually make an ironing table for myself, but now I can’t imagine going back to a wobbly, fold-out ironing board.
Recently, an ironing table is the first thing I did for my new sewing space. The space is part of a new way of life. Yes, I am now one of those elusive, migrating creatures, known as a snowbird, who wanders between North and South constantly seeking sun. This has been the first winter in our new abode, and I am deep into the process of feathering the southern landing spot, which, of course, means that I am creating that new sewing space. Since I will still have a sewing space in the northern nest, I am starting from scratch. The new space at the top of the house has a ceiling that follows the pitch of the roof, creating a loft-like room. I have been strategically placing my cutting table, sewing machine stands and ironing table to avoid whacking my head when standing up. It will take some getting used to.
As I have filled the space I have realized there are things I like to have, things that are no longer part of the way I want to sew, and a few non-negotiables. One of those must-have items is the ironing table.
I decided to go with the tried-and true model I had figured out already . . . with a couple of improvements.
The base
A 4-foot-long by 2-foot-wide table works well for a couple of reasons. First, 48 inches accommodates…
Start your 14-day FREE trial to access this story.
Start your FREE trial today and get instant access to this article plus access to all Threads Insider content.
Start Your Free TrialAlready an Insider? Log in


FABULOUS! I want to be a snowbird with a bomb ironing setup!
Go for it! You definitely have the Key West color vibe going on. Come on down!
Thanks for showing the industrial shelves and the MDF table tops. What kind of tables do you have for your sewing machines?
I found some simple desk style tables from Target. They have cross pieces on three sides that make them more stable. So far they are working well.
Love it! I use an adjustable table from Home Depot, so I can sit at it when I'm ironing a lot of little things. But I don't have all that great storage underneath.
I haul a stool over if I need to, but I do bump my knees! ;)
Did you cut the 6" uprights in half? (I'm trying to see how you got from 2 6-foot tall shelving units to 4 3-foot tall units.) If so, did you use a hack saw and were any other adjustments necessary?
The ones I used came in 3 foot segments. If you wanted a 6 foot tall shelving unit you stuck them together. I only wanted the 3 foot sections so I was good to go. On my first table, I decided to put wheels on it and my husband and I did hacksaw the ends off to accommodate the added height of the casters. And we are still married with all 20 fingers!
Very helpful & useful information. I am especially interested in the cutting table.
I was so glad to figure that out. The one that I have in my original sewing room in Michigan was one that I designed and my Dad helped me build. Not only perfect for sewing but filled with good memories.
I like your stool. Can you tell me the company that makes it and where you got it? Is it more comfortable than a regular office style chair?
I found it online at Target, but I know there are other versions around. I love that there are no arms to get hung up on when getting up and down. The only little quirk is that I often end up sitting backwards on the saddle shaped seat. Not a big deal, and easy to adjust. The casters are great and it does adjust up and down so I can use it at my taller cutting table as well.
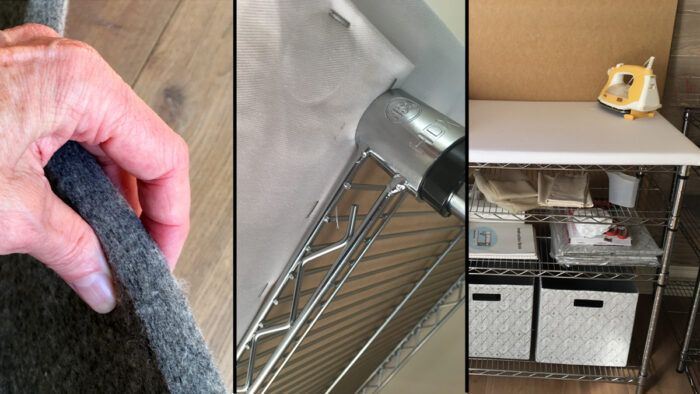
Great article, thank you! Can you please let us know which type of felt you used from thefeltstore.com? The weights/stiffness and fibre contents vary. Cheers!
I used a 3/4" thick, the highest wool content, and firm. I can't remember if it was 2 feet wide or 6 feet wide...but I got a 2' X 6' piece. For me it is totally worth the $$$$.
Do you remember what the F rating was?
I've had in mind to build an ironing table for the last year - this article gave me the ideas and the motivation to do it. I used 1/2" felt which is plenty and a piece of wood instead of MDF (they didn't have MDF) - again, 1/2". I had to improvise when it came to the shelving unit - to get enough surface area, I had to buy a unit with five shelves and use half of it. I ended up using the other half for shelving in the basement, so not a problem. Like the author, I did not need to attach the top - the weight of the wood plus felt is enough to hold it down. Now all I need is a ceiling plug for my iron.... I may rig up an extension cord with a hook in the ceiling to achieve the same effect. I love my table and the additional shelves.
The article too motivated me to construct an ironing table that is far more useful and appropriate for sewing projects. I am delighted with the outcome. I did make some changes and additions. I used
1-1/8” plywood (which I had) since instead of attaching the wire shelving to the wood top as per the article, I drilled a 3/8” deep hole the diameter of the vertical supports to securely mount the top onto the shelving unit. I sealed and stained the plywood, rounded the corners and made the overhangs 3-1/2” on 3 sides and 5-1/2” on one end to accommodate the addition of a pegboard to hang ironing tools. I used the F-3, 3/4” firm felt for the pressing mat. I put a foil batting under the mat, secured with double sided tape to protect the wood top from possible heat and moisture migration. I did not staple the cotton cover. I fitted the cover with a draw string so it can be removed and more easily replaced. I also used casters so I can move the table more easily. The table measures 24” wide by 56” long by 41-1/2” tall. Thank you for a great article and super addition to my sewing room.
This is fantastic to see!