
Fold Bias Binding That’s Easier to Sew
Control fabric layers for accurate seam finishing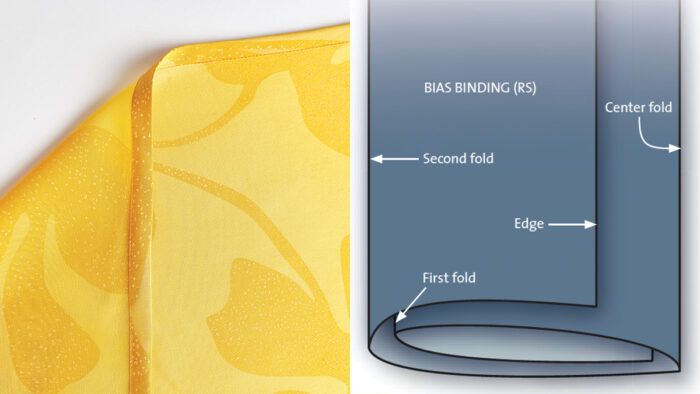
Turn of cloth is familiar to most garment sewers and quilters. Whenever fabric is folded, some of its width is taken up by the fold. A fabric folded in half always measures less than half its original width. The difference is almost unnoticeable in thin fabrics but becomes more obvious in bulkier fabrics.
Turn of cloth also has an effect when one piece of fabric wraps around another. For example, a shirt cuff’s inner layer must go around your wrist, but the cuff’s outer layer has to go around the inner layer as well as your wrist. Therefore, the outer layer must be slightly larger.
Each time you sew layered and folded fabric, such as in a collar, jacket lapel, cuff, or lined patch pocket, you deal with turn of cloth. If you’ve ever turned up a hem on a straight garment, especially one in a thick fabric, and wondered why the fabric on the inside is puckering, the culprit is probably turn of cloth. The hem allowance does not fit within the hem of the same circumference. Turn of cloth is a factor that can create challenges in garment construction, but it can sometimes be a good thing. Following are simple ways to take advantage of it to make your sewing easier and neater.
Precise bias binding
This method for making double-fold bias binding relies on turn of cloth to extend the inner fold’s edge. The method should work for most fabrics, but if your fabric is thin or bulky, make a sample to test the stitch placement. The illustrations below are larger than life-size for clarity.
1. Prepare bias strips
Cut them four times the planned finished binding width. I recommend using a quilting ruler and rotary cutter to cut accurate strips. If you cut…
Start your 14-day FREE trial to access this story.
Start your FREE trial today and get instant access to this article plus access to all Threads Insider content.
Start Your Free TrialAlready an Insider? Log in


Log in or become a member to post a comment.
Sign up Log in