
How to Re-cover an Umbrella
Give an old umbrella a new look
There is something captivating about umbrellas; the way they open with arms outstretched and then close back down into perfectly compact forms can seem downright magical. They keep us dry on rainy days and shield us from the bright sun on hot ones. If the cover of your favorite umbrella is ripped or torn, don’t just toss it in the trash. Simply remove the old cover, assemble a new canopy, and attach it.
The process is simple to master and enables you to re-cover any umbrella frame you find, including tattered antique or vintage finds from your local thrift store. You could even make umbrellas to match your outfits. Before you know it, you’ll own so many gorgeous umbrellas that you’ll be looking forward to rainy days.
Get to know your umbrella
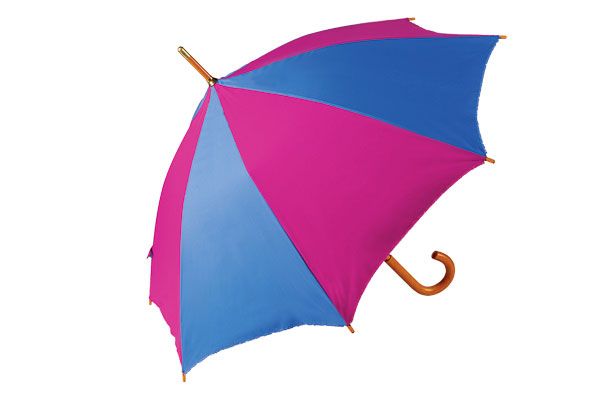
There are many styles, configurations, and uses of umbrellas. When considering the project of re-covering an old umbrella or covering a new frame, keep in mind that the most important features are the length of the ribs, the number of sections, and whether the tips are built into the ribs or they slip over the rib ends. The more sections your frame has, the better, since each seam needs to stretch less, assuring a better fit for the canopy.
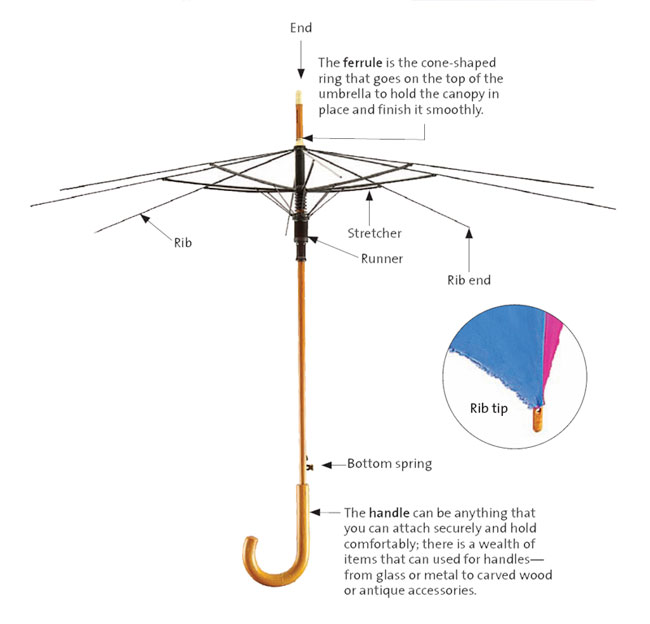
Umbrella anatomy
Each rib has a corresponding seam in the canopy. At the end of each rib is a tip. Study your umbrella to see how your canopy is attached at the tips. They may be hand-sewn to the ribs. Or, the tips may be hand-sewn directly to the canopy and pop off easily.
Select the right fabric
Something to keep in mind as you consider new umbrella fabric is the behavior of today’s fabrics as opposed to that of vintage fabrics and the relationship of the fabric to the shape of the pattern. For most umbrellas, 2.2-ounce nylon taffetas and 2.5-ounce Supplex with UV protection are usually good choices. Both are available at TheRainShed.com.
Many vintage umbrellas are covered in natural or more loosely woven fabrics. If this is the case with your umbrella, choose a fabric with equal amount of bias stretch needed to arch over the ribs; however, if you choose a fabric that is a tightly woven synthetic with a fine yarn, it will not stretch as well over the ribs, and you will need to curve the long edge of the pattern slightly. Keeping the area around the point at the top flat to prevent ripples as the panels converge there, draw the curve into the top third of the pattern from just beyond the point, curving it out smoothly from 1/8 to 1/4 inch at the most, depending on the number of ribs—more ribs, less curve.
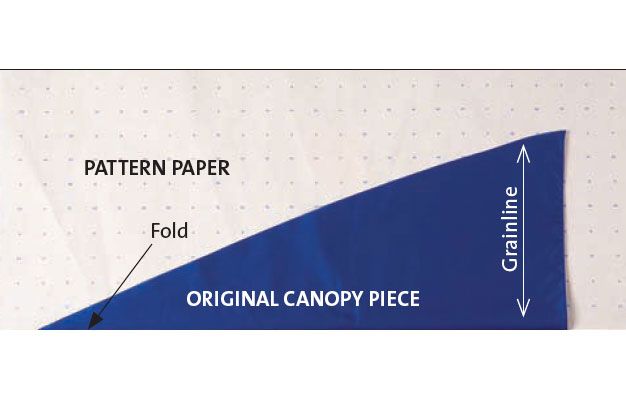
Use the old canopy to make a pattern
A successful canopy depends on the ability of the seams to stretch enough to accommodate the curve of the open umbrella. Make certain that you cut absolutely on-grain.
1. Take apart the old canopy. Using a seam ripper, take apart the original canopy seams. Choose the least distorted, most intact segment from which to make your pattern. Press it with the grain. Keep your umbrella’s fabric in mind when pressing; you may need a press cloth to avoid damaging the material.
2. Straighten the segment’s edges. Fold it in half down the center, and press. Straighten the sides if they are stretched out of shape.
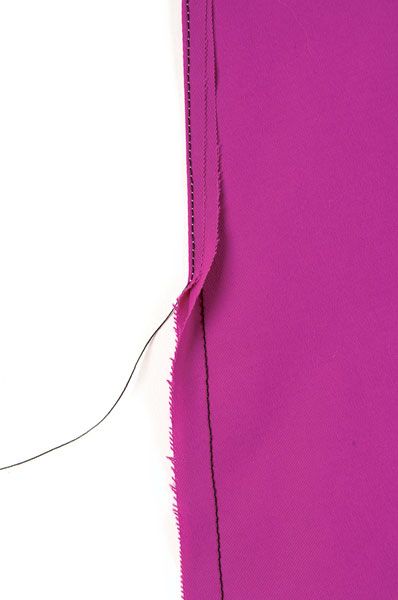
3. Trace the pattern. Fold a large piece of paper in half. Align the segment fold along the paper fold, and trace the half section. Include the size of the seam allowances; it’s usually 3/8 inch. To get an accurate pattern, mark the beginning and end of the cutting or stitching line, and then connect the marks with a straight edge. Cut out the pattern on folded paper so both sides match.
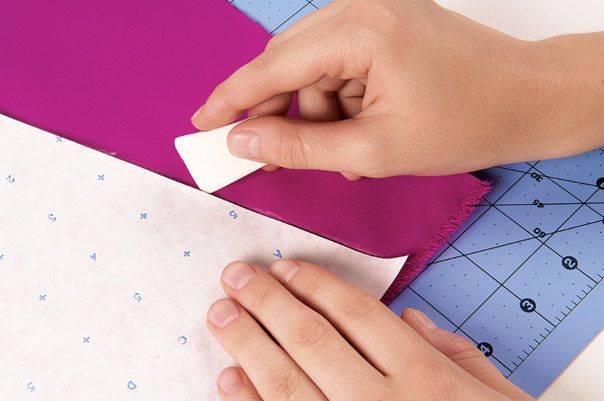
4. Choose your fabric, and cut out the canopy pieces. Select a fabric that is similar to the original canopy because that fabric was initially chosen to suit the frame construction and provide adequate bias stretch; use the same fabric type throughout your umbrella. There is only one pattern piece for an umbrella, and it’s cut on the cross-grain with the hem parallel to or on the fabric selvage, depending on whether you use the selvage edge as a decorative edge or you sew the hem. Place the unfolded section on a single layer of fabric, chalk-trace, and use a rotary cutter and mat to cut each one accurately.

Assemble the new cover
Sew each seam twice for added strength. Use a polyester or weather-resistant thread (available at SeattleFabrics.com) and a small stitch length (12 to 14 per inch).
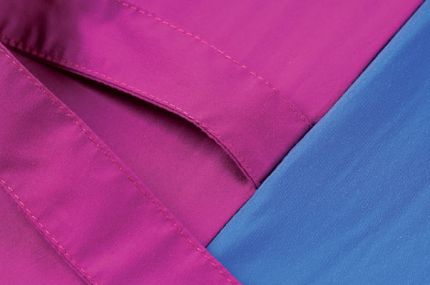
1. Hem the pieces if desired. First, if the finished selvage won’t be used for the edge, make a narrow double-fold hem on each section.
2. Make a tie. When finished, the tie is a 1/2-inch-wide, double fold of fabric that’s long enough to go around the closed umbrella. Finish the exposed end since there will be a ring or loop sewed onto it. Wrap the tie around the umbrella to check for proper length. Insert the tie about a third of the way up from the lower end of a seam as it’s sewn in the next step, or add it to the fold of a section later. To attach a tie to the fold, topstitch it after you’ve attached the canopy to the rib tips.
.
3. Connect the pieces. When sewing the sections together, sew all of the sections together in pairs first. Then sew pairs together into groups of four, sew those groups together into eight, and so on. From the top to the tips, stitch a seam allowance the same size as the original canopy’s (or 3/8 inch). Fold the seam allowance in half, and stitch again; stitch only through the seam allowances next to the first stitching line. When all of the pieces have been sewn together, there should be a small opening at the top for the insertion of the point of the umbrella tube. If the opening is too large, re-stitch all the sections so the opening fits snugly over the point of the umbrella.

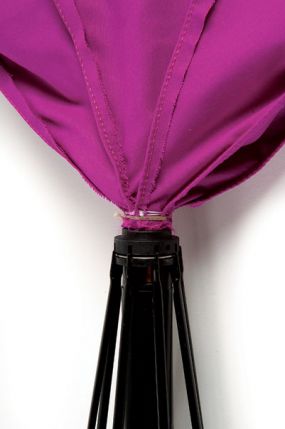
4. Secure the canopy over the umbrella frame end. Place the canopy over the frame, and place a 3 1/2-inch-diameter circle of fabric with a 1/2-inch-diameter hole in it over the canopy. Place the ferrule over the top. If a new ferrule is unavailable, and the old one can’t be removed, insert the umbrella end into the canopy hole. Turn the canopy back over the ferrule. Use upholstery thread to wrap tightly around and secure the raw canopy edge between the ferrule and the base of the ribs. Hold the umbrella upright, and let the canopy fall over the ribs. Make sure that it isn’t twisted.
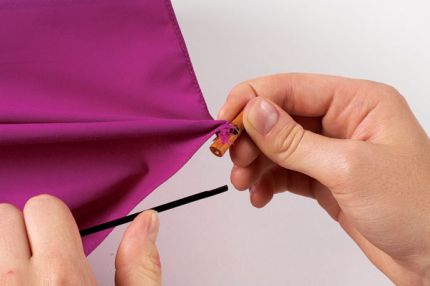
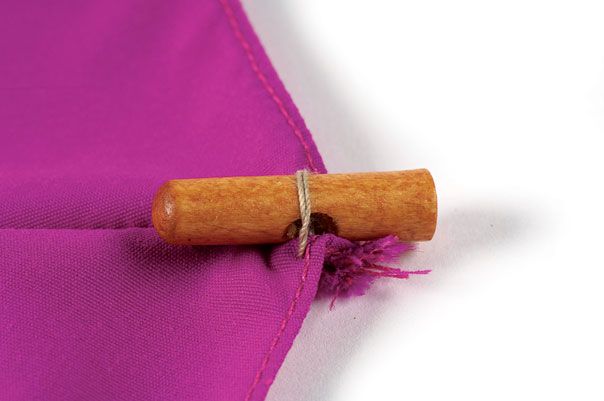
5. Attach the canopy to the rib tips. If the umbrella has detachable tips, remove them from the old canopy. Sew the tips onto each seam end by placing the rib tip upside-down on the canopy’s right-side hem. Use waxed buttonhole thread, and hold the fabric at the tip as you sew. Stitch from the inside of the umbrella into the hole in the rib tip two times, and then knot off the thread. When the rip tip is turned right-side up, it will hide the stitching. If the umbrella has tips that are part of the rib ends, fold the end of each seam under, and sew over the top of the rib and through the hole underneath the rib.

6. Press the canopy, and attach the tips. Steam-press the canopy seams, pulling them to make them stretch a little longer. This makes it easier to pull the tips over the umbrella ribs. Attach the rib tips to the ribs, steaming more while open if it seems too tight. Steam the canopy once more when it is closed and rolled up; make sure that all the folds are pointing in the same direction.


What a great idea! I think I'll use some cotton and spray with Scotch Guard to weatherproof it!
Thanks!
Great article. I have a golf umbrella which needs recovering and will definitely try this method.
I have 2 old and faded outdoor umbrellas that I would like to recover in Sunbrella this time. Great idea. I need to grab those umbrellas out of storage and try this out.
It's funny that this came at this time, because I am almost finished making a new cover for my daughter's patio umbrella, using Sunbrella canvas and outdoor uv resistant thread. Never would have thought to do this until she asked. She sent her old shredded one, which I took apart to use as a pattern. It was very easy to do and looks nice, but now I am anxious to see if it fits! Must send it across the country.
I am delighted to have these instructions. I have my grandfather's large black umbrella, with his name engraved on the silver handle. The canopy is in surprisingly good condition, but definitely needs replacing. I am going to give it a go and can really use a new umbrella here in rainy Seattle!! Thanks for this very timely article.
Thanks, I use one every time I go out in the sun, you know, super light skin etc. I have wanted a 'pretty' one for the sun instead of just another rain umbrella. This is pretty much as I expected, but it's still nice to see it and read it first!
I make a new cover for our patio umbrella several years ago.
It was not perfect, but I was pleased. My husband was more please than I was.
Always give something a try, you will succeed or make a mess. Either was you gave it a shot.
Every time I collapse the umbrella the rib tips fall off - this was the case with the old (original cover) and with the new one. Anyone have a suggestion how to make the tips stay secured to the tips of the ribs? I'm thinking superglue?
Thanks.
what a nice idea, I have always wanted to cover an umbrella.
this is a new project, i will add to my others asap
I have been a lurker here at http://www.threadsmagazine.com for a couple of years, admiring all of the amazing information on this site. I chose to not join because I was still in the process of educating myself in this area of expertise. I have now decided that although I'm not quite as informed as I want to be, my degree of excitement and near-obsession has pushed me into becoming a subscriber. Good to meet everyone and if you guys want to join my new forum im at best cleaning service las vegas thanks again for your warm welcomes!
I have seen a lot of tutorials online for how to use a pre-existing cover as a pattern. However, I have an antique umbrella skeleton that has long since lost its cover. How do I go about forming a pattern for this?