

Kenneth King and I often teach together in New York. It’s educational, fun, and you can’t beat the location–smack in the middle of the garment district. And, you can imagine that our students bring interesting projects. A blouse that one of them worked on recently involved a closure with a thread bar, and I thought I’d share the technique with you; it’s a good one to have in your repertoire.
Thread chains and thread bars are similar: a thread chain is a length of hand-crocheted thread, but the thread bar, in which a group of threads is firmly wrapped with more thread, is the sturdier of the two. Further, it’s easy to do and pretty to look at, and of course, it’s strong.
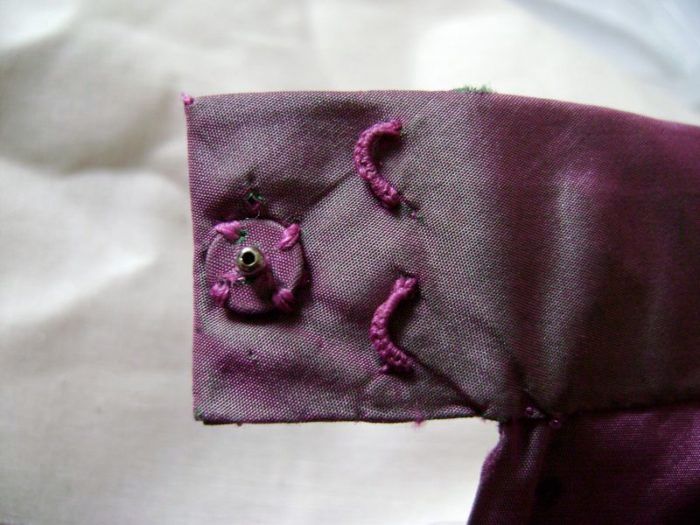
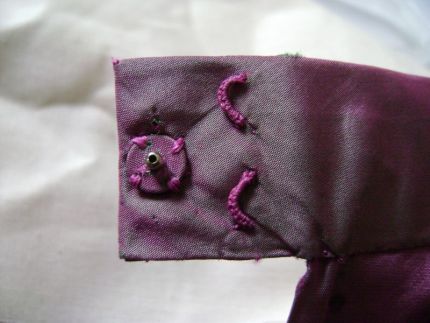
Thread bars are a pretty stand-in for metal eyes, both on waistbands…
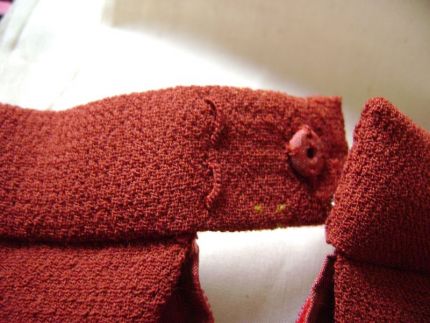
and at the top of a zipper.
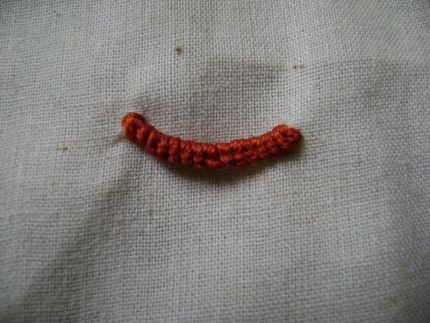
And here’s a thread bar on its own. You can see that a series of knots are formed around the base threads.
Certainly, beyond the obvious, there are lots of ways to close a garment, but restrictions often enter the picture. In the case of our New York student, the blouse fabric was gazar (sheer and a little bit transparent), and the pattern was vintage. The closure needed to work with a simple keyhole opening in the back. We could have done little bias fabric loops, but it would have been tricky to hide the ends of them (there was no separate facing around the opening). And a zipper was out–much too heavy for this light-weight blouse. A button and buttonhole also didn’t seem right, either. So a thread bar it was.
To make one, you’ll want to begin, as with almost all the sewing you do, with…
Start your 14-day FREE trial to access this story.
Start your FREE trial today and get instant access to this article plus access to all Threads Insider content.
Start Your Free TrialAlready an Insider? Log in


Its really great...admirable!!!
This is a new site for me and I am enjoying it very much
Although I have made these for years (starting with Mom's tutalage) this is the clearest explaination I have ever seen.
I have made these for years too, and still find it the niciest and studiest way to finish a garment closure. But the knots made on the first 4 threads tend to spiral around them. So I alternate the direction of the knots : I go back in the loop once upward (as shown), once downwards (or 2 upwards, 1 downwards).
I use these very often. I don't, however, take a tiny stitch on each end of the original loop of thread. I come out of the fabric at the beginning and in on the other side, then carry the thread across the back and out again at the beginning. I take 2 or three stitches then finish as above. This makes a nice, strong loop. Sometimes I even reinforce the back if the loop will get much pulling - like above a zipper.
THANK you very much for this from a sewing Newbie! I wondered how this was done, and this was very easy to follow.
I learned to make a bigger version of these as belt carriers.
Thanks for introducing me to a new technique!!
i also have been teaching my grandaughter to sew,she is into skirts,dresses for church,loves the longer version of the dresses,skirts,sometimes i have to create my own version of the longer skirt,dress.
i also have been teaching my grandaughter to sew,she is into skirts,dresses for church,loves the longer version of the dresses,skirts,sometimes i have to create my own version of the longer skirt,dress.
I have used this method for many years, but I add an extra back support by using either those clear plastic buttons, or the itty bitty buttons, both of which need to have two holes. I stitch the first entry of thread into the fabric, then when the thread exits on the other end THAT is where I slip the thread through the first button. I attach the second small button when I exit after the second pass. Depending on the fabric thickness there have been times that I make a third pass of the base thread before I begin the "knitted" (as I call them) stitches on the right/loop side. Each time I exit the base threads I attach the thread to the buttons, almost as if I am sewing the buttons on to the fabric. It ends up with the loop on the right side of the garment and being supported by the buttons on the wrong side of the garment.
While Canerday's suggestion of looping the base threads around to the back is tempting, I find that it can sometimes distort the thread bar and pull the whole thing out of place. And as for that spiraling of the knots (and it does happen), if you twist your needle as you work (rotate it when you grab it to twist the thread - you're going to be spinning it counter-clockwise, if you're looking straight at your thumb and index finger), that will counter-act the tendency. In fact, that's a good thing to do with all your hand sewing, whenever the thread starts to twist. It beats holding it in the air to let the thread un-twist, at which point the needle often falls off and lands on the floor!
Although you're hardly aware of it, you're constantly re-grabbing your needle - and if you feel the thread starting to twist - and this may never happen, it may happen with every stitch, it may happen every 10 stitches, who knows - just give the needle a little spin as you grab it.
I have used these before, but had forgotten about them. I have to go fix a skirt and pair of pants missing one side of the closure right now! Thanks!
Thank you for the great technique. I'm new to this arena and I wanted to create a pretty loop inside a purse to go over my fabric button and this is perfect.
Thanks! A friend of mine hired me to replace a thread bare on a pair of shorts. I had no idea how to do it,without actually buying a new closure. Now I do, it's so simple!
Wonderful. Perfect for top of zippers on my dresses.