

There are a variety of ways to add width to the front of a pattern. I like to increase the circumference gradually from the shoulder to the hem. One good place to start making this adjustment is the area about halfway along the shoulder seam, where it doesn’t interfere with the neckline and all the additional pattern pieces that would incur or the armscye, where it would have to contend with the sleeve being inserted. This method adds nothing along the shoulder seam, a small amount through the upper chest area, a bit more over the bust and the greatest amount at the hip area. By placing the alteration hinge at the shoulder seam, you can adjust just the front, nothing else would have to be adjusted to the back along the shoulder seam or anywhere on the back pattern piece for that matter.
This adjustment might be especially useful for women who have succeeded in fitting the bust, but whose jackets still won’t hang perfectly vertical at the center front edges. These edges may still open diagonally over a tummy area.
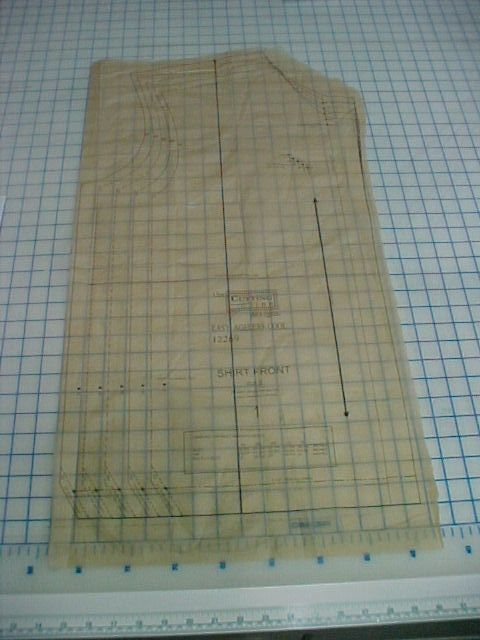
1. If needed, redraw the grainline so it is near the center front and won’t be affected by the adjustment. Be sure it remains parallel to center front.
Draw a vertical line from the hem to the middle of the shoulder edge, parallel with the center front. Cut the pattern on the vertical line, leaving a small hinge at the shoulder stitching line. Slide tracing paper underneath. Tape along the cut edge closest to center front.
2. Spread the hem of the pattern to achieve the adjustment needed. The cut pattern will open all the way to the shoulder, adding more width at the hem/tummy area, less at the bust, just a bit over the upper chest and…
Start your 14-day FREE trial to access this story.
Start your FREE trial today and get instant access to this article plus access to all Threads Insider content.
Start Your Free TrialAlready an Insider? Log in


Super article! There are so many complicated tutorials for adjusting a pattern, it is refreshing and inspiring to see that 7 steps are not better than 2 or 3. And from a person such as Louise Cutting makes the tutorial that much more valuable! I hope to take a class from Louise soon...soon...soon!
Ah, the ability to fit things without buying a larger pattern just for the bust size. Thanks so very much.
Pat
Louise has an unique way of making adjustments simple. Thank you Sew much. She is by far one of the best educators and I appreciate the time she shares with us through Threads.
Louise has a way of making things easy to understand. I'm looking forward to trying this tip.
Perfect timing! I was just in my studio trying to find an easy way of adjusting a t-shirt pattern for my hubby!Thanks so much
I am new to this group. I like the idea that these are
tuck/pleats or whatever. I am just thankful that Threads so kindly brings us this type of help (seeing is better).
Thanks for the tip. This makes adding width at the hips easy.
OMG how simple...I could have used it this weekend but next time I will know what to do. This is all a learning process and I have just added another valuable piece of information towards becoming an accomplished sewer. Thank you Louise
Couldn't be timelier for me - I need to add almost 2 inches through the midriff of my blouse pattern. This may be much easier than what I had planned to do. Thanks so much!
can you use the same concept but reverse process to decrease the width of a pattern( all patterns have too much room at the hip and waist line)?