
An Easy Way to Accurately Pleat Ribbon for Trims

I was teaching a class recently for the Massachusetts chapter of the Window Coverings Association of America. We were making samples of different trims, and I demonstrated how to mark muslin with a permanent marker.
For more inspiration be sure to pick up the latest issue of Threads, and don’t miss other techniques like this one by ordering a print subscription which comes with FREE access to our tablet editions.

This method will work beautifully for the trims I’ve blogged about in the past such as this lovely pleated trim; this re-creation of a pleated edging; the box pleat experiment, part one; and the the cross drape, part two.

A question arose during the class: How can one quickly and easily mark the pleats on finished fabric? Not with a permanent marker, for sure. I decided to figure it out.
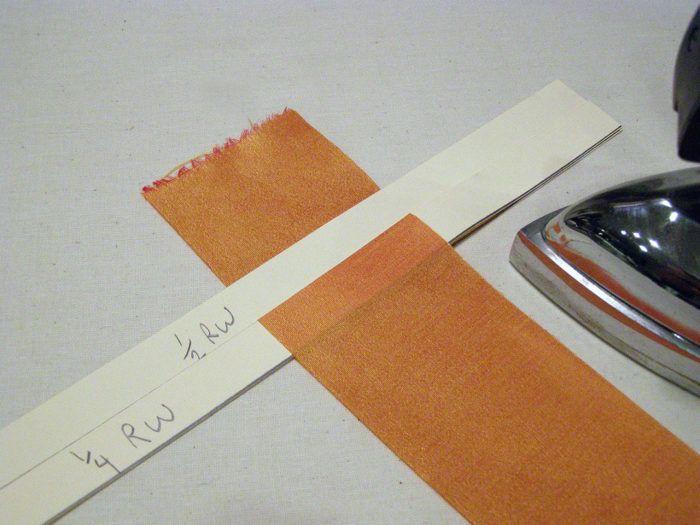
In woodworking, there is a measuring tool called a jig. It is sometimes purchased, but many times it is made specifically for a particular project. A jig provides the means for accurate duplication. It enables you to do the same thing over and over.
I’ve created a jig for the specific pleats I needed for this trim. I based my dimensions on the finished fabric or ribbon width (RW). By the way, this trim is featured in a previous technique post. This method will work for other trims I’ve written about, which can be accessed by clicking here and here.

This simple jig is cut from a manila folder. I measured the pleat depths and marked their distances on the folder.
This design needed two pleats, so it needed two jigsone for the depth of the pleat and one for the return.

After experimenting, I found a longer jig was easier to manage than one that…
Start your 14-day FREE trial to access this story.
Start your FREE trial today and get instant access to this article plus access to all Threads Insider content.
Start Your Free TrialAlready an Insider? Log in


I haven't done pleats on anything yet because it looked like such a pain to do! Not anymore, this is simple and easy. Love it!
I took a class from a Pfaff educator who used her ruffler to make pleated ribbons. They were gorgeous.
As I started reading this post (not realizing that it was Kenneth King) I thought, "Genius!!" - then I saw who made up this technique and thought, "Of course ..." Working various mediums I've used "jigs" and never did it occur to me to make one up for this purpose. I mean, I use all kinds of cut and torn paper to get the pressing right but this never OCCURRED to me! Absolutely Genius! Thanks!
Now that I've seen this technique, I'll be adding pleated trims to some apparel and home decor items! Thanks for the easy to follow instructions.
Those are great easy-to-follow instructions. Great to see something that looks so hard to get trés accurate explained so well. Thanks! BTW, it'll be a heck of a lot cheaper than the Mokuba I bought in Paris several years ago!
Glad you all like this technique! I'm basically lazy so wanted to find an easy way to avoid work, and here it is!
While making a wedding gown, I had somewhat the same challenge. Here is my Blog Post - http://blog.londasfiles.com/?p=1504.
I'll copy my directions here, but at the blog post you can see photos. Basically, I'v used my throat plate to 'measure' AS I stitch!
" In playing with how much pleat, how deep, how often – I came up with every inch, a 1/2″ deep pleat. That math then meant that I needed 2x the skirt hem circumference. I cut the 8″ strips lengthwise on the fabric – and seamed them so I had one continuous length of fabric. I then pressed in half, wrong sides together.
I HATE math, and boring repetitious tasks, so I was NOT looking forward to marking all of that almost 350″ length of fabric…
Playing, I decided I could physically ‘do’ this right at the machine….my first step was to measure 1″ from the needle in down position – forward. I made a mark on a piece of tape, and stuck it to my machine bed. See photo below.
Conveniently, the break of the metal throat plate was 1/2″ from the needle, and then obviously 1/2″ from the mark I had just made…so that meant that I could put a pin into the fabric at the mark, and pull fabric back until it meets the 1/2″ mark – the break of machine bed and throat plate to create the 1/2″ deep pleat. See the next photograph.
Then, the next step was to stitch up to the pin, and stop with needle down and repeat the entire process. Over and over and over – but this was relatively ‘painless’ compared to actually measuring and marking each pleat!
Londa Rohlfing
Kenneth, you said you are lazy and wanted an easy way to avoid work. Well, I don't think you are lazy at all, I think this is a fantastic idea. I have decided to save some funds and make my daughter's school uniforms this year, which are really simple straight tunics, but I was scared to tackle her P.E uniform as it involves a pleated skirt. Not sure if I'll have the time to try it on this project but I will definitely use this idea in future. I love simple tools I can make myself that make my life easier. Thank you. Your articles are inspirational and a pleasure to read.
I just received info about your site from a friend. I have an antique pleating board with flat wire "fingers" that can be lifted on one side to place the fabric under and mark for pleats. Unfortunately, the instructions on the back label are so faded and stained that they are no longer readable. This has helped me to figure out a little more how to use it! And yes, it is possible to iron on the board as the pleats are made. Thank you so much for the help!!!
Glad to be of help!
I use the (metal)slats from venetian blinds to set the pleats in some of my folk costumes when I am to lazy to do the whole boiled starch routine. I suspect they would work for this as well.
Senor King,
Being innovative and industrious plants you furthest from laziness, or any similar descriptors.
It's always a pleasure to see how you make fabric yield and submit to your wants.
Of course, your i500 also delivers, and you clearly know how to use it for stellar results.
As always, in awe of you.
Thanks for the kind words!