
How to Make a Lovely Pleated-Ribbon Trim

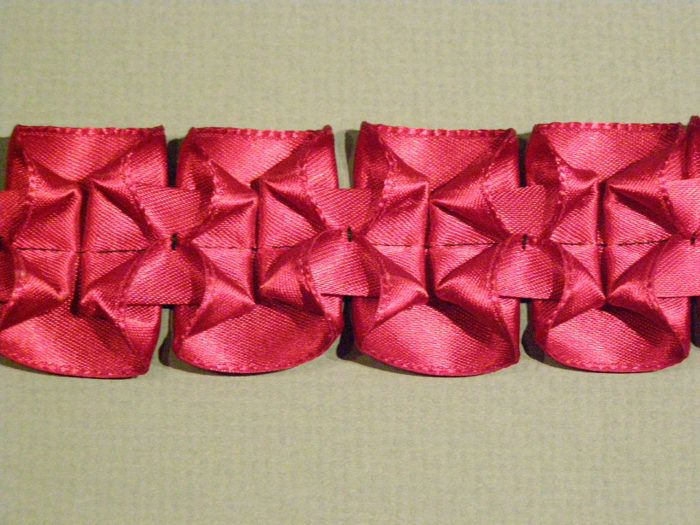
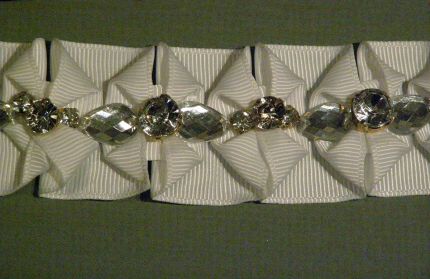
When I recently came across this white ribbon trim, I wanted to figure out how they made it. My last post on ribbon trim was so well received, I thought I would share the results with you.
For the unit of measure, I’m using ribbon width. I got this idea from Candice Kling, who has written quite a bit on ribbon techniques–she uses this as her unit of measure, so everything she demonstrates can scale up or down easily.
I will also alternate between a paper model, and ribbon, in this post. I find it’s a better way to illustrate how this works.
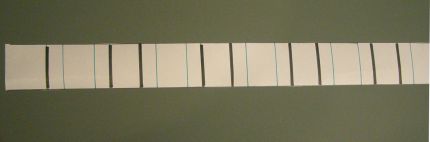
Marking the ribbon:
I use disappearing chalk on the ribbon, and mark lines perpendicular to the selvedges. These lines alternate–1/3 ribbon width, then 2/3 ribbon width, and so forth.

For example, if you used a 3″ wide ribbon, then the 1/3 width would be 1″, and the 2/3 width would be 2″.
Next, you need to crease the ribbon. You’ll press creases on every other unit of 2/3 ribbon width (black lines in the photo).
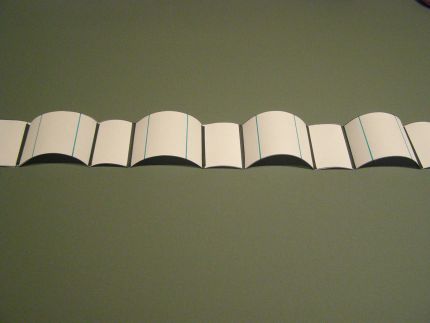
This is what the creasing will look like in profile in paper. Note the folds all occur in the same direction (a valley fold).
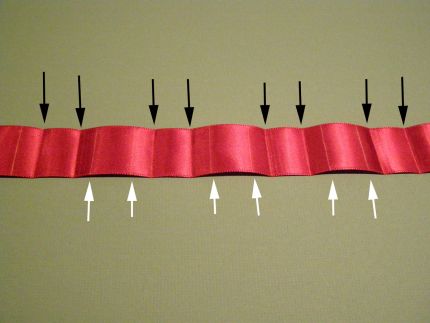
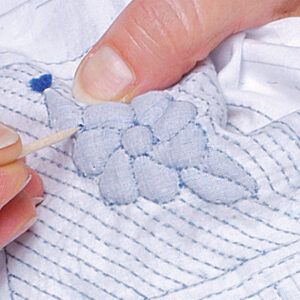
This is what the ribbon looks like, when creased. The black arrows correspond to the black lines on the paper model, the white arrows pointing out the chalk lines correspond to the blue lines on the paper model.
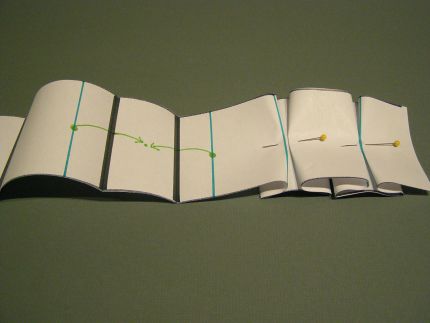
Next, mountain fold the uncreased blue lines towards the center of the unit, as shown on the paper model. Pin in place.
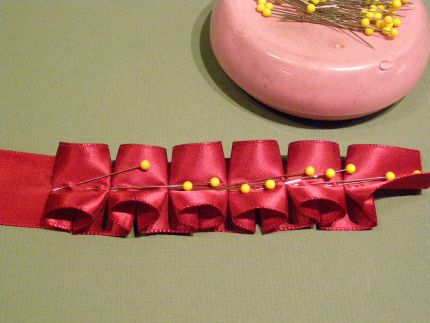
This is what the work looks like in the ribbon.
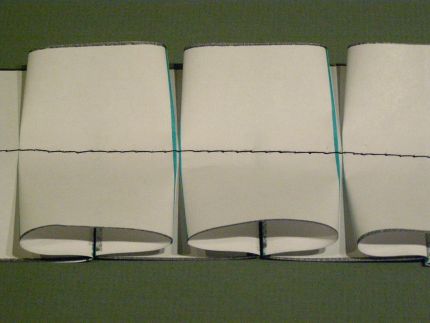
Now, machine sew down the middle of the ribbon, securing the pleats. First, the paper model.
Start your 14-day FREE trial to access this story.
Start your FREE trial today and get instant access to this article plus access to all Threads Insider content.
Start Your Free TrialAlready an Insider? Log in


I love this ,thank you so much
Thank you so much Kenneth! This is a beautiful trim.
I'm going to make this beautiful ribbon for a wedding gift pillow. Thank you.
I am loving the series on ribbon trims. The illustrations were awesome!
Thank you for all you share with the sewing world.
I am loving the series on ribbon trims. The illustrations were awesome!
Thank you for all you share with the sewing world.
Thank you Mr. King. As usuall, your explanations are just wonderfull!!! You really have a heart of a "grand maestro"
beautiful! i must make! thank you!
Lauren
Absolutely beautiful! I can't wait to try this. Thank you.
Paper plus ribbon makes a superb demonstration. Thank you!
Awesome! Another great embellishment for a special garment! Thank you for your ribbon trim ideas.
Thank Kenneth, I will use this ribbon trim technique on a jacket, love this!!!!
That's beautiful! And the instructions are so clear. Thank you!
Excellent! Thank you.
Kenneth,
I've used so many of the trim ideas you've shared with us. This idea will also be used in the near future on a project I've been contemplating. These trim ideas are innovative, creative and beautiful. Thank you so much and I'll be watching for more.
Ymana Johnson
Absolutely stunning and seems easy to achieve. Thank you Mr. King,
once again you have shown people how to make something beautiful.
Great embellishment! I can imagine using this trim on a variety of garments. It actually is a lot simpler than I thought when I first looked at the picture, thanks to the clear instructions provided. Thanks Kenneth.
Your instructions/illustrations are always so clear. Thanks for a beautiful trim technique.
Isn't reverse engineering so much fun! That looks like fun! Much simpler than the effect.
Thank you for sharing!
http://vani-testblog2.blogspot.com/2011/07/canadian-smocking-design-mesh-with.html
reminds me of canadian smocking
So, how much ribbon do you need per finished length, 3 to 1?
Thank you for this wonderful explanation! There are so many ways to use this ribbon technique that it will be hard to choose.
a very clear tutorial, i think it is very similar to what we call a "froschmaulborte" in germany-as an embellishment on a dirndl.
Thanks for showing.
Wow! This will come in very handy for heirloom sewing.
Thanks
Thanks for the kind words!
In answer to how much ribbon this requires, I generally assume a 3:1 ratio. Sadly I didn't keep track of how much the technique ate up, but 3:1 is a good rule of thumb....
Where is the how-to on the ribbon trim pictured on p 13 of the new Threads magazine?
Thanks!
That's a wider trim than the previous one you did. Would you still attach it at the middle where the stitching is? Thank you so much for your wonderful tutorials. Much appreciated!
In regards to attaching the trim, you would indeed sew it at the center of the trim. If you want to tack down the ribbon at the edges you can, but to my eye, tis looks too restricted and tied-down.
In regards to the request for the information on the ribbon trim in the current issue, click the link in the text of this blog to get to it.
Do try this technique on satin fabric...first make tucks about 2 inches apart going one way (Verticle)...then do the same going the horizontal. Then hand tack folded edges of each square in the center...makes a lovely bow and gives plenty of manipulated fabric to work with...It's also very fast.
Thank you for another fun thing to try. I just bought some sheer green ribbon to try it out! I picked sheer ribbon because I have been inspired by your sheer jeans to not fear the sheer anymore. Baby steps.
"not fear the sheer"---that's a good phrase! Sounds like a mantra for sewing....
Yes, Kenneth, please do keep the ribbon embelishments comming. They are a delight and you do a wonderful job explaining them!
Wow! This is absolutely gorgeous! I'm glad this wonderful technique is available to me, what an awesome tip. Thank you.
Thank you for sharing yet another technique for turning an ordinary garment into couturier.