

Nowadays, precision and symmetry are commonplace in machine and hand quilting, thanks to the many tools and devices available for measuring and marking. The demand among quilters for exactitude arises from their desire to quilt designs that complement the symmetry in the precision-pieced quilt tops that are so popular today. But this insistence on precision quilting hasn’t always been the case. Consider freehand quilting.
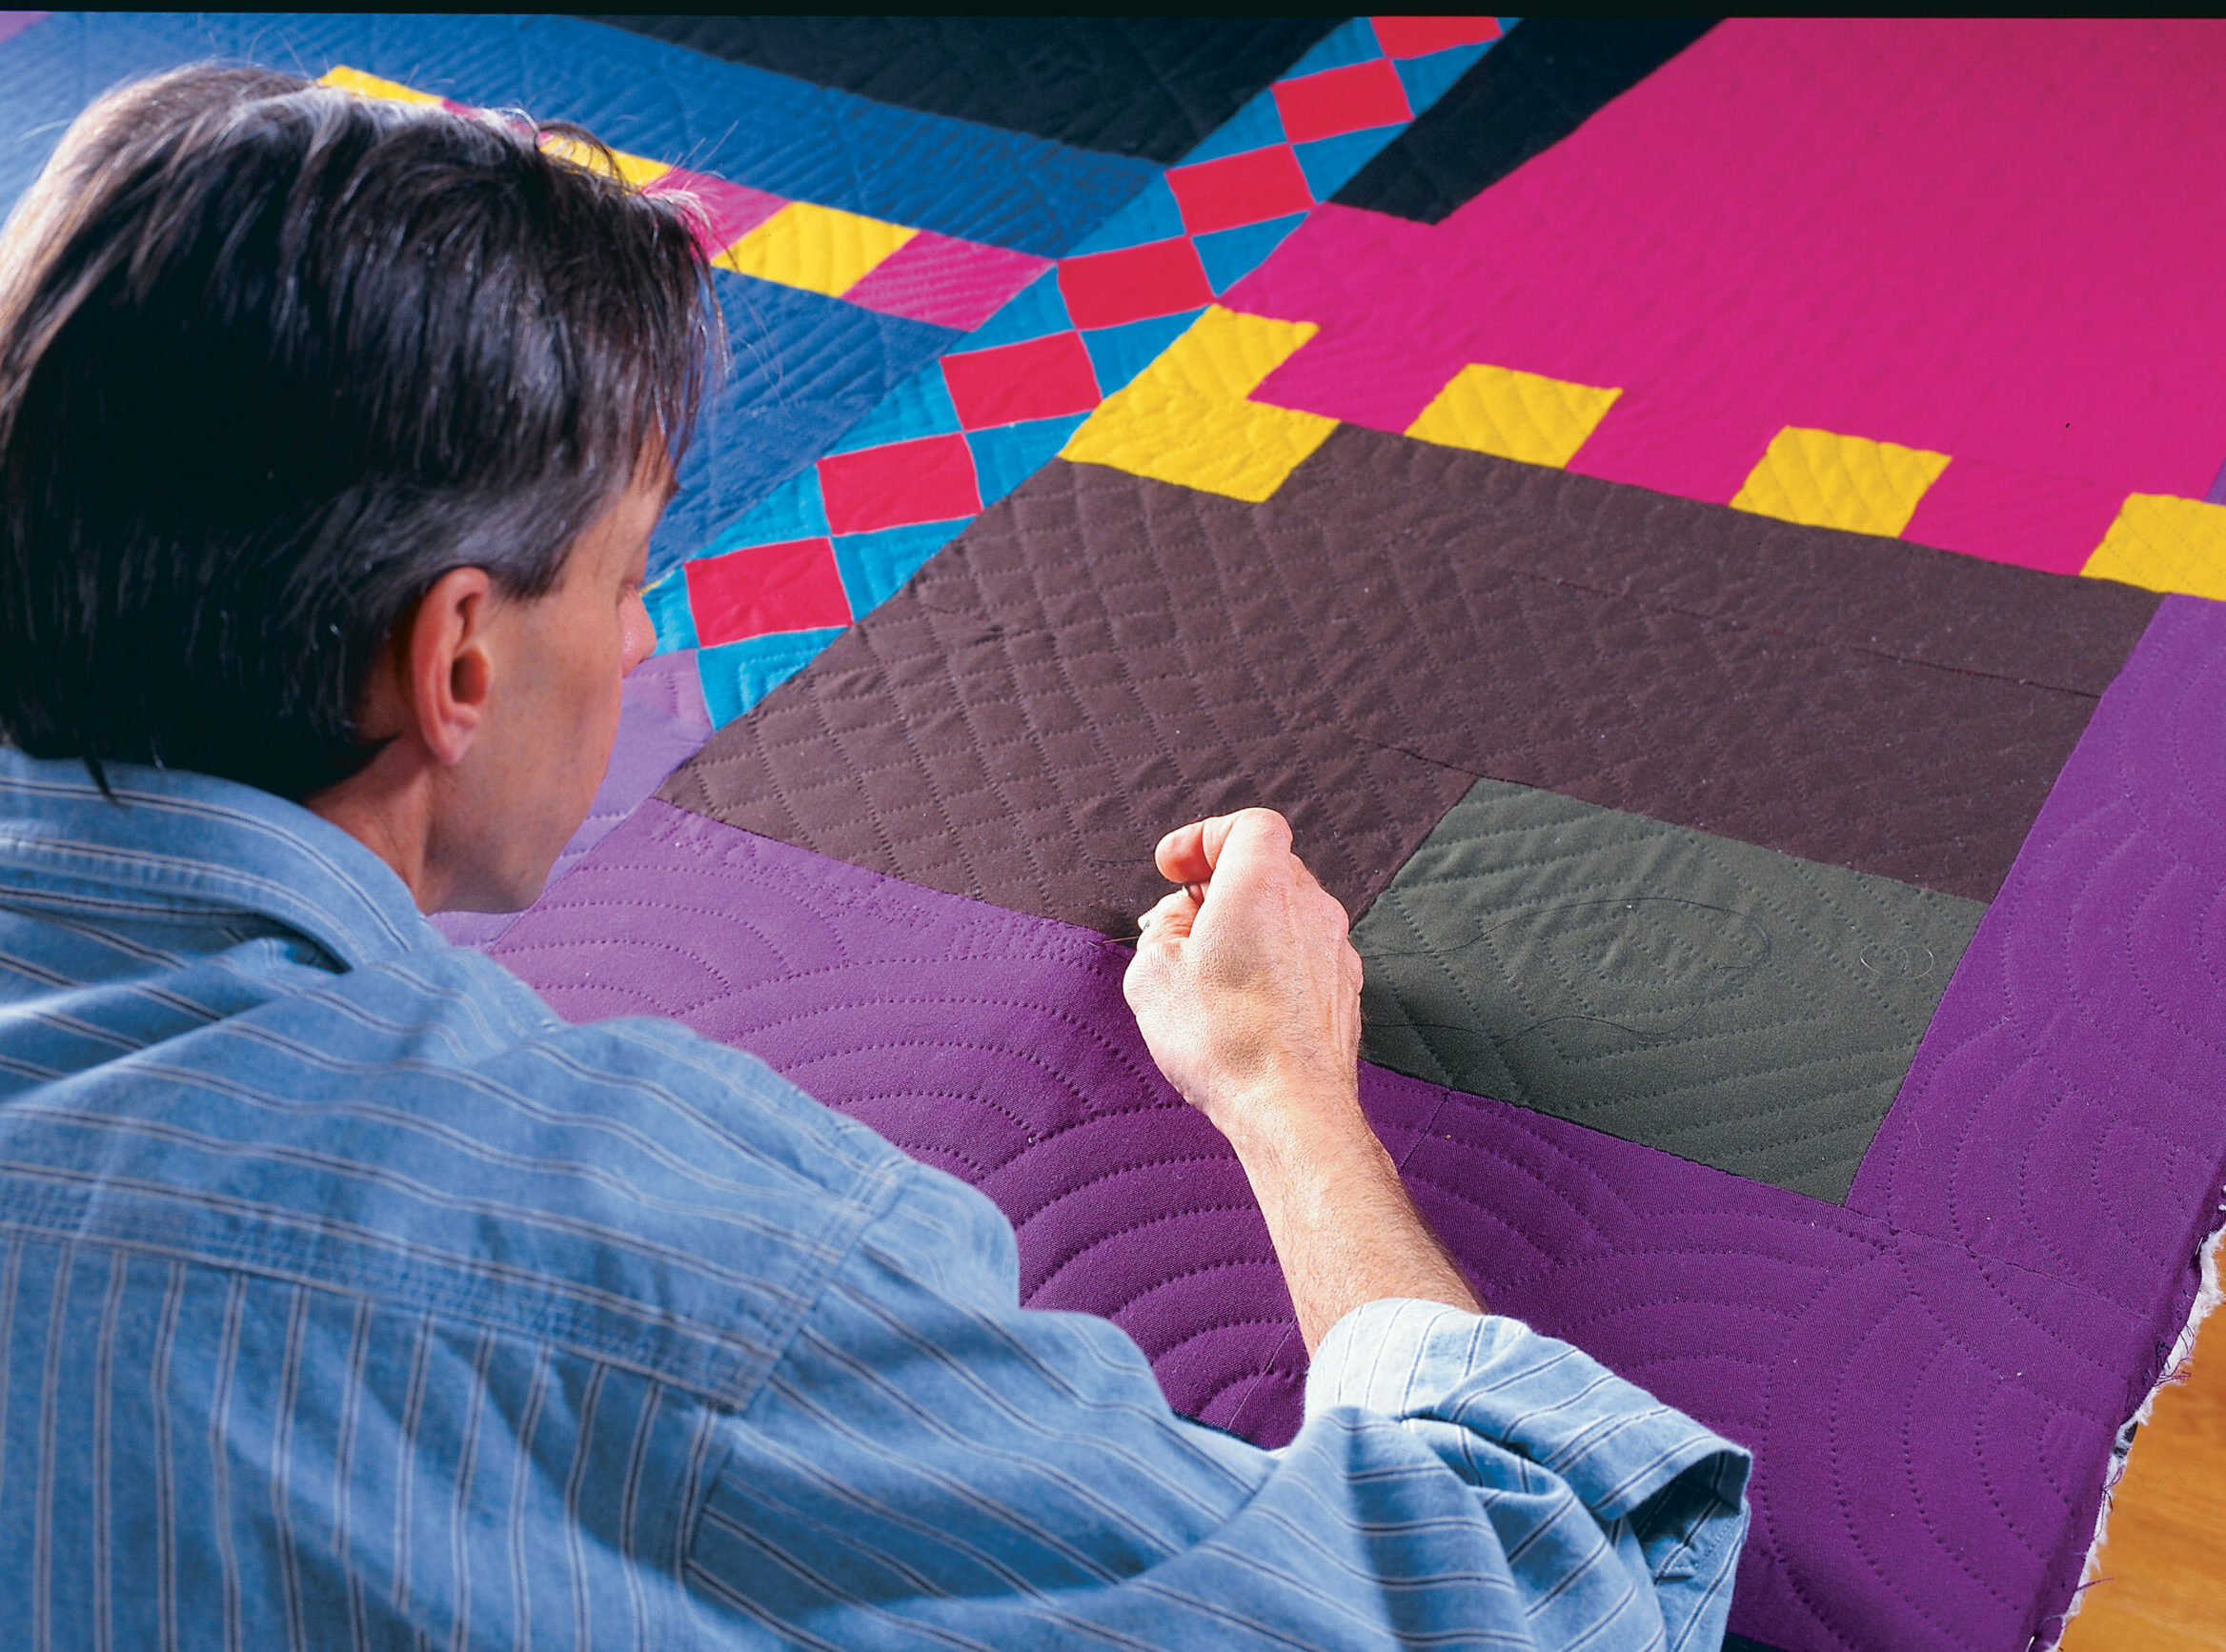
Quiltmakers of the last century took a much freer approach, sometimes intentionally infusing their quilts with irregularities and asymmetry. Instead of casting their quilting stitches in a subordinate role to the patchwork, these quilters were likely to go their own way with tiny stitches meandering across the quilt top, heedless of its patterns, freehand-quilting everything from simple outlines and floral shapes to large-scale borders and overall fan patterns. I’ve always liked the beauty and spontaneity of their quilting, so after years of meticulously marking and stitching symmetrical designs, I decided to give freehand quilting a try.

One step at a time
Even though I had plenty of seams in my piecework to use as guideposts, the idea of quilting with no marks to follow was more intimidating than I expected. It was disconcerting to think about starting a line of quilting wherever it pleased me, and I was so afraid of making mistakes that I had to wean myself slowly from the security of designs drawn on the quilt top. I began with outline quilting, which I quickly learned didn’t need to be marked since the seam I was outlining was only 1/4 inch away from my needle. I couldn’t wander more than a millimeter or two from the line before the stitching looked severely lost, and by the time I reinserted the needle, I was back on track aligning my stitches with the nearby seam.
Next came small blocks
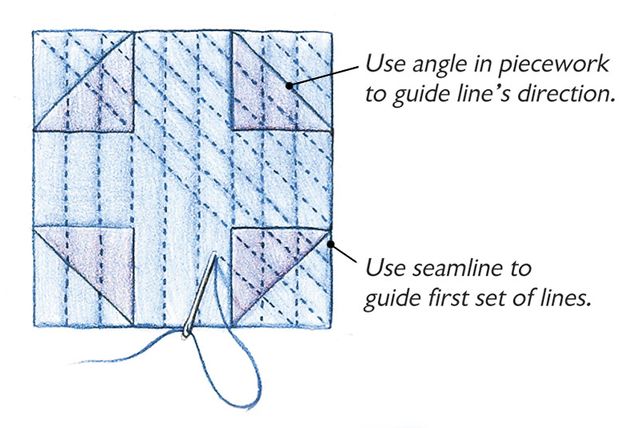
With confidence gained from freehand outline quilting, I decided to venture further away from the security of seamlines while staying within the boundaries of a single block. Stitching diagonally across small squares in alternating directions didn’t seem too scary. I only needed to decide in advance how far apart the diagonal rows should be, then do my best to maintain that distance–which, it turned out, wasn’t difficult at all.
A classic frame for quilting
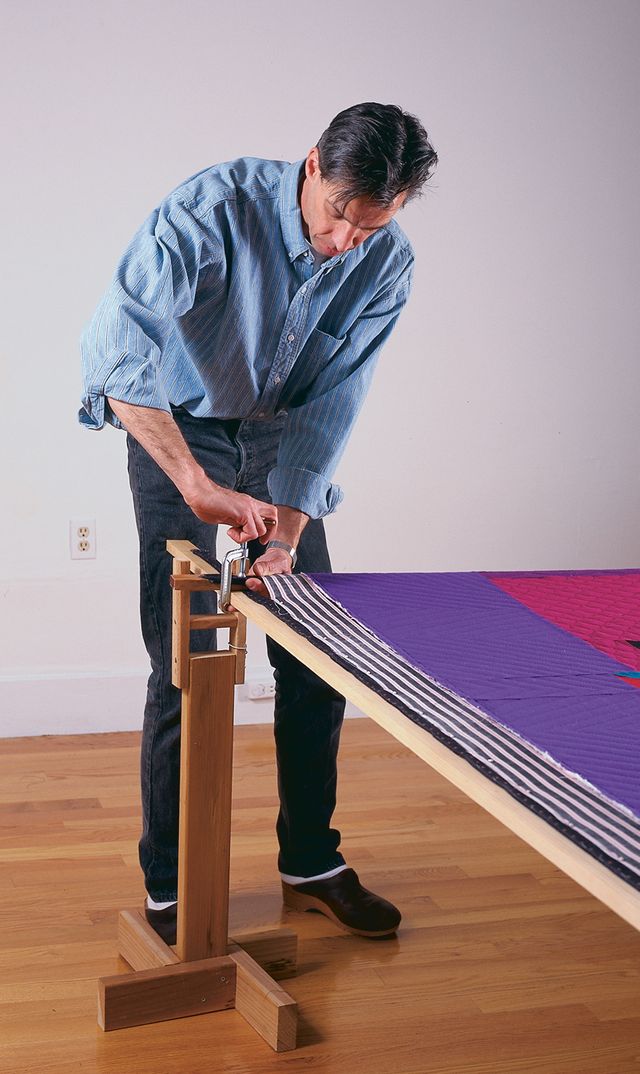
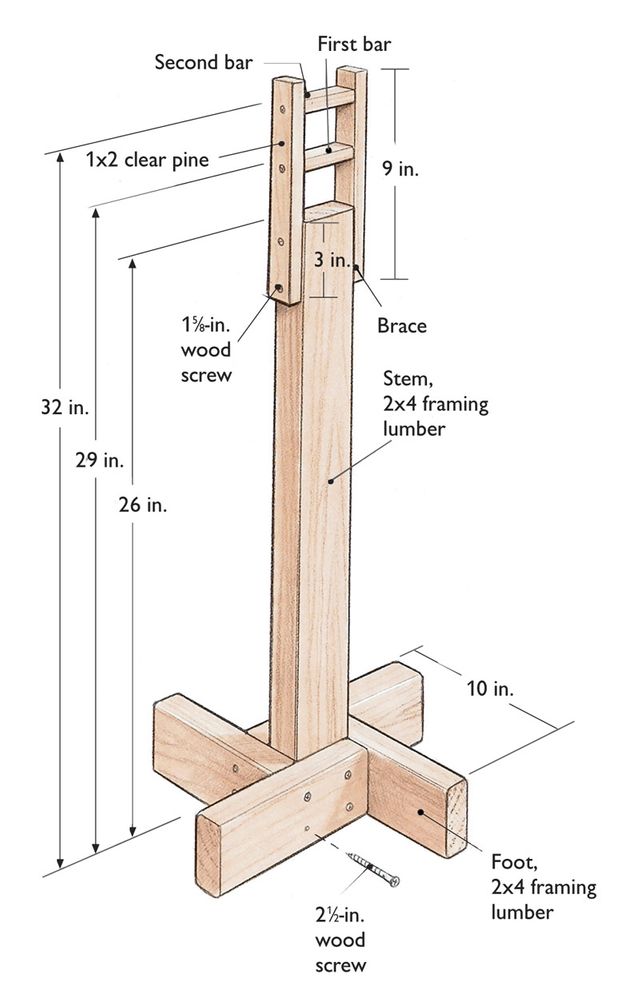
Before I continue my freehand-quilting saga, let me tell you about the simple quilting frame I use, which is helpful for this type of quilting and similar to the frames used by most pre-20th-century American quilters.
Cheap and easy to make, it allows me to view the whole quilt at one time, or roll it up to get at the areas I need to quilt. Best of all, I don’t have to baste the quilt because its layers are stretched and secured on the frame where they can’t shift. Finally, if I want to use a quilting method that requires basting, such as tying or machine quilting, I can install my quilt sandwich in this frame and baste it in no time.
 |
 |
Assemble stands
1. Drill holes for wood screws in feet and top bars.
2. Screw braces to top bars, then to stem.
3. Screw feet to stem.
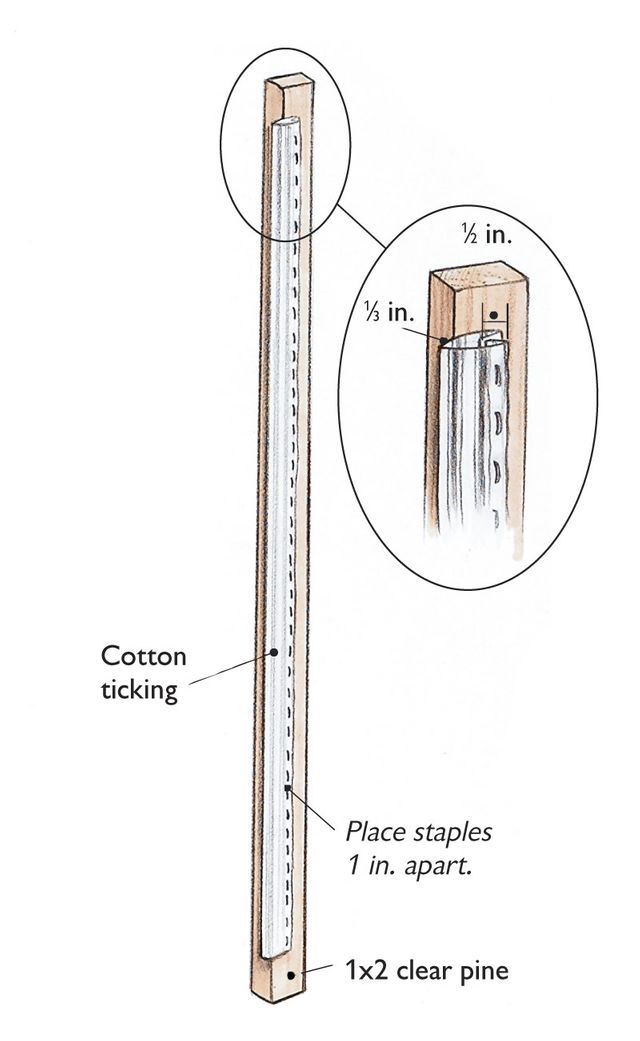
Prepare stretcher bars
1. Fold cotton ticking with edges inside.
2. Position ticking on bar with 1/2 inch of folded edge overhanging bar’s edge.
3. Staple ticking to bars every 1 inch
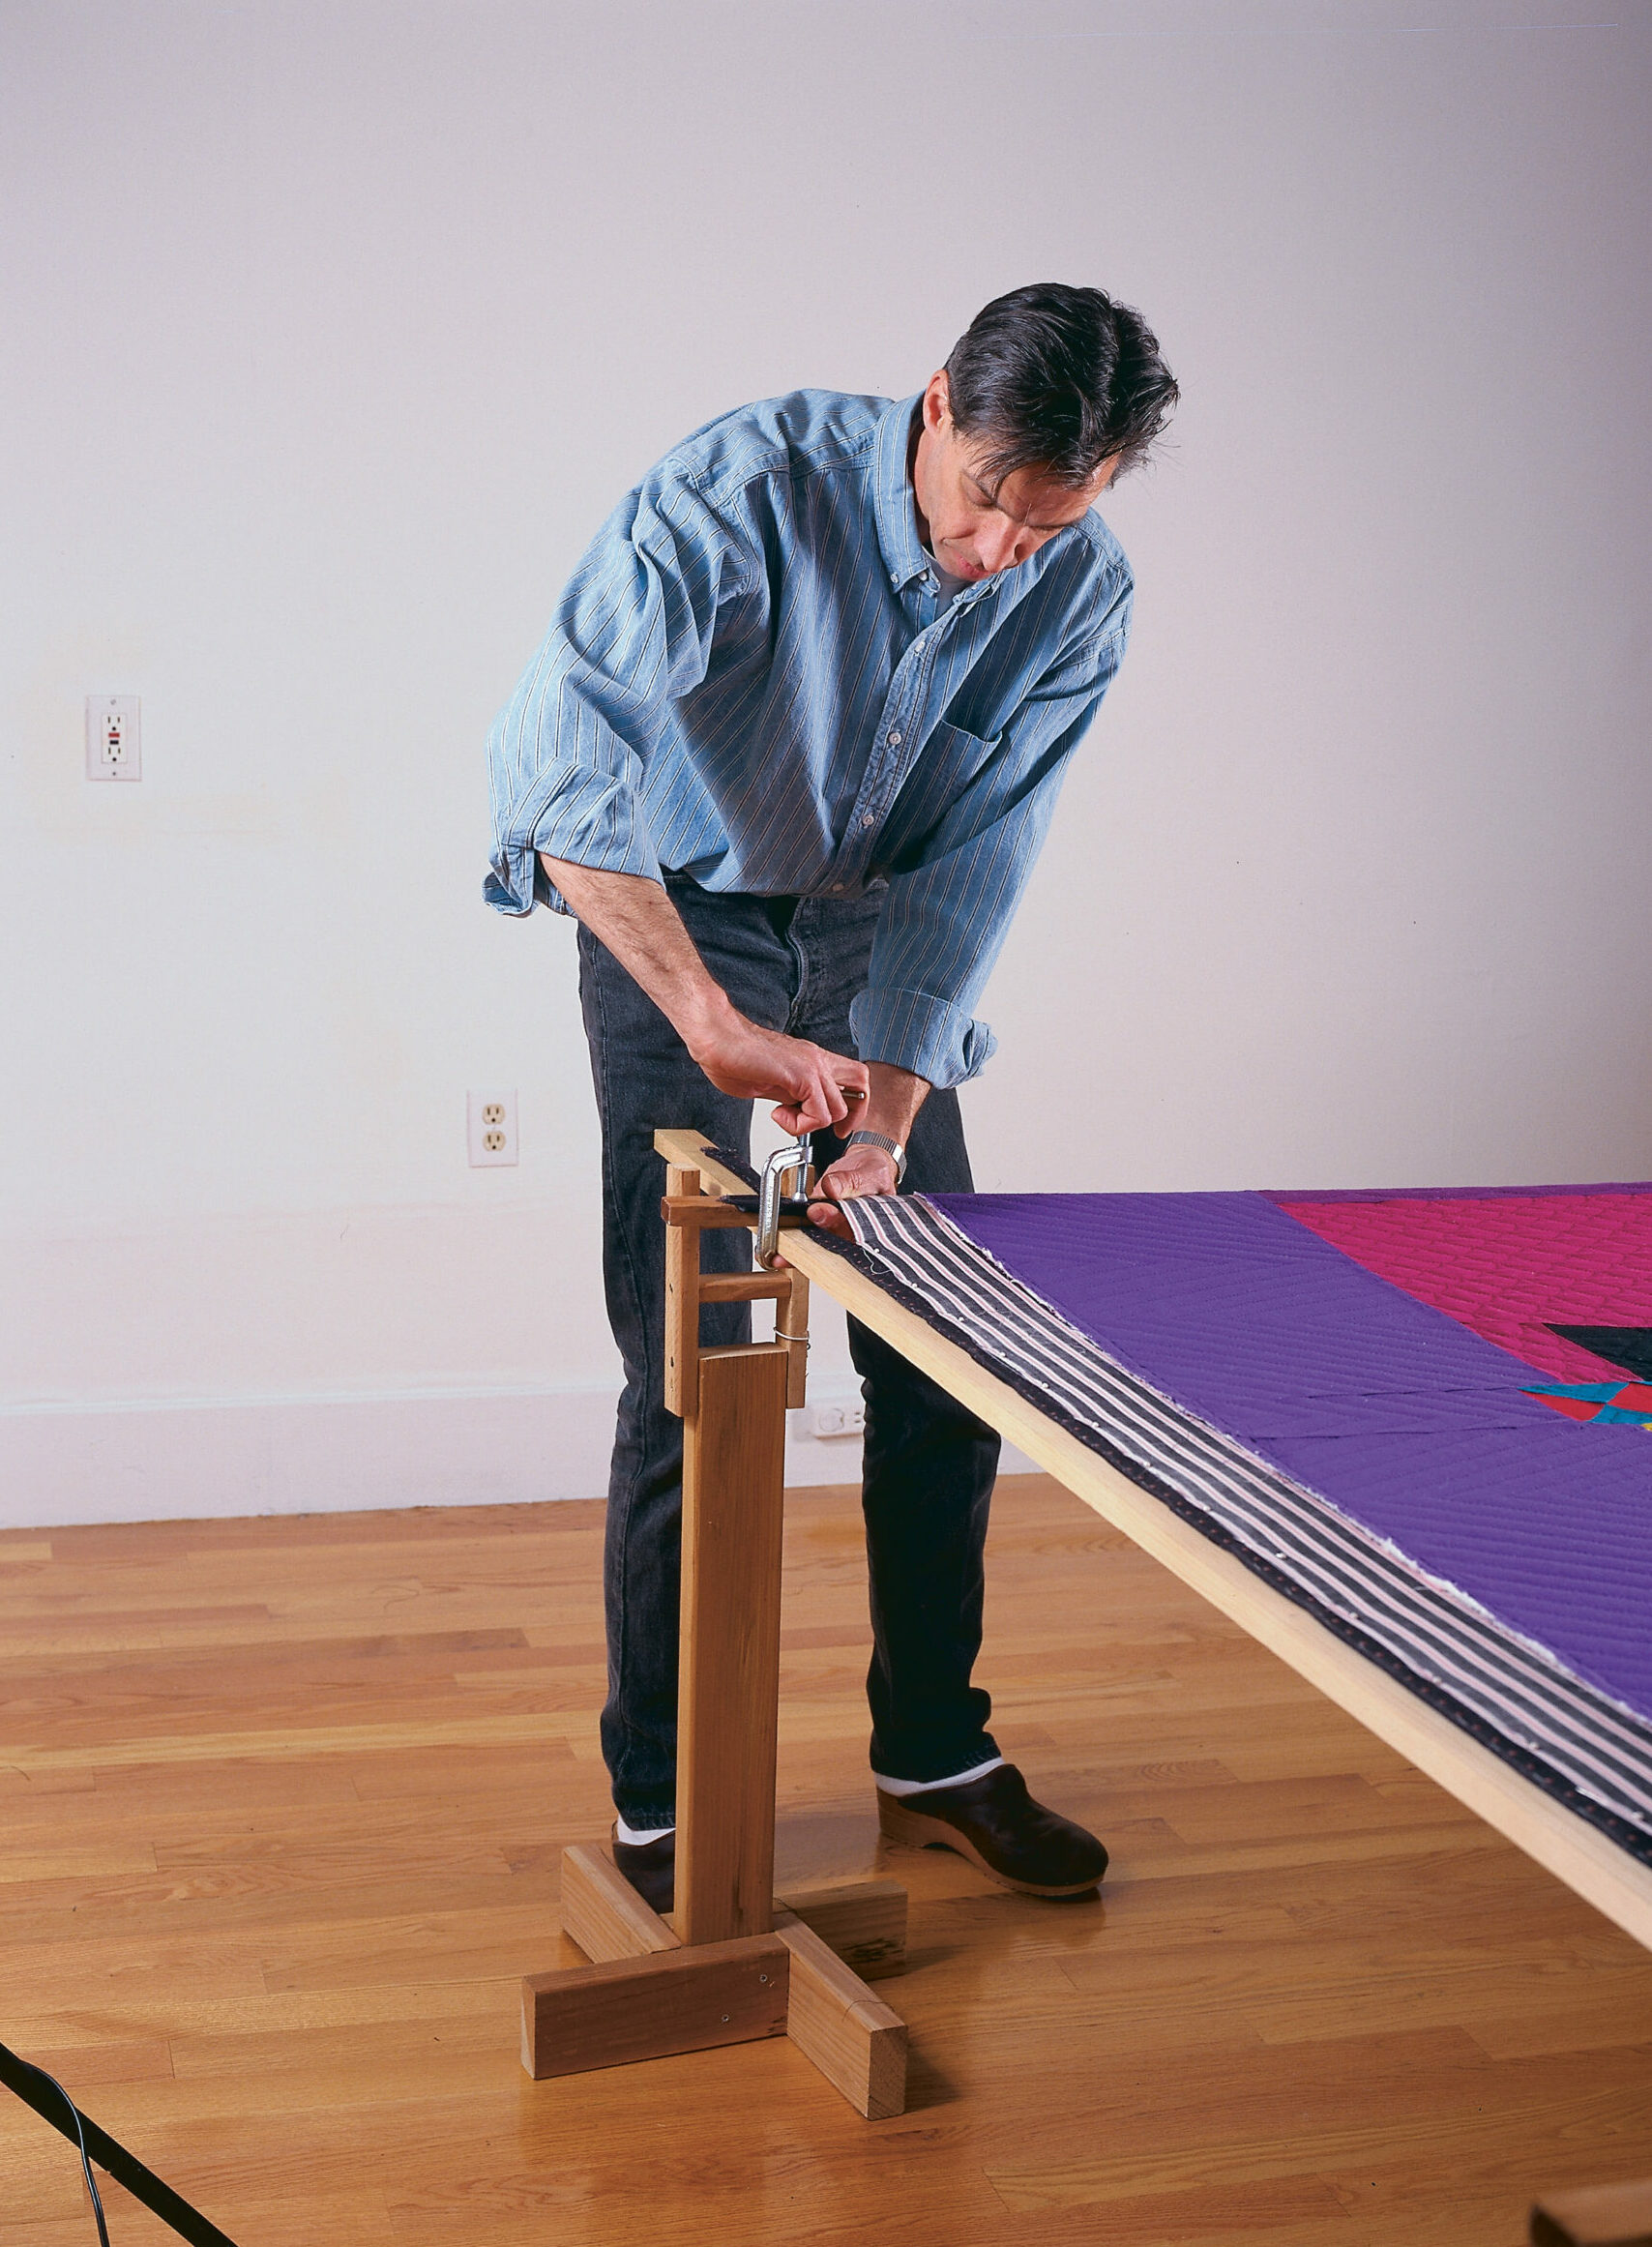
Clamp the four bars together, ticking side up, stretching the backing very tight and using a carpenter’s square to true the corners, then pin the remaining two sides of the backing to the ticking. Spread and smooth the batting, then the quilt top, right side up over the backing, truing the top with a carpenter’s square. Pin the quilt top’s edge to the batting and backing every 3 in., position the frame on the four stands at a comfortable height, and start quilting.
Install the quilt sandwich
Before attaching your quilt to the frame, prepare the backing 5 inches to 6 inches longer and wider than the quilt top. Lay the backing wrong side up over the four stretcher bars and firmly whipstitch the two short sides (or any two opposite sides of a square) of the backing to the bars’ ticking.
Quilt from the outside in
Quilt in about 6 inches, or as far as you can comfortably reach, around the quilt’s entire edge, then release the clamps on either end of one whipstitched side. Brace one bar against your thigh, roll the quilt up to the edge of the quilted area and reclamp the two bars, making sure they’re still properly trued up. Do the same on the other end of the bar, and continue quilting. When the quilt has been rolled up 3 feet to 4 feet, it will become difficult to reach in far enough to reclamp the bars. At this point remove the pinned bars and replace them with the two 4-foot bars.
Expanding my horizons
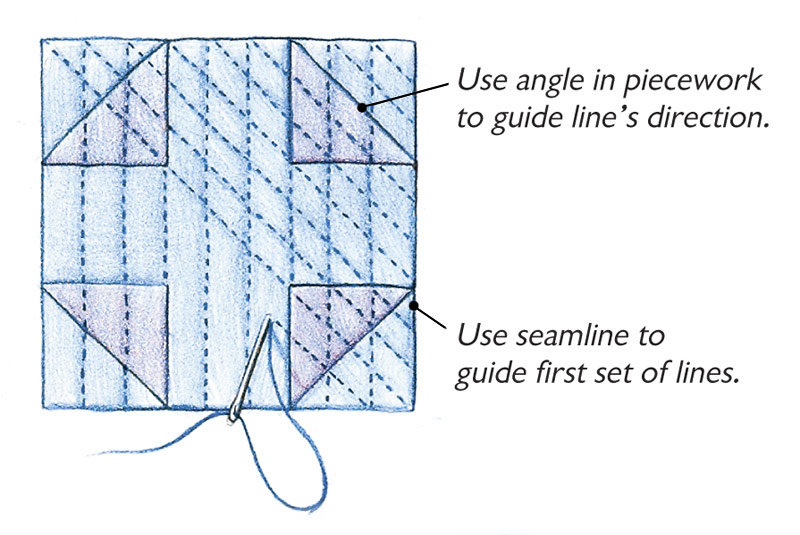
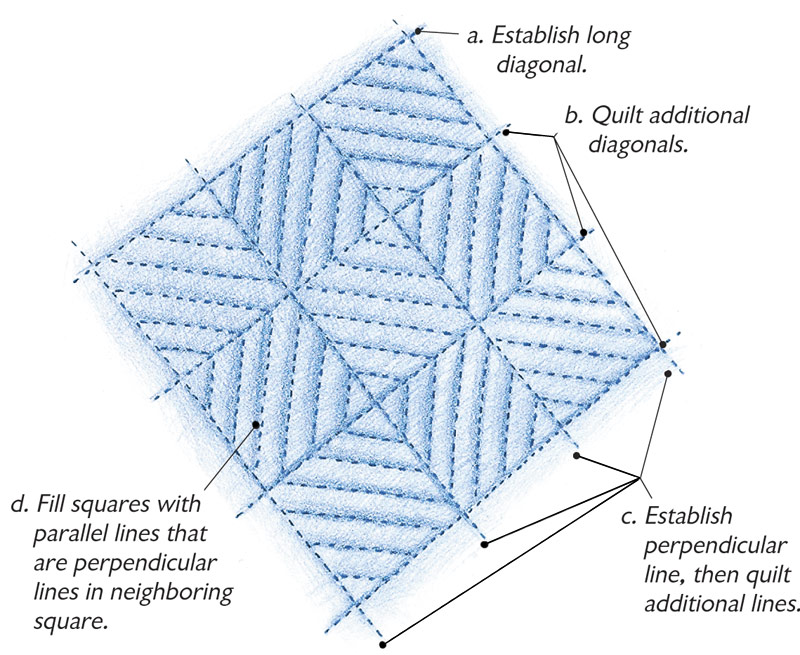
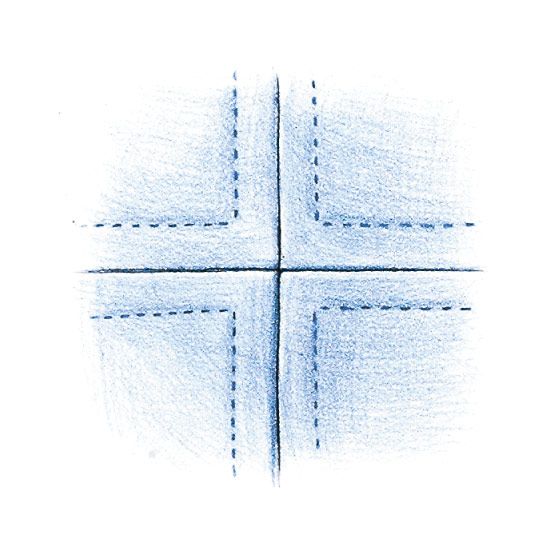
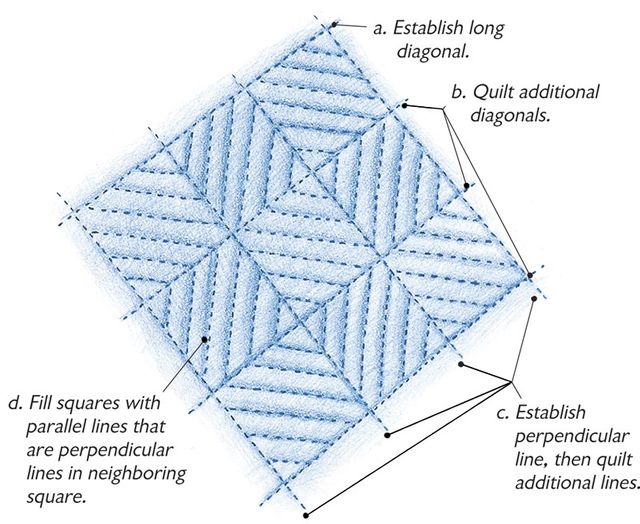
Returning to my tale of freehand quilting, once I was comfortable quilting small areas confined by nearby seamlines, I was ready to embark on a larger expanse with a crosshatch pattern. Still “fenced in” by the piecework’s seamlines, I established a diagonal line by starting at one corner of the block and pointing my needle at the opposite corner. But to make sure my eye didn’t stray as I traversed the distance, I marked the desired path with a few pins so that I’d have something to aim my needle at. As hard as I tried to keep the long diagonals parallel, they inevitably seemed to wander, but after a while I came to prefer this organic effect. And I knew I didn’t have to work at achieving this look because it was going to happen anyway. The stitching logistics I arrived at were simple: after covering the area with lines going in one direction, I was able to stitch a second set of diagonals in the other direction without any pinned guideposts. The spacing between the lines had already been established by the first set of diagonals, so I only needed to make sure my needle was perpendicular to the previous line, which was only an inch or so away.
Feathers and fans
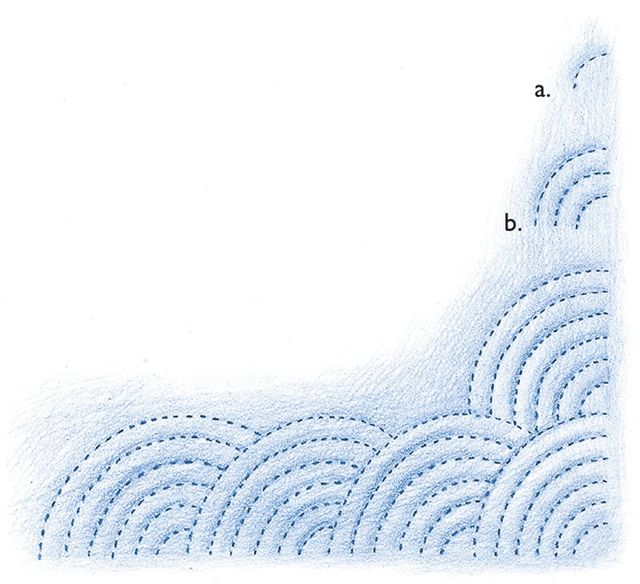
Floral motifs and feathers were next, but I still had to ease into them, marking one row of feathers, shown in quilting pattern 4 in Quilt these designs freehand, or floral patterns that I could then follow in subsequent rows. Eventually I graduated to freehand fans, pattern 5, consisting of concentric arcs across the entire quilt top without regard for the pieced design, as I’d seen in many 19th-century quilts made throughout the South. I learned to work the way old-time quilters did, quilting one row of freehand arcs around the edge of the quilt about one needle length apart (I use a no. 9 between needle), then building more rows of concentric arcs, as shown on the facing page.
Finally fearless, freehand
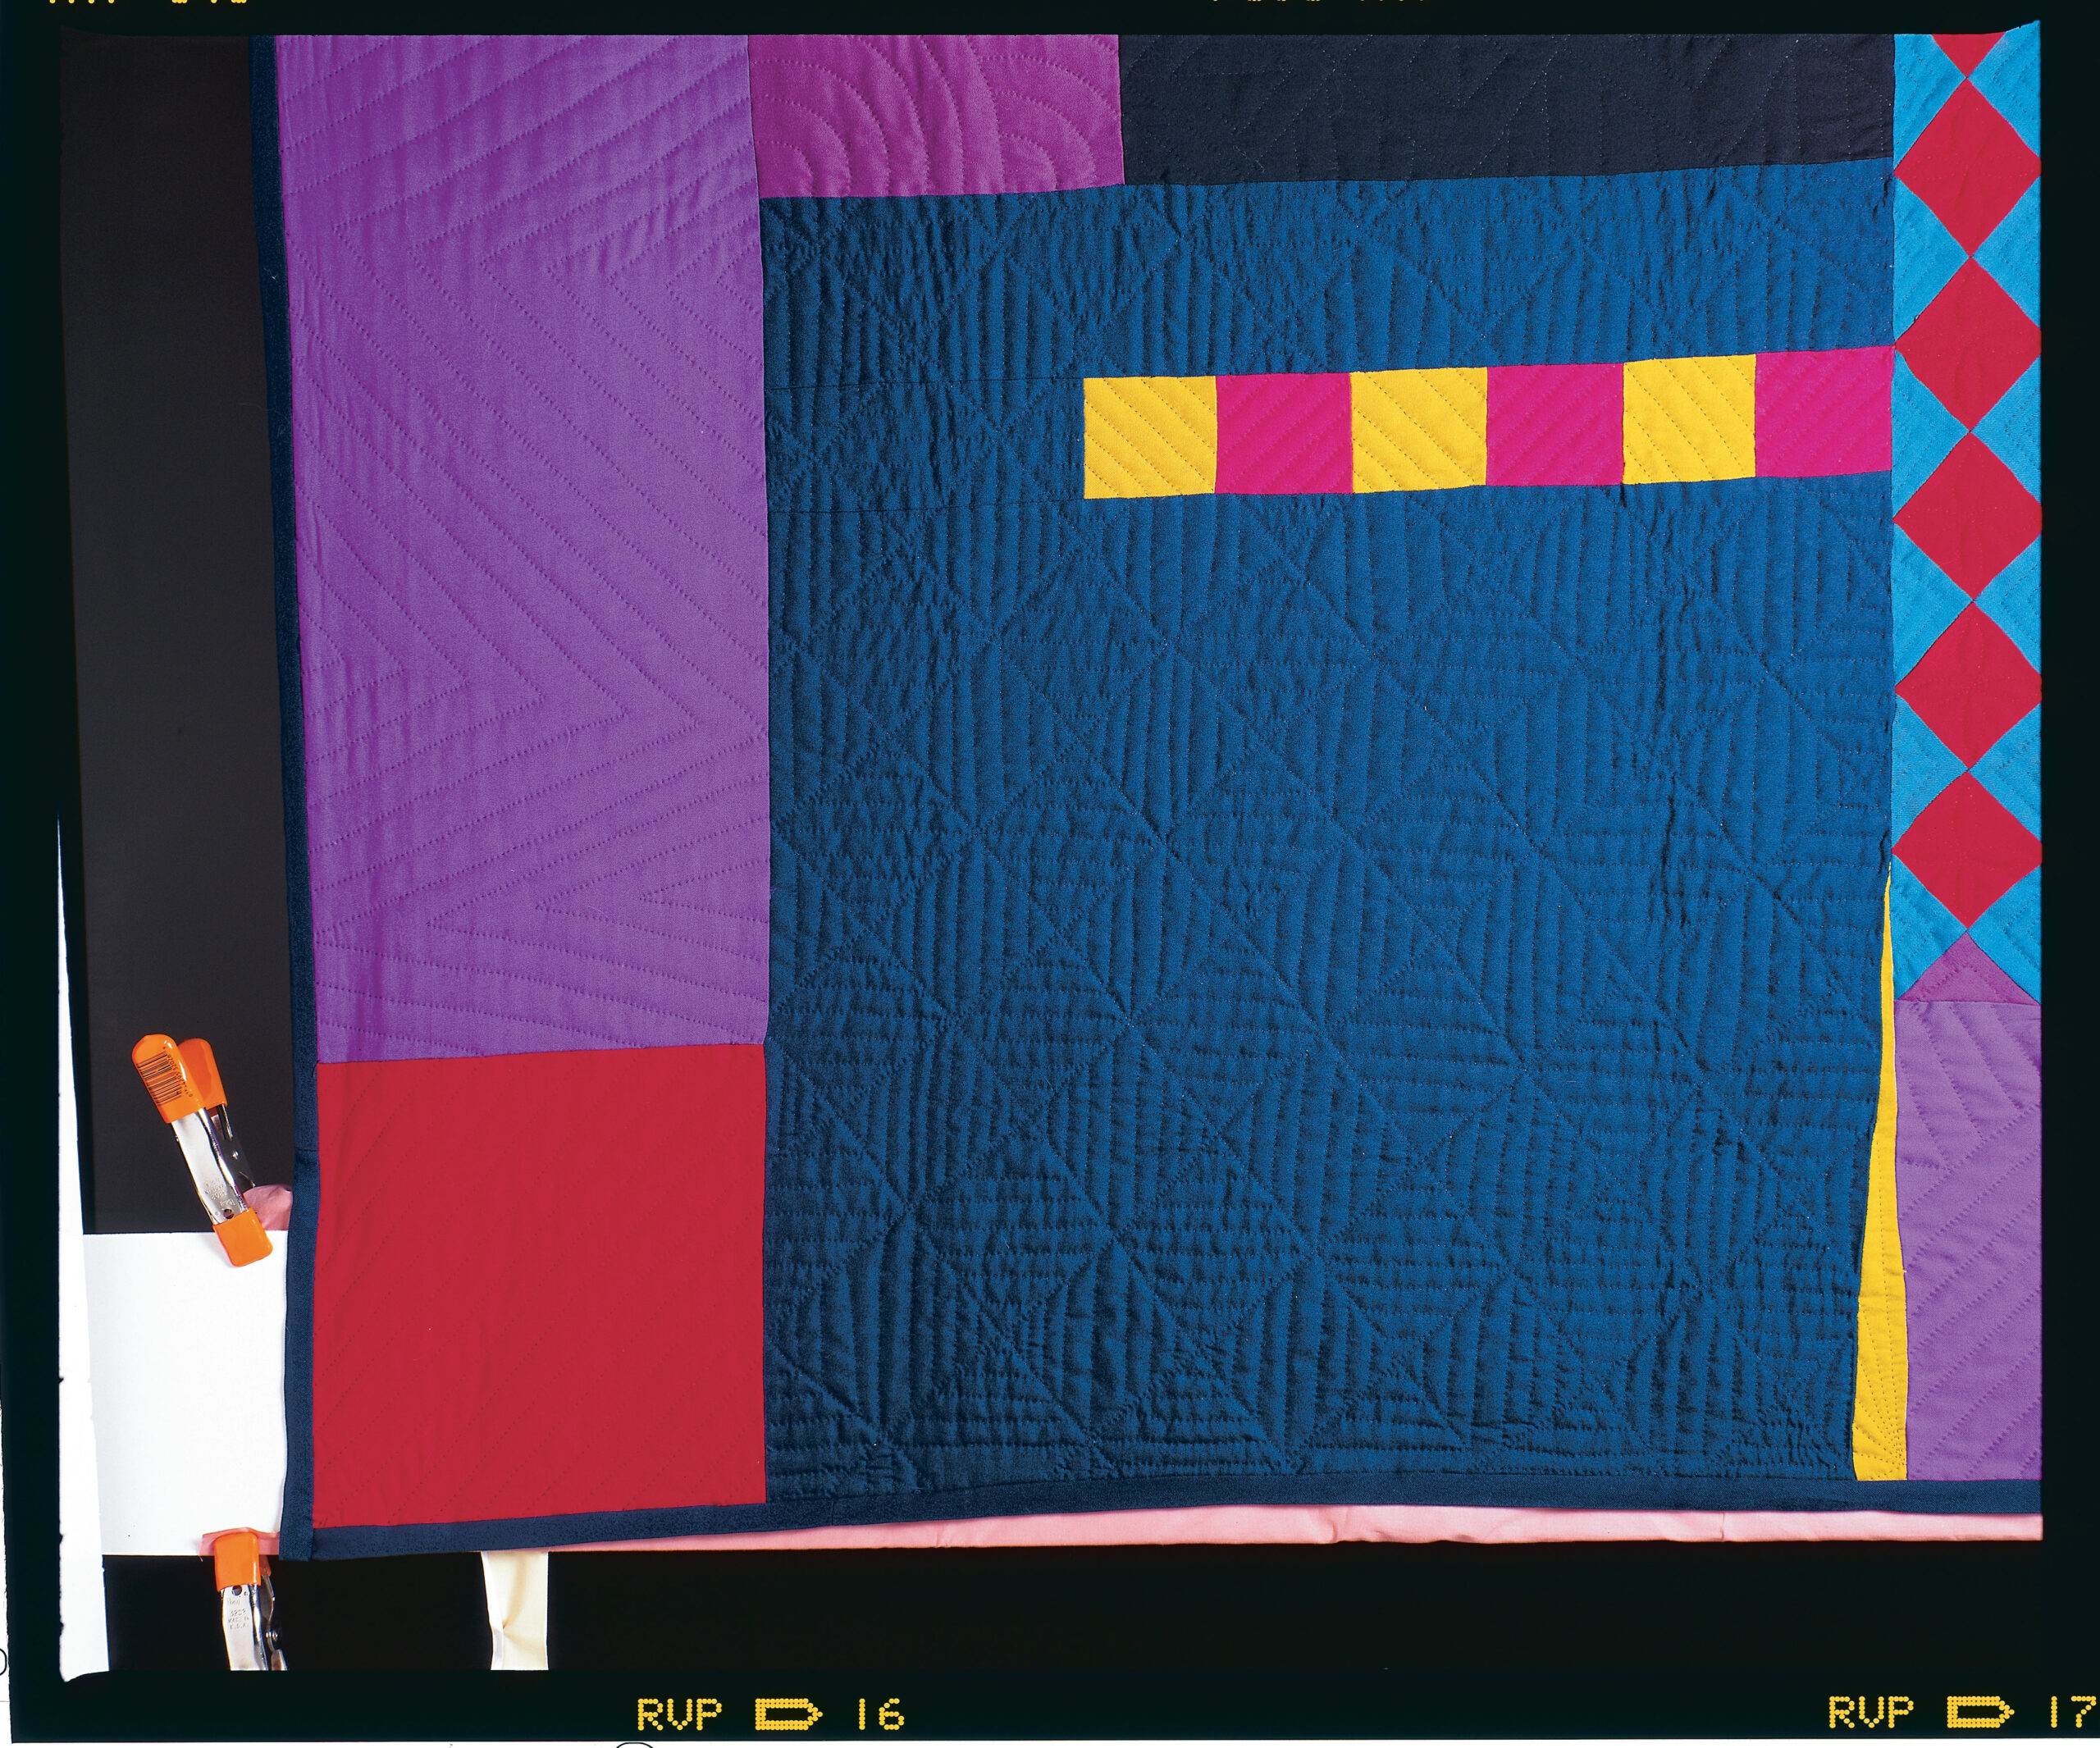
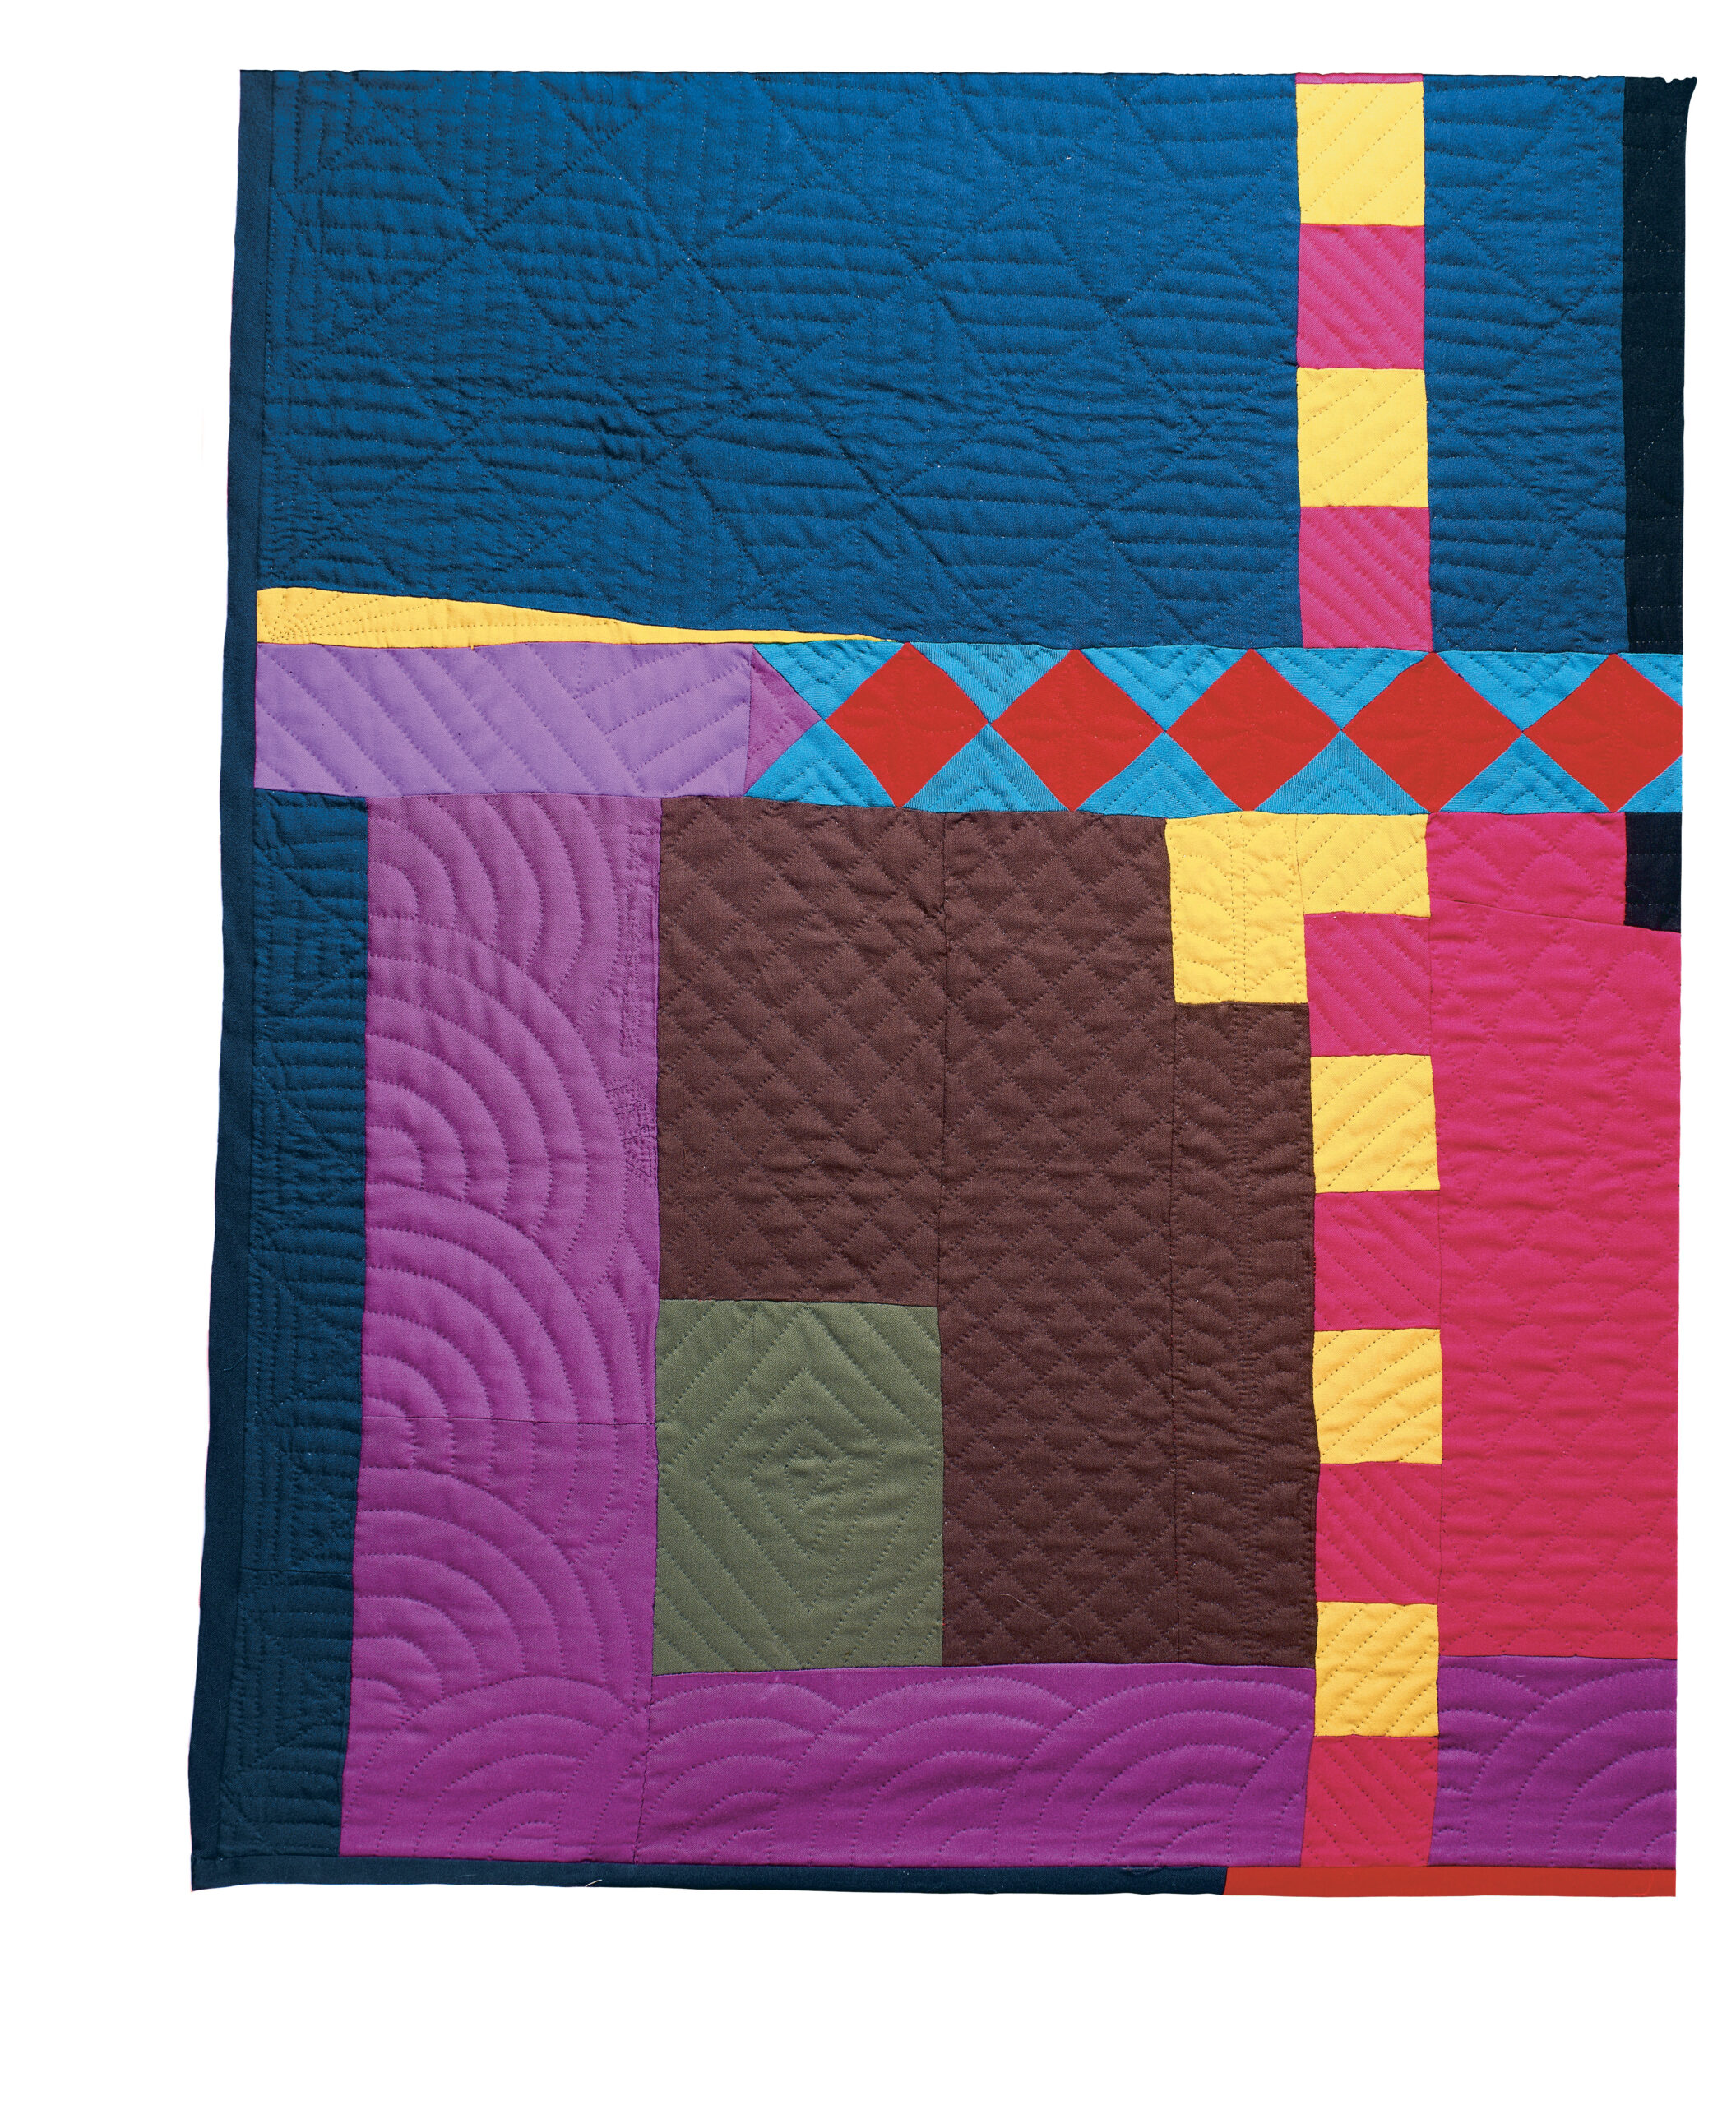
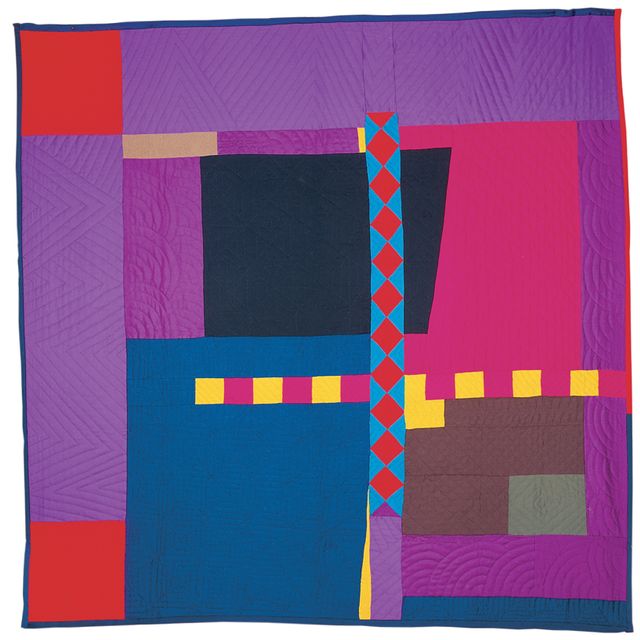
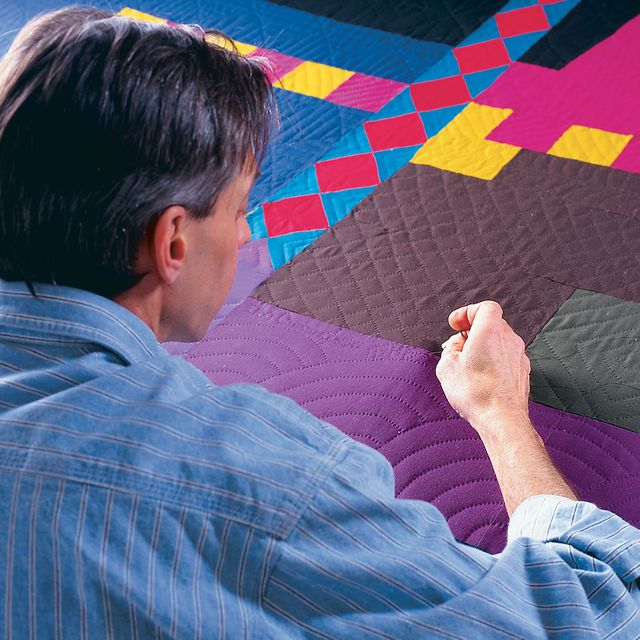
Dispensing with markings altogether, I finally got up the courage to put a quilt in the frame, with no patterns and no plan. All I had in mind was the idea of an abstract, Amish-style quilt with large areas of solid color that needed close quilting. Working from the edges into the middle, I started with the loosely arranged, large zigzags on the purple borders, then decided to try the basket weave in the navy area. Once I accepted the inevitable variations as part of the effect in the basket weave, the rest was easy.
Next, I quilted a row of fans in the plum border area, “hanging diamonds” in the brown area and a row of unmarked feathers below the hanging diamonds. I decided to treat the diamond strip up the middle with classic Amish-style “pumpkin seed” shapes in the red diamonds and wide double-outline quilting in the turquoise triangles. The clamshells, which I worked from the quilt’s right side inward, appear to expand uniformly, which would have been quite a feat if I’d done it on purpose, but the truth is that the shells just grew naturally with each row of half-circles I stitched. The medium-sized blocks throughout the top ended up with an assortment of odd designs as I started to run out of ideas for block fillers. (For a book with abundant filler ideas and other quilting designs, see Resources.)
What to expect
Try as you will, freehand quilting will never be as precise as marked stitches, but that’s part of its charm. Having tried a fair amount of freehand quilting, I’ve come to see some of the underlying principles of this approach: First, the larger and more interconnected the stitching design, the more irregularities it will have. Second, the more your quilting designs are related to the seamline intersections and angles they create in the quilt, the easier it is to control the direction of your stitches. In turn, this means you can quilt freehand and still respect the symmetry of the piecework design since you always have checkpoints for your eye and needle. Third, if you truly want to keep lines as straight and parallel as possible, use pins to mark strategic starting and ending points.
Finally, the less geometric the shape of the quilted design, the more accepting your eye will be. Flowers, feathers, leaves, and any pictorial designs or organic shapes will look as elegant or polished freehand as they would carefully marked on the quilt top.
To mark or not to mark?
One advantage of marking a quilt is predictability and visual order, so when these factors are important, or when precise symmetry is desirable, marking is the way to go. But whenever I want a looser, more spontaneous visual impact, I freehand-quilt everything I can.
To me the appeal of freehand quilting is that it prolongs the fun part-designing and figuring out what you’re going to do next. Thus the moment of creation lasts throughout the entire quilting process. Whether you enjoy sustaining the tension and surprises of creating as you go, or would simply like to eliminate the tedium of marking a quilt top, you might want to try setting out across an unmarked quilt, needle in hand, and see where it leads.
 |
 |
 |
![]()
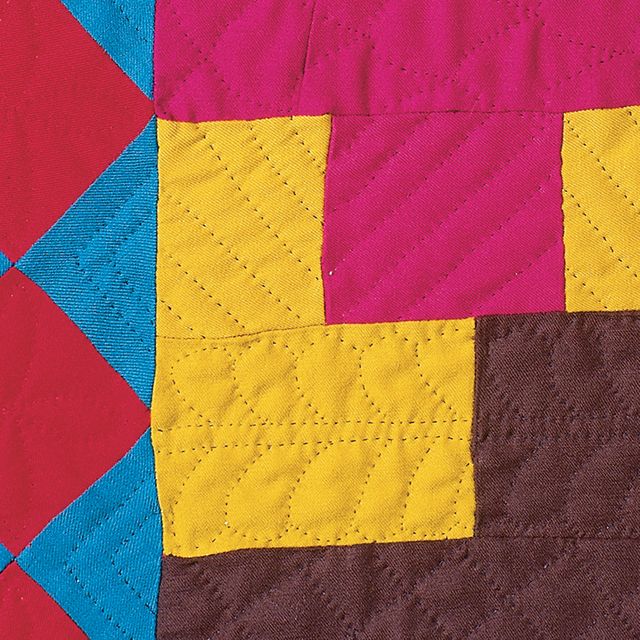
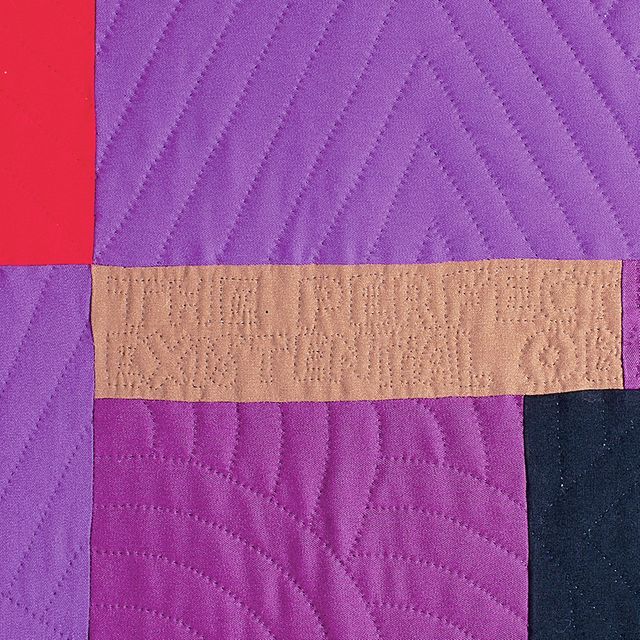
Irregularities in complex, geometric quilting designs aren’t noticeable at first glance, as can be seen in the quilted “basket weave” set on point in the navy area. “Pumpkin seeds” in the small red squares and wide echo stitching in the turquoise squares serve as traditional Amish-style block fillers. Two horizontal parallel lines stitched first down the center of the feather pattern were the only “markings” for quilting. Freehand clamshells “grow” as they progress sideways on the quilt. The quilt’s title, “The Perfect Existential Object,” is handwritten on the tan block.
Quilt these designs freehand
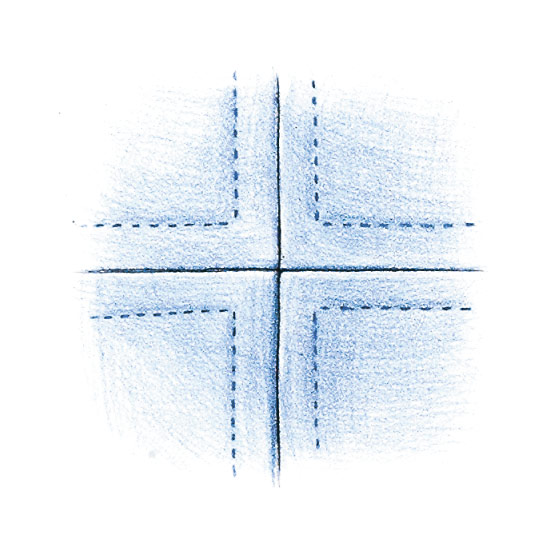
1. Outlining
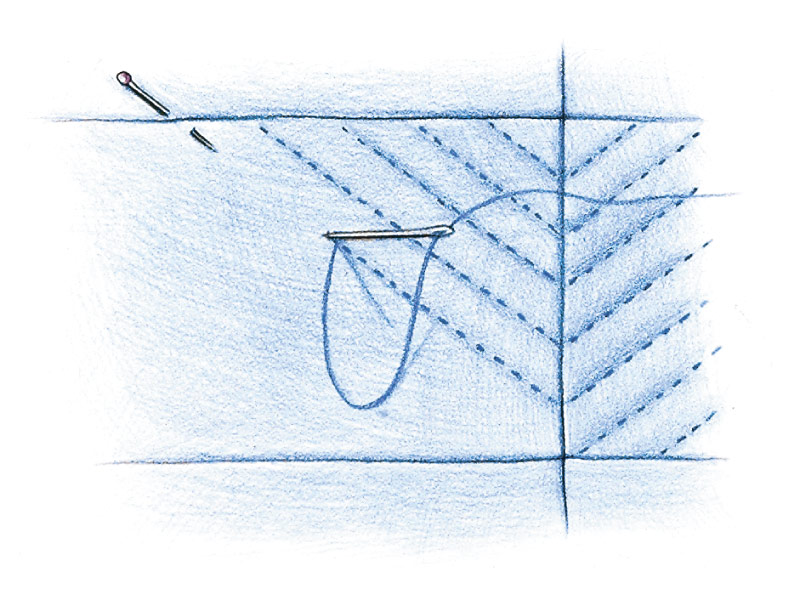
2. Diagonals
3. Hanging Diamonds
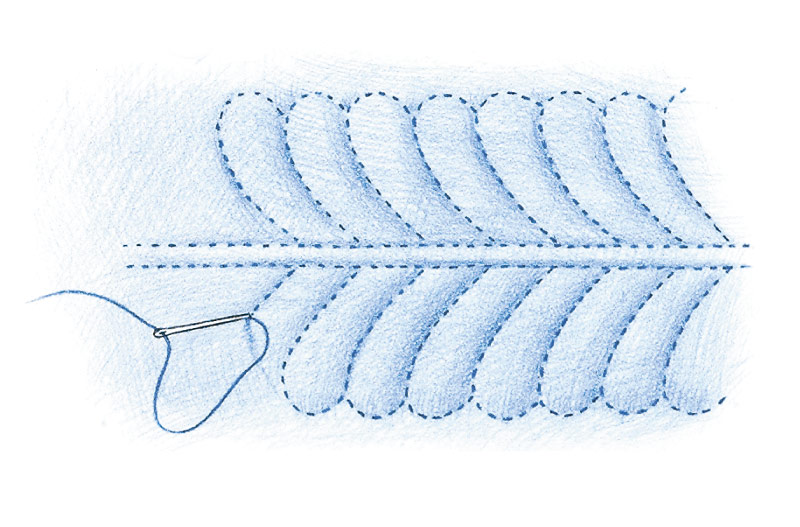
4. Feathers
5. Fans
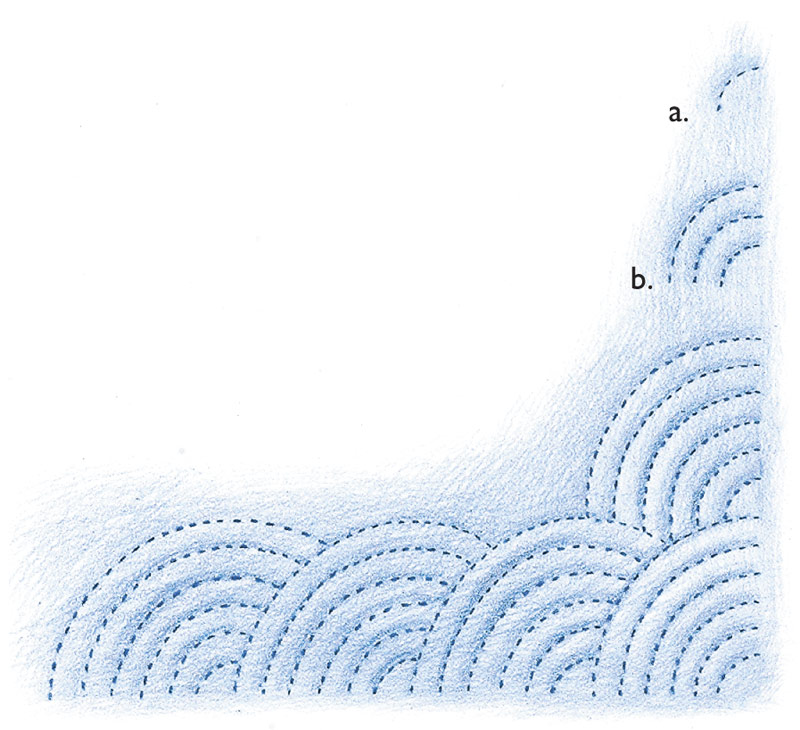
6. Clamshells

7. Basket Weave Set on Point
Resources for classic quilting patterns
For design inspiration and information on creating classic quilting patterns and variations, see:
Quilting with Style
by Gwen Marston and Joe Cunningham (1993)
Author Joe Cunningham of San Francisco, California, has been a quiltmaker since 1979 and has authored many books about quilting. Prices were current at the time of publication (November 1997).
Photos, except where noted: Scott Phillips; drawings: Bob La Pointe
This article, by Joe Cunningham was originally published in Threads #73, pp. 50–54.


As is so often the case, this was just what I was looking for - I just didn't know I would find it here! Thanks.
Thanks for the tips!
Great display .. Really good work
Wow, some of the quilt designs were completely new to me. Thanks for teaching me new stuff I guess.
Wow, some of the quilt designs were completely new to me. Thanks for teaching me new stuff I guess.
These look lovely!
Nice designs!!!!
I love this patchwork technique
I've always had troubles hurting my fingers when trying to make something complicated. Now I am ready to quilt with no wounds at all!