
Slopers help simplify the fitting process.
When I started out as a custom dressmaker, I needed a way to simplify the fitting process. So I turned to patternmaking, where I learned how to draft basic fitting patterns, called slopers, and create different styles of garments from them. I was excited about using slopers to make my own patterns, as designers do. But since my students work with commercial patterns, I wondered if I could use what I’d learned from making slopers to speed up the alteration process. The clear connection I finally saw between a sloper and any existing garment pattern surprised me with the speed and elegance it offered as an alteration technique (whether your garment or figure is simple or complex), and with how much it clarified the entire fitting process. But to make sense of it, you need to know more about slopers.
Sloper: a “second skin”

A sloper fits the figure it was drafted for with only the minimum room needed to breathe and move (called wearing ease), but without design, or style, ease—or seam allowances. It’s the most snugly fitted garment you’ll ever wear, and as such, is almost like a pattern for your skin. In fact, the skintight cloth covers of commercial dress forms are made from slopers, drafted from the measurements of the so-called “ideal” figure the garment industry aims to fit.
If you’ve ever fitted a pattern company’s basic bodice and skirt to yourself, you’ve taken another route to getting a sloper: remove the seam allowances from the altered pattern and there’s your sloper. (You’ve also discovered exactly how you differ from the company’s “ideal” figure, represented by their basic.) A complete sloper, from which a patternmaker can draft almost any style of garment, includes a darted bodice front and back, a straight skirt, and a set-in sleeve.
Of course, many garments don’t resemble slopers at all, once design ease and fashion details are added to them. But virtually all garments that hang from the shoulders (as do most “tops”) will match the sloper they were drafted from more or less exactly in the shoulder area (allowing for current trends in shoulder width and pads). Likewise, most well-fitted “bottoms” match their “parent” skirt sloper in the waist and high hip.
It’s important to understand that no matter how you get a custom-fitted sloper (whether you alter a company’s basic fitting pattern, drape or draft your own, or have a computer generate a fitted pattern from your measurements), once you try it on and perfect it, your sloper is a record of what fits you. Any path to this destination should result in the same basic outline and amount of dart shaping.
The chief use of the sloper is in flat-pattern design, where the idea is that every pattern properly made from it will fit the figure the sloper fits. But having such an accurate, tangible record of your own shape can be a powerful fitting tool for existing patterns, as well. After all, if you have a sloper that fits, you’ve already solved your most important and most complex fitting problems. Why should you have to re-solve these problems each time you alter a pattern?
Your sloper is a two-dimensional dress form
I think of a sloper as a flat dress form, cut into front and back pieces. Lay your pattern on your “flat form,” and you can see immediately whether the pattern will fit you because you can see how and where it fits the sloper, and where it doesn’t. You’ll almost certainly have to redistribute the sloper’s dart shaping to line up with the pattern’s (see What you need to know about pivoting darts below), but once that’s done, it’s easy to see the variance between the two shapes, even if you don’t yet know how to fix it.
What you need to know about pivoting darts
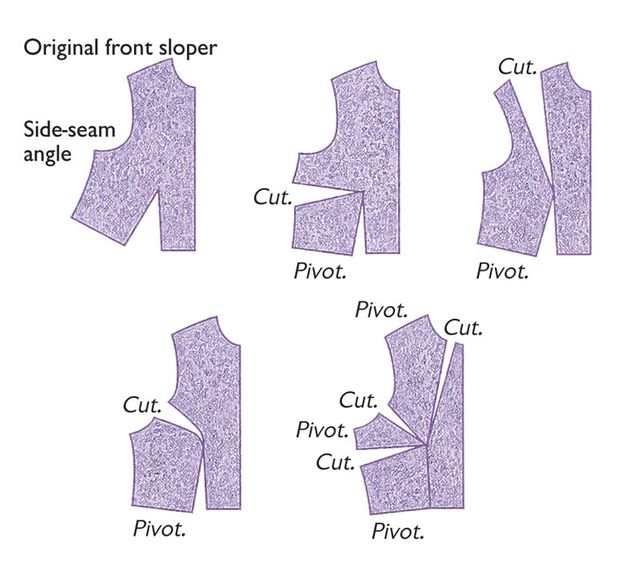
Darts reduce width and length wherever you don’t need it (at the sides of the bust or at the waist, for example), after you’ve provided the extra length required to fit across a “bump” such as bust, tummy, rear, hip, or shoulder blade. The accumulated size (measured by the angle of each dart opening) of all the darts pointing to a single bump represents the total extra width and length that bump requires for coverage. This amount is called “dart control,” and in many slopers it’s gathered into one big dart for each bump, as shown in drawing at far left below.
Fortunately, you can divide that one dart into two or more smaller darts without changing the total dart control, as long as their combined angles equal the total dart-control angle. Further, the position of the darts doesn’t matter. Provided they all point toward the apex of the bump, the dart legs can be pivoted to end in any surrounding seam, as in the examples of altered slopers above, all of which have the same amount of dart control. In patterns, all or part of the total dart control can also be taken up in gathers, pleats, or ease at any surrounding seam, or left unstitched. The unstitched portions can also be pivoted around the bump, resulting in longer seams (and loose wrinkles) at shoulder, armscye, side, or waist, wherever the designer positions it.
Finally, dart control in a sloper extends to the apex of the bump it fits (for example, a bodice sloper’s bust point), which makes pivoting easy. When converted to garment darts, the dart’s point is shifted from the apex by at least 1/2 in. to smooth the fabric at the apex.
To pivot darts, trace the sloper onto tissue paper, then adjust the tissue copy. Slash from the seam edge where you want to position the new dart to the dart apex, leaving a small paper hinge at the apex. Pivot the existing dart closed until the new dart opens up sufficiently. Notice how pivoting changes the angle of the sloper side seam, relative to the center front.
Comparing sloper and pattern
When you lay your sloper over any commercial pattern, it’s difficult to see the relationship between them until the dart control on the sloper has been divided and pivoted to match the way it was positioned on the garment by the designer. After aligning the front and back centers on your pattern and sloper, the next step is to pivot the control so the side seams are parallel (but not necessarily aligned). But where to put the new dart(s)?
Obviously, if the pattern has any visible darts or gathers, slash your sloper tracing parallel to them but pointing to its apex, then distribute as much control to that section of the sloper as you need to align the side seams. If you can’t see the dart control, it’s been left unstitched, so look for lengthened shoulders and armscyes, unshaped waists and/or side seams, and (on jackets) eased roll lines, all common places for unstitched dart control. These features are also clues that some control has been positioned here, even if there’s a visible dart elsewhere in the pattern.
In either case, slash and pivot your sloper tracing (as described in the drawings above) in the unstitched, dart-controlled areas just described, as you would for visible darts, until the side seams are parallel. Even if your dart-control total is different from the pattern’s, as long as you’ve distributed yours in approximately the same directions away from the apex, you’re ready to match slopers when the sides are parallel, as in Step 2 and Step 3.
See Step 1 (below) for a simple example of sloper/pattern alignment using a pattern shaped much like the sloper. Start with a commercial pattern that matches your measurements as closely as possible at the shoulders if it’s a top, or at the hips if it’s a bottom (though the technique works equally well if the pattern is sized very differently from the sloper).
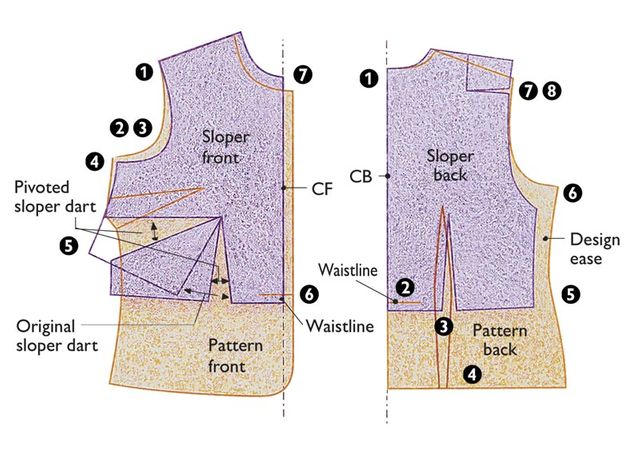
Step 1: Align/assess sloper and pattern
All outlines are without seam allowances, and alignment process is same for front and back.
1. Mark seamlines on commercial pattern (or trace pattern along seamlines only).
2. Trace sloper onto separate tissue.
3. Position sloper tissue over pattern with centers aligned, then slide sloper up or down until shoulders match at neckline. Start with back, then work on front. 4. Pivot and distribute dart control (see sidebar on p. 50) as necessary to make side seams parallel and align dart placement. Comments below reflect author’s judgment of commercial pattern at each seam, based on comparison with her sloper:
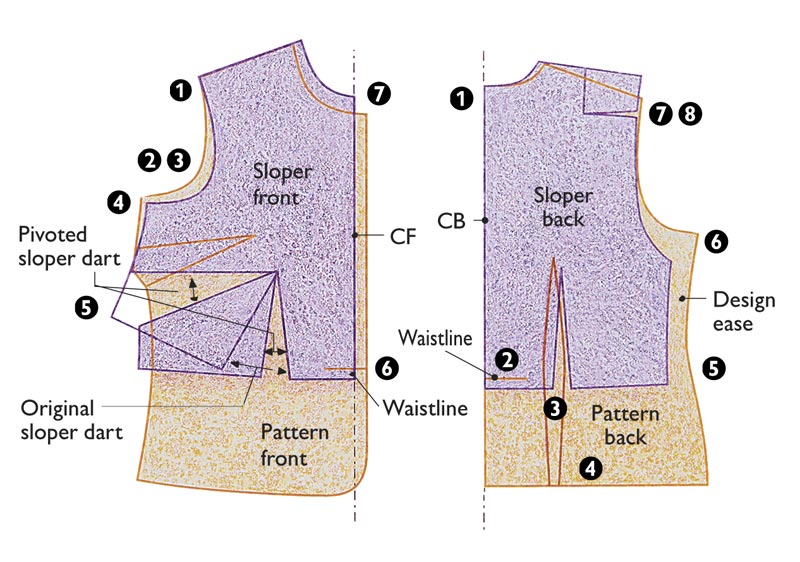
Front (left)
1. Shoulder on pattern too sloped.
2. Armscye on pattern too high.
3. Prefer armscye shape on pattern; sloper fits too snugly for this style.
4. Not sure which above-dart side seam will work best; mark both and test at muslin stage.
5. Side seams not parallel; need to pivot dart control; after pivoting, not enough design ease at side seam.
6. Waistline on pattern too high.
7. Prefer sloper neckline.
Back (right)
1. Prefer sloper neckline.
2. Waistline on pattern too high.
3. Waistline dart OK.
4. Use hip measurement or skirt sloper to compare below waistline.
5. Design ease at side OK.
6. Armscye on pattern too high.
7. Shoulder dart pivoted to armscye because pattern shoulder seam is straight, without dart, suggesting that’s what designer did.
8. Shoulder on pattern too sloped.
Work with the back first, positioning the back pattern over the back sloper and aligning the two center-back lines. Imagine you’re pulling a garment on over your head: keeping the center backs aligned, slide the pattern until the sloper’s shoulder contacts the stitching line of the pattern’s shoulder. The sloper represents you, and the pattern parts not covered up by your sloper show the design ease. Is there enough (or too much) design ease at the waist? the hips? across the bust? Is your sloper outside the stitching lines in places, indicating the pattern is too small there? Are the shoulder seams a different length and at a different angle than your shoulders? How far below your own underarm is that armscye supposed to fall?
If you were using the sloper that this pattern was drafted from instead of your own, of course, there’d be no such questions. You’d see exactly the amount of design ease the designer intended at every seam, and how (and where) he or she had repositioned the dart shaping that’s built into every sloper for the female figure. The exact relationship between the outlines of the sloper and pattern at every point is the record of the designer’s idea of a good fit for that garment.
From this relationship comes the idea that it makes sense to alter a pattern company’s basic fitting shell before trying to alter individual patterns from it. If a company’s patterns were all drafted from the same sloper, once you knew how to make that sloper fit you, you’d be able to change any other of the company’s patterns and it would fit you the same way it fit the sloper. Well, this implies that you should adjust the basic fitting pattern from every company whose patterns you want to make. But not all companies publish one. Worse, not all patterns from companies that do publish one are drafted from that same sloper, and there’s no way to tell which aren’t! Happily, there’s a simpler way.
Introducing “Match the Slopers”
To make the process I’ll describe easier to visualize, start by imagining an ideal world in which every pattern comes with an outline of the sloper it evolved from drawn right on the pattern, aligned at center back and shoulders as described in the “2-D dress-form” example above. Next, imagine laying your own sloper over the “ideal” one, also aligned at center back and shoulders.
Now, what if you simply cut apart the pattern and shifted the pieces so the outline of its sloper exactly matched yours? You’d have altered the pattern to fit your sloper, without changing the design ease the unaltered pattern had to start with.
I’ve actually traced an “ideal” sloper onto a commercial pattern derived from it (see Step 2 below). It turns out that with nothing more than a few horizontal and vertical tucks and/or slashes, it’s easy to make one sloper’s outline match the other’s. Once I did it, the resulting garment fit!
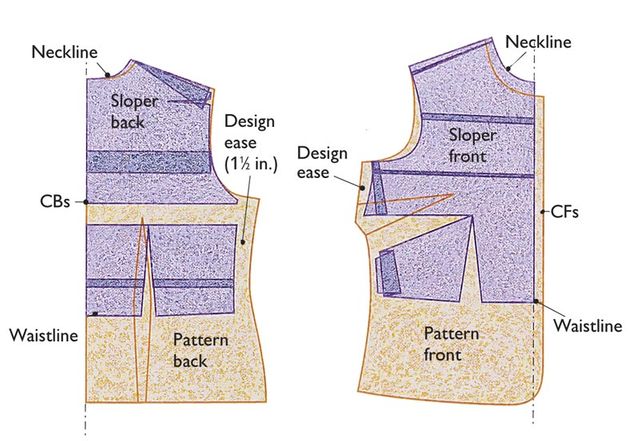
Step 2: “Match the slopers” by adjusting yours
Process is same for front and back: adjust horizontals first, then verticals by folding or slashing and spreading your sloper to fit pattern outline with your preferred amounts of wearing and design ease at each seam. Fold over thin ruler to help start folds. Use repositionable glue stick to bond sloper tissue to pattern after matching.
Horizontals
Adjustments should be made horizontally and evenly across pattern, except at shoulders, where alteration will be slanted:
Check/adjust armscye.
Check/adjust waistline.
Check/adjust shoulder slope.
Verticals
Adjustments can be angled and needn’t be equal across pattern; wedges OK:
Check/adjust width from CB to neckline at shoulder.
Check/adjust width from neckline at shoulder to shoulder point.
Check/adjust width from shoulder point to side seam.
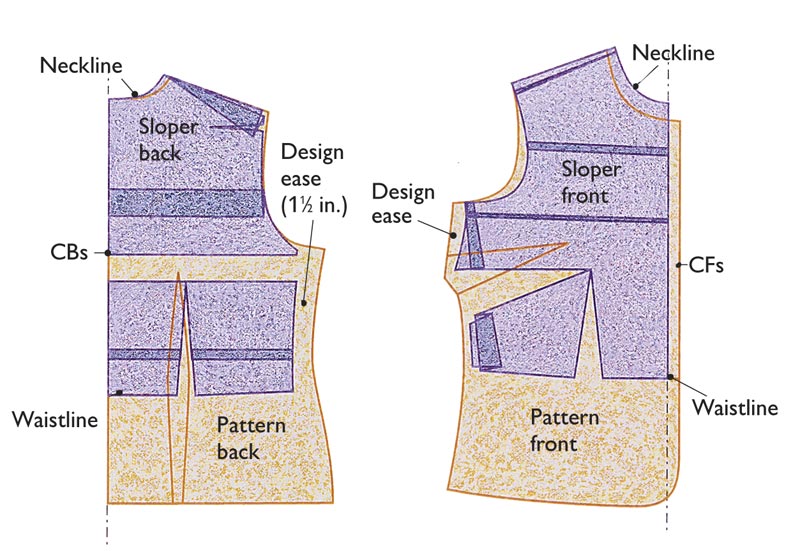
Back (left)
1. Horizontals: Armscye difference is substantial, so slash just below armscye, then fold sloper across armscye to match bottom of armscye curve to pattern. Fold sloper across dart to match waist. Fold wedge on sloper at shoulder to match pattern (no pads on pattern).
2. Verticals: No vertical adjustment needed (1-1/2-in. design ease OK). Use hip measurement or skirt sloper to match/adjust vertical seams below waist.
Front (right)
3. Horizontals: Fold sloper across armscye to match bottom edge to pattern. Fold sloper above dart to raise waistline. Make angled fold on sloper at shoulder to match pattern.
4. Verticals: Width OK from center to shoulder point. Make angled fold on sloper across armscye to get desired design ease at side seam (1 in.).
I’ve found that the easiest and most controllable way to do this in practice is simply the opposite of what I just described: first tuck and/or slash your sloper to make it fit the ideal one, adhere it to the pattern underneath (repositionable glue stick is perfect for the job), slash completely across the pattern beneath each horizontal and vertical sloper tuck or slash, then return your sloper to its original shape, taking the pattern with it. It’s just that easy, and the step-by-step examples in Step 2 and Step 3 walk you through the process on a simple pattern. I’ll cover more complex examples in a future article.
Step 3: Return sloper to original shape
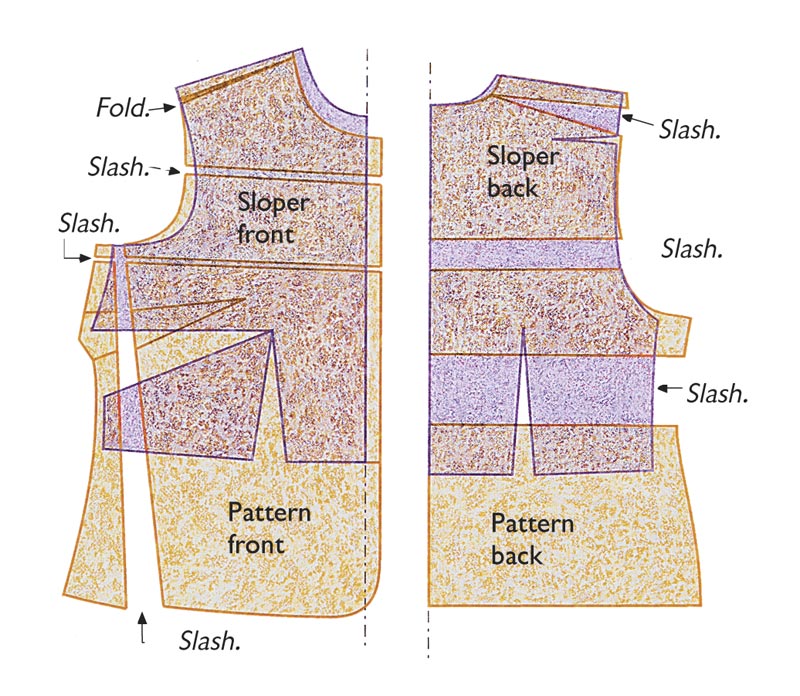
Front (left)
Make sure sloper tissue is firmly bonded to pattern tissue on either side of all folds, wedges, and slashes, using repositionable glue stick. Large sheet of poster board can be handy surface for securing adjusted final pattern (use glue stick), after returning sloper to its original position.
Amount of design ease depends on fabric and preference.
Back (right)
Cut across entire pattern directly below each fold or wedge on sloper. Spreading slashes on pattern to extend attached sloper will allow movement. When returning sloper slash to its original position, fold pattern tissue underneath slash.
True all changed seamlines, averaging between new and old lines when different. Reposition all dart points at least 1/2 in. from apexes.
So, where’s the sloper in the pattern?
Of course, there is not a sloper drawn on your patterns, and this is no doubt only one of the objections spinning in your head, as they were in mine when this idea first dawned on me. Now that I’ve worked with the method a while, I’m even more convinced of its usefulness, especially if you’ve been unhappy with more traditional pattern-alteration methods. But I have to remind myself that I’m an experienced patternmaker, as I try to explain to other sewers how this can work. Fortunately, I’ve been pleased with how easily many beginners have taken to the process after a brief orientation. Here’s how to see that imaginary sloper:
First, remember that the primary difference between the sloper and pattern is design ease— someone else’s idea of how much extra room the garment should have in relation to the body inside it for this particular style, and where this room should be placed. So, rather than drawing or even imagining some precise, ideal sloper, all you need to do is reshape your sloper in relation to the pattern until you feel that the garment will have the right ease in the right places. You can use measurements given on the pattern envelope, on charts of standard ease allowances (like those in the pattern catalogs), the illustration on the pattern envelope, and your own judgment and experience in equal measure as you determine the appropriate ease. You’ll be refining whatever you decide at the muslin stage, anyway, so you don’t need to get bogged down with ultraprecision at this point.
In fact, being able to see, at every point along every seam, the exact difference between your sloper (whose fit you know is correct, if skintight) and the pattern you don’t know allows you to make more immediate, precise, and intuitive decisions about how you want each garment to fit (more like your sloper, or more like the designer intended?), with less experience, than just about any other alteration technique. The feeling of control and understanding is great!
Start, as in the directions in Step 1 by aligning the pattern and sloper (with darts repositioned as described) along center back and center front, then at the shoulders. Simply mark how much ease you’d like at each point listed.
Where’s the bust point?
As you reshape your sloper, you don’t need to make any effort to align your bust point with the “ideal” one. Ignoring how it will temporarily move as you contract or expand the sloper, simply leave the point where it is on your sloper— this reflects your figure, so why change it? To adapt the carefully fitted dart control on your sloper to the new pattern, be sure the sloper’s control is oriented in the same directions as in the pattern (i.e., the darts are in about the same places), leaving each dart’s angle and starting point as you’ve fitted them on the sloper.
Among the important questions your sloper has already answered, after all, is how much dart control you need and where it should point. Now you’re simply adapting the pattern to reflect this information, and all that’s required at this stage is to correct the differences in length and width that a bust variance between sloper and pattern represents. As you can see in the examples above, matching slopers even ensures that the front and back side seams match after you’ve adjusted overall lengths, without requiring a single measurement or dart adjustment. Sound too simple? Give it a try.
Karen Howland gives detailed sloper-drafting directions in her book Cut to the Fit (Kensinger Press, 1995).
This article was first published in Threads #79, Oct./Nov. 1998, pp. 48–52. Photo: Sloan Howard. Illustrations: Karen Meyer.


thanks for this, its really helpful, and just what I was looking for
hola gracias por este espacio tan bello donde podemos ayudarnos necesito hacer un vestido imperio de novia y quiero ver algunos patrones gracias
I found this article very helpful. My daughter sews a lot of custom work and she measured and created a sloper for me. I was on my own to figure how to use it to fit other patterns.
I did get confused by the middle section when I was seeing the sloper being manipulated to fit the pattern, it didn't seem to make sense.
I love all of the people that know more than I do about sewing and pattern making, you truly help to stretch me even further in the sewing field. Loving it...THANKS BUNCHES!!
This is interesting and needed. I have been shown how to make a sloper but never how to use it. I do agree with Seraphim, I did not follow the part where the sloper was being manipulated. I need a video of someone adjusting a pattern to her sloper.
This is one of the most excellent articles I have ever read. I knew the concept of using a sloper but never knew how to do it. Excellent. Thank you
Great article . I am copying it so I can have it handy all the time. I understand the concept and feel like I had an epiphany and really finally realize how to use my slower. Thank you
I don't always appreciate all the help my computer gives me.....I meant sloper not slower!
Since it is described pretty well I got the idea, but I think a video would be extremely useful to beginners.
I wish Threads would encourage THE BIG 4 to do just this:
'ideal world in which every pattern comes with an outline of the sloper it evolved from drawn right on the pattern, aligned at center back and shoulders as described in the "2-D dress-form" example above"
Thanks for an enlightening article; I learned a lot.