
How to Sew a Catchstitch

Hand stitches are crucial in good finishing; when sewn properly, they are as strong as machinesewn stitches, and you can do them almost as quickly. But many people avoid them and try to always use machines.
A few words on thread before I begin: Any thread longer than the distance from your hand to your elbow will tangle when you work and slow you down. I’ve actually clocked this; it’s faster to re-thread than to fight a long length of thread.
Before they sew, some sewers wax their thread to strengthen it and make it easier to work with. I don’t, but I do iron it to take out any extra twists. When you’re buying thread, beware of bargains. those spools you get ten for a dollar aren’t for fine sewing. Good-quality thread allows you to work faster, and it’s more durable.
You should also always keep a good supply of sharp, high-quality needles. Preferences in lengths and diameters vary; my favorite is a no. 10 milliner’s needle because it’s slightly longer than a regular hand-sewing needle; it feels better in my hand (probably because I’m used to long beading needles). Experiment and find the needle that suits you best. With good thread and your favorite needle, you’re ready to master the catchstitch.
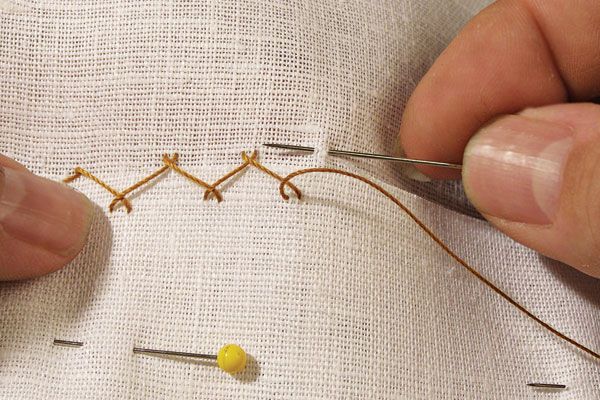
The catchstitch keeps layers of fabric flat against one another, such as a hem or seam allowances. Use it on lined garments because the lining covers and protects the surface threads, which tend to catch on things. You can vary the stitch length according to taste. For the catchstitch, I recommend making stitches 3/8 inch to 1/2 inch apart.
Classic version: In the classic version, the direction of travel is left to right, but the needle points to the left.…
Start your 14-day FREE trial to access this story.
Start your FREE trial today and get instant access to this article plus access to all Threads Insider content.
Start Your Free TrialAlready an Insider? Log in


I have done the catch stitch to. It will give good results.
Like the pictures. Give us more tips
I love these handy "suggestions"!!! Sewing is such fun!!!!
I love the Threads magazine and all of the helpful information!!!!
How funny! I grew up doing the catch stitch because it is the only way that I saw my mom and grandmother (awesome seamstresses- Granny introduced me to Vogue and WWD when I was 12) hemming skirts and dresses. Everything else looks half-done to me...;-D
Great tipz!
I like your version! Looks both speedy and thrifty. When I
saw the picture of the classic version I instantly thought "herringbone stitch" from hand embroidery.
My late motherinlaw used this stitch (classic version) on quilts instead of running stitch/ quilting stitch
Mr King, Thank you for posting this technique. So clear and well narrated, your "lessons" are always welcome and much appreciated. You're a real confidence booster.
I never knew that there was an option to the catch stitch, but I can see its usefulness; a lot less thread in half the time!
Your tutorial is so well written, it got me to thinking.
I think I see an advantage to the Classic Catch Stitch. If the stitch catches then the loop of the crossing threads would tighten and limit the length of the pulled thread. It would still need to be repaired but the damage would be mitigated. So if you must have an exposed catch-stitch the Classic may be a better option.