
Where, Why, and How to Apply French Binding
Keep edges smooth, lightweight, and supple

In your sewing career, you’ll discover that there are times when a garment calls for a thin, flexible finished edge. Some instances are in garments made of heavy boiled wool, double-sided fabrics, or fabrics that have decorative surface effects. A binding enables you to finish the edge without a facing, so you eliminate the bulk of enclosed seam allowances made of the heavier fabric. A beautifully applied binding also creates a finish that looks attractive from both sides, so it is ideal for reversible garments or those in which the fabric’s reverse face may show during wear. My preference for this finish is a French binding.
A French binding starts with a bias strip, usually of a lightweight fabric, that has been folded lengthwise with wrong sides together. The cut edges are attached by machine and the folded edge is wrapped around the edge and secured invisibly by hand. This process takes a little longer than a quick machine-stitched bias binding, but the sleek, clean results are worth it.
Prepare the garment
The sample garment below is made of a double layer of wool tweed. Follow this method for your fabric. Don’t remove any seam allowances.
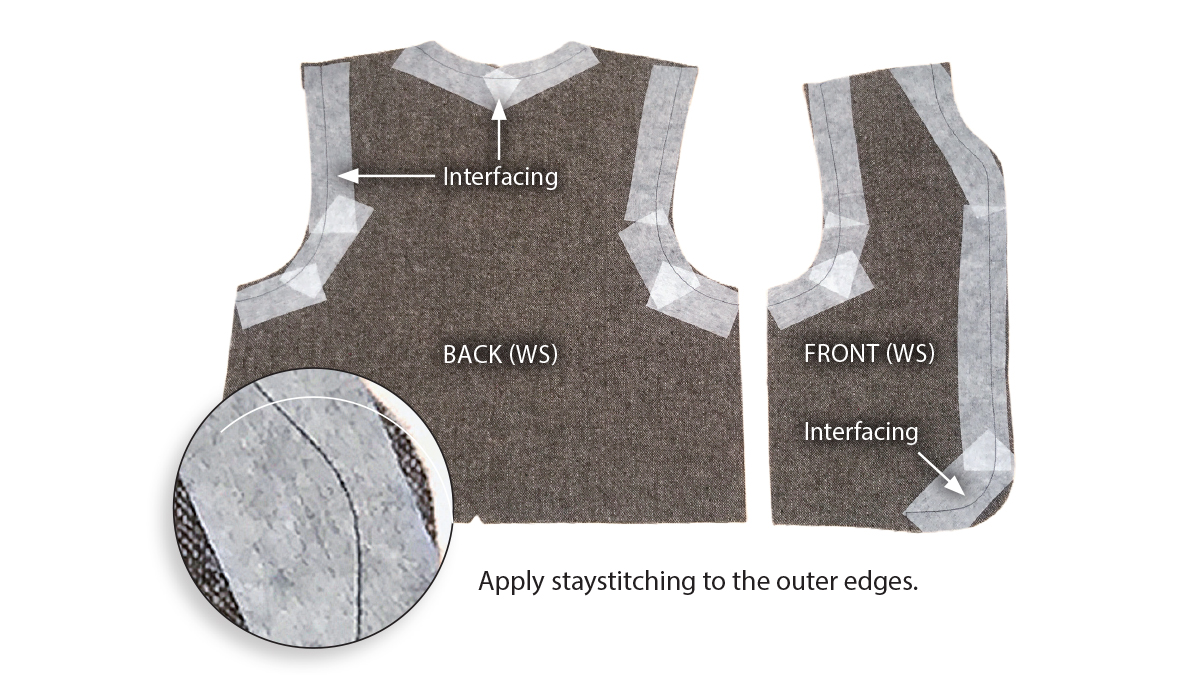
1. Stabilize the curves. Apply fusible interfacing to the fabric’s wrong side along the curved edges of the garment’s outer layer. In this garment, the neck and armhole seamlines and the front opening edges have been stabilized.
2. Staystitch the edges. On the outer layer, stitch directly on the seamline. This line further stabilizes the edges and serves as a placement guide for the French binding.
 Kenneth D. King is a Threads contributing editor and an adjunct professor at the Fashion Institute of Technology in New York City.
View the full article by clicking View PDF below.
Start your 14-day FREE trial to access this story.
Start your FREE trial today and get instant access to this article plus access to all Threads Insider content.
Start Your Free TrialAlready an Insider? Log in


Love the the vest especially the pleated fabric, would love to know how to do that.
That vest hjas been shown before, but not the sewing instructions. It would be great if Kenneth would share that with us.
Thank you for this idea - it's a good one! Will see what we can do. Best, Christine - Threads digital content manager
Here's a video that shows the curved tuck technique: https://www.threadsmagazine.com/2013/12/10/video-how-to-create-curved-tucks
Insiders can access the full article at https://www.threadsmagazine.com/2013/04/25/create-dramatic-texture-and-detail-with-curved-tucks
Carol Fresia, Threads Senior Technical Editor