


My introduction to bound buttonholes was a popsicle-pink linen jacket with meticulously worked bound buttonholes in bright tangerine. I was awestruck with the clashing colors and wondered how these complex-looking buttonholes were sewn.
Unlike a regular buttonhole, which is edged with an overcast stitch in thread, a bound buttonhole is finished with a strip of fabric that matches or coordinates with the garment. When described, the process for creating a bound buttonhole sounds fearsome. But when you actually construct one of these buttonholes, you’ll find the steps aren’t all that scary. And if you haven’t found a method you like for sewing this buttonhole over the next few weeks I’ll show you five different approaches from a quartet of sewing experts, to see which one suits you best. Then, after mastering the easy steps shown in this article, why not incorporate these buttonholes where they’re least expected: on denim, chiffon, organdy, or linen, and maybe in an altogether unusual shape. They can add subtle color to your garment and will doubtless elevate the overall impression it makes.
Buttonhole Construction Notes
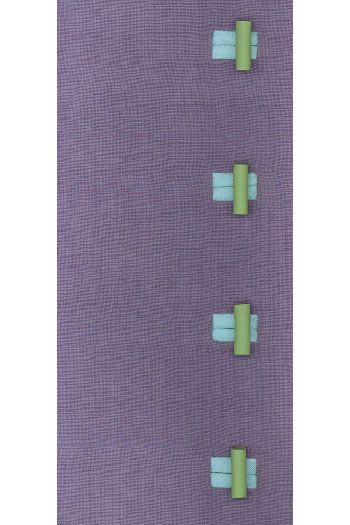
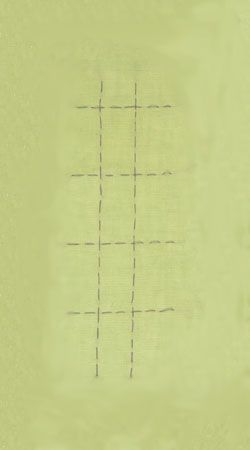
Classic bound buttonholes are positioned horizontally and placed in a vertical row on the front edge of a garment. For this traditional placement, three of our experts start with a basted “ladder” to mark the buttonhole’s positions, and then sew them from the front of the garment. With regard to the drawings and instructions, the two parallel vertical “sides” on the ladder represent the finished length of the buttonholes, and the “rungs” mark the vertical reference for each buttonhole’s slash line. After fusing interfacing on the section where the buttonholes will be placed (at least immediately under the buttonhole) to reinforce the slash, hand- or machine-baste the ladder, using a contrasting thread and extending the rungs 1 in. beyond their vertical side lines. This is the safest marking method, which will show conveniently on both sides of the fabric.
Once the ladder has been marked, bound buttonhole methods vary, though all involve making lips, fitting them to the shape of the buttonhole, cutting the hole, and reversing all of the workings to the wrong side of the fabric. Anne Kendall owns Apple Annie Fabrics in Swansea, MA. Here’s how to make her classic bound buttonhole:
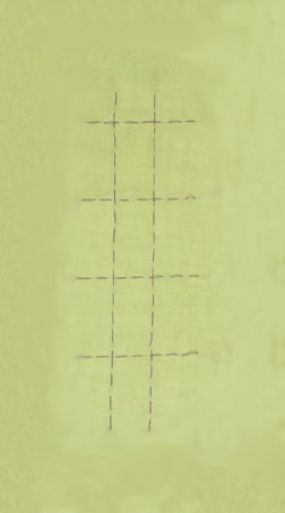
A basted “ladder” like that shown is key to positioning classic bound buttonholes in a vertical row.
5 steps to a classic bound buttonhole
1. Make buttonhole lips.
2. Attach lips and establish opening.
3. Slash fabric and turn lips to inside.
4. Anchor lips.
5. Finish back of buttonhole.
Anne Kendall’s Classic Bound Buttonhole
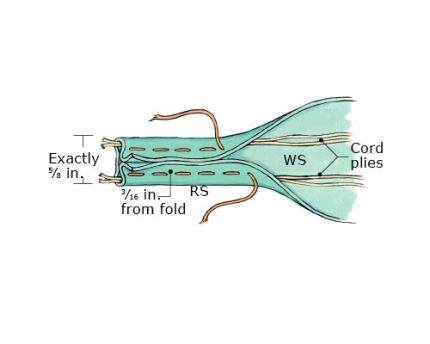
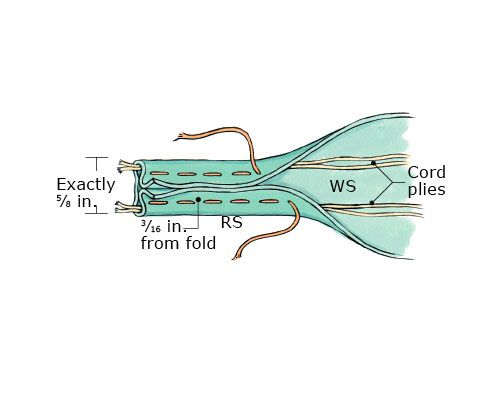
1. Make buttonhole lips: Cut 2-in.-wide bias strip long enough to make all buttonholes. Untwist cotton cord to separate one or two plies. Place plies on WS of bias strip, fold over one-third of each long edge to encase cord, and pin. Baste 3⁄16 in. from fold. Measure exactly 5⁄8 in. (or 3/4 in. if using thick fabric) from fold to opposite fold, and baste other edge making 5⁄8-in.-wide strip. (You’ll later cut strips to buttonhole lengths.)
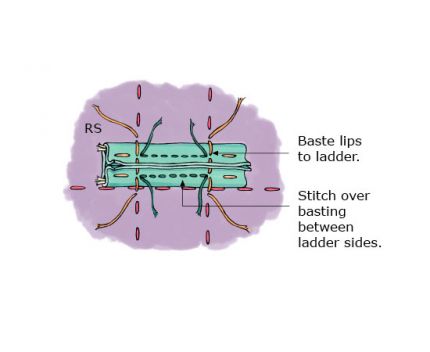
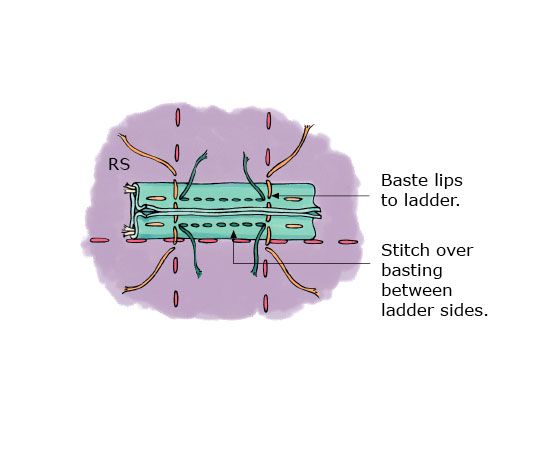
2. Attach lips: On RS of garment, position lip section, raw edges up; align lower folded edge to marked “rung” line (which is 5⁄16 in. below buttonhole center); and hand-baste on vertical “ladder” lines stab-stitching through lips (see photo and text above for details on basted “ladder”). Stitch over horizontal cord basting to attach lips; back-tack at ends. Sew lower lip on all buttonholes first and check that stitching is square, then sew top lip.
3. Slash fabric/turn lips: On WS of garment, snip in center of buttonhole outline between stitching lines, and clip diagonally as shown, being careful to cut only through garment fabric and bottom layer of buttonhole strip. Clip to, but not beyond, corners. Turn lips through opening, straighten, press, and stitch lips together from RS until you finish garment construction.

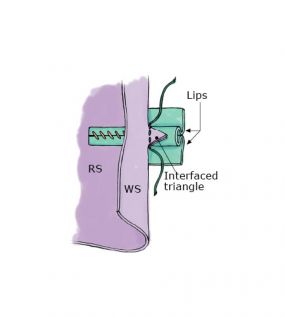
4. Anchor lips: Place garment RS up and fold back to expose ends of buttonhole lips. Stitch along edge, catching triangle of interfaced garment fabric created by clipping. Repeat on other end.
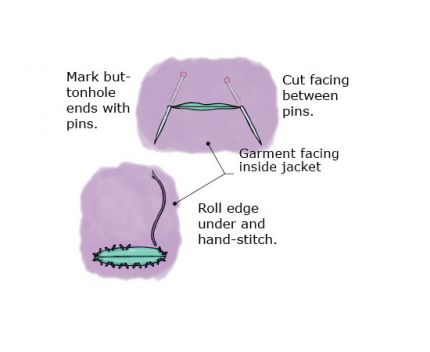
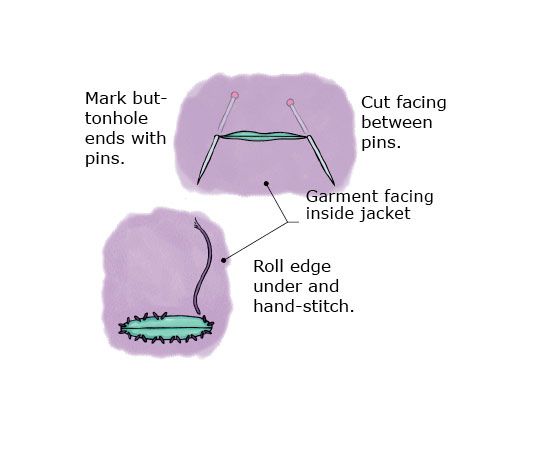
5. Finish back: After sewing front facing to garment, mark ends of lips with pins, cut slit in facing, turn edges under, and hand-stitch to finish inside of garment. Or face a compatible shape on facing with organza to finish inside of buttonhole.
excerpted from Threads #95, p.58


Love bound button holes, but I usually make a mess. Going to try this method see if I can succeed. After sewing for over 50 years, guess that would be an accomplishment, since I can't remember all the failures there were so many. lol
I took sewing lessons from Anne Kendall for several years to learn advanced sewing techniques. We all agreed someone should videotape her explaining bound buttonholes. I was very happy to see her article printed in Threads a few years ago and happy to see it reprinted here. She is a terrific teacher with endless patience.
I sewed many a bound buttonhole back in the 50s, even a triangle shape but have not done a corded one. Just may try it!
I enjoy making bound buttonholes. I like what they look like and I like handling fabric while making little windows. They add a nice bit of detail to a piece. My bound buttonholes usually look better than my machine buttonholes because I tend to rush through my machine buttonholes.
I have used a similar method that is described here. The one I used does not use a bias strip but an on grain strip. The strip is basted down the center on grain. The ladder rungs on the garment are on the exact buttonhole placement and you align the center strip basting with the ladder rung. The rest is just about the same. I will have to print this up to keep in my sewing area.
Is the cord primarily for strength and stability or for body and bulk?
Thank you for a very clear lesson and looking forward to more.
dpog,
To answer your question:
Is the cord primarily for strength and stability or for body and bulk?
The cord is used to keep the bias strip from stretching out of shape and to keep the lips of the buttonhole looking full.
Thank you Kathy for your kind words..I hope you are continuing to sew!!!
The second-to-last illustration shows the lips basted together, but I see no mention of this step. Also, if I am reading the instructions correctly, the lip strip is, in its original state, like single fold bias tape with a bit of cord inside to help add stability. Is that correct? So how does this process go from one solid piece of folded fabric to two lips? Here's my guess: when you stitch down the lips in step two, you have little flaps of fabric above the top stitching and below the bottom stitching that hang loose. Do these then fold down/up on those stitching lines to meet in the middle, and then up/down again to create two abutted folds? Wouldn't that make the lips double thickness?