

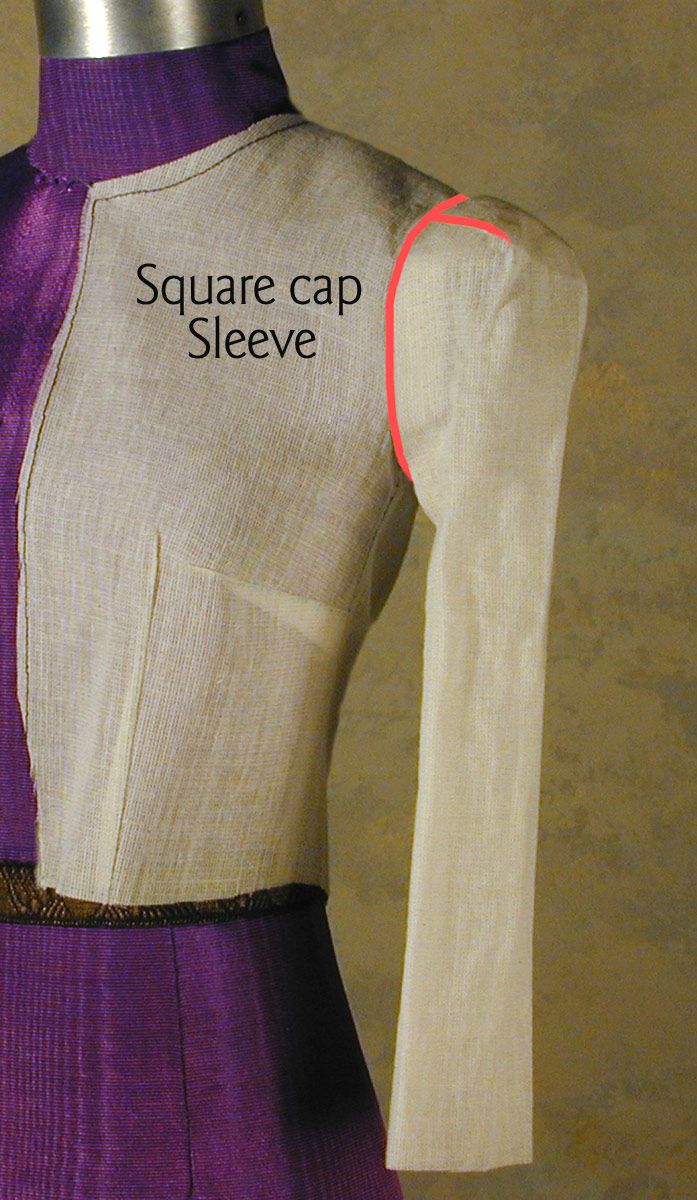
The square sleeve cap is one of those Forties styles that makes appearances every now and then. It introduces design into the cap of the sleeve.
Its mitered, box-like appearance extends the shoulder line into the sleeve cap and adds to the sleeve biceps, which makes it a good candidate for fitting a jacket, where a small armhole is desired but the wearer has a developed biceps, and needs more room in that area of the sleeve. The miter helps finesse any extra cap ease that would be added to accommodate the fuller biceps.
Advantage of square sleeve caps
A design advantage to this sleeve for those who have developed biceps: When the muscle is full, generally there is a full bust as well, which makes the shoulders appear narrow in comparison. This draws the eyes to bust level, making the eyes track horizontally.
Having square sleeve caps adds width higher up on the body. They draw the eyes upward to the shoulder, so the observer’s attention goes to the face, which is what we want.
Create the square sleeve cap pattern
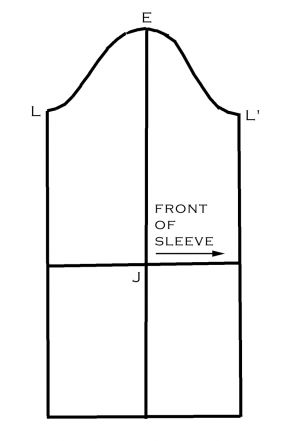
Start developing this sleeve pattern by using the basic shirt-sleeve draft.
1. At the sleeve cap point E, extend a straight line up about 2 inches and mark point F. This line is variable, but 2 inches (5 cm) is a safe length.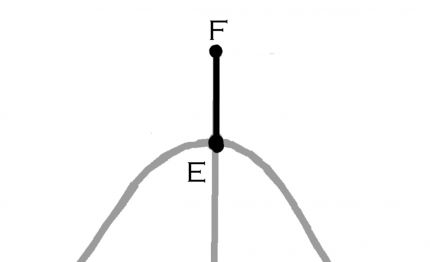
2. Draft a line perpendicular to line EF, through point F. This line is also 2 inches (5 cm), and is line GH.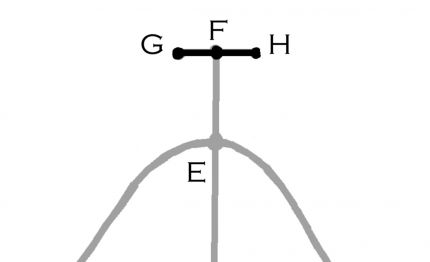
3. Extend lines from points G and H, parallel to line EF. These lines will end on the sleeve cap, at points B and C respectively.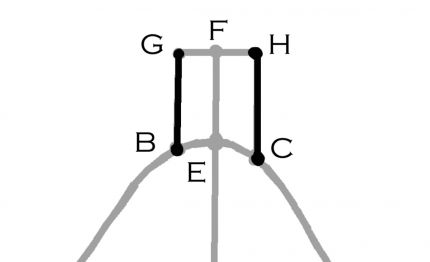
4. Also note that I have narrowed the sleeve to give a slimmer line (gray lines being the original lines). Do this equally on both sides, starting…
Start your 14-day FREE trial to access this story.
Start your FREE trial today and get instant access to this article plus access to all Threads Insider content.
Start Your Free TrialAlready an Insider? Log in


Thank you, Kenneth, for another excellent tutorial. I have ALL your written and video publications and have learned so much. Your use of geometry to create masterpieces inspires me. I'll definitely use this sleeve.
I like the look of this sleeve. You did not mention anything about Seam Allowances on the extension for the dart/pleats in the tutorial. Also, will this sleeve fit into the original armhole or does an adjustment need to be made to it as well?
Thank you
Yes, I'm going to try this. Thank you!
Great tutorial. I have a jacket pattern that has slightly puffed/pleated sleeve heads that are above the shoulder line, and I don't really care for them so I may well substitute these. As a pear shape, the extra shoulder width will help with overall balance of my silhouette.
I love this kind of sleeve...cooler and edgy than a gathered one, I 've been waiting for someone to do a good demo of this. I will been make sleeve asap!
Oh my gosh! I've been wanting this type of sleeve pattern. Thanks so much for sharing!
I've been wanting to know how to draft this kind of sleeve as well and I have a dress project planned that it will be perfect for. Great, easy instructions.
BRILLIANT...Thank you again. In my mind almost has a 40's retro appeal, love it.
I will certainly try this square cap sleeve on the dress I am making for Spring. It looks simple enough for me since I am a seasoned dressmaker. I have two or three of Kenneth's books and his directions are quite simple.
Great Tutorial! I really appreciate your "objective view" tip, ie: WHY you want to bring the eyes up from the bust area to the face, and HOW to do so. FYI: I would love to see a picture of a finished cap sleeve on a dress.........!
Most Sincerely, SewingSadie
Love it. Thanks. Will use it soon. Jenny
Thanks for the kind words, folks!
To Rit: You do in deed want to add seam allowances to the draft--I always show a drafting process with just finished stitching lines for clarity.
This sleeve will fit exactly into the same armhole, as you don't change the circumference of the sleeve armhole in the draft.
I love this idea. Thank you so much for the tutorial. I'm thinking of many ways that I can use this sleeve. Also, using it for a modified ladder back sleeve opening.
Enjoyed the lesson very much. You make everything so clear. I have not drafted any garments lately but this makes me want to jump back in.
Thank you for sharing! I can see how it works. As someone with broad shoulders already, I'm not likely to use this for myself. It's good though to have a few tricks up my sleeve...
I always read Kenneth's tutorials, even if I think I might not use it. I love to learn and love his teaching format. Clear, concise instructions but I love the comments like "I just eyeball this". Thanks for sharing your experience and knowledge!
I love the idea of expanding the shoulder. Will this work for narrow shoulders and thin arms or will it collapse on itself?
It will indeed work on narrow shoulders--you want to make a custom shoulder pad, but yes you can!
Kenneth-
I would like to make this sleeve; in fact, I have the Style ARc pattern which incorporates such a sleeve. It appears that the bodice should have some adjustment for this sleeve, too. It does not appear to sit in the same armscye as a 'regular' sleeve. Help!
If I'm wrong, how do I modify my bodice's armscye so my sleeve sits in farther?
Thanks-
Teresa
To user-1146366: You don't have to modify the armscye on the bodice for this sleeve, unless you want it to sit further up the shoulder. The point of the darts in the cap, is to reduce the armhole of the sleeve to match the bodice.
Yes, I will be trying this one. Great clear instructions and a stylish outcome. Thanks!