

If you’d like to add sleeves to a favorite sleeveless dress or top pattern, the best way to do so is to create a custom sleeve pattern. All you need are some arm measurements, and some measurements from the bodice pattern.
Be sure the bodice has been fitted properly and that you like the size and shape of the armhole. If the bust area or upper back is a little too snug, adding sleeves to the bodice will exaggerate that fit issue.
This is a basic introduction to creating a sleeve per your arm and bodice measurements. There may be more ease in the sleeve cap than you prefer, especially if your fabric doesn’t ease well. Also, the sleeve is symmetrical, when there really should be a different curve in the front and back sleeve cap seamlines.
If you want to learn more about how to add a sleeve to a bodice, read through this post, then check out Judith Neukam’s “A New Way to Fit Sleeves,” a method to remove any unwanted ease and customize the front and back cap shapes. Another informative sleeve-related post is Kenneth D. King’s Insider video, “Professor King on Sleeve Mobility and Appearance.”
Measure your arm
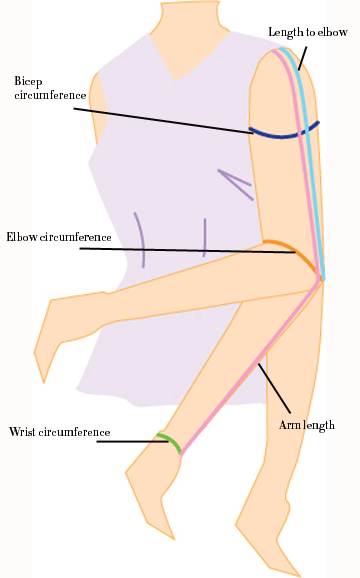
1. To get started, you’ll need the bodice pattern and a few arm measurements. Follow the illustration to take the correct arm measurements needed for the sleeve.

Biceps circumference: Measure around the arm, but don’t pull the tape too tightly. Measure around the fullest part of your arm, about 4 inches below the shoulder.
Arm length: Bend your arm slightly at the elbow and measure from your shoulder bone to the wrist bone, passing over the elbow.
Length to elbow: Measure from the shoulder to the point of the elbow
Elbow circumference: Bend your arm again. Measure around circumference of the elbow.
Wrist circumference: Measure your wrist circumference.
2. Next, you’ll need to add a bit of ease to the circumference measurements to ensure a nice fit and make sure the finished sleeve isn’t too tight. Add 2 inches to 3 inches to your biceps circumference (adjusted biceps circumference), 1 inch to 2 inches to your elbow circumference (adjusted elbow circumference), and 1 inch to the wrist (adjusted wrist circumference). For fuller or more muscular arms, add the larger amount.
Measure the bodice armhole
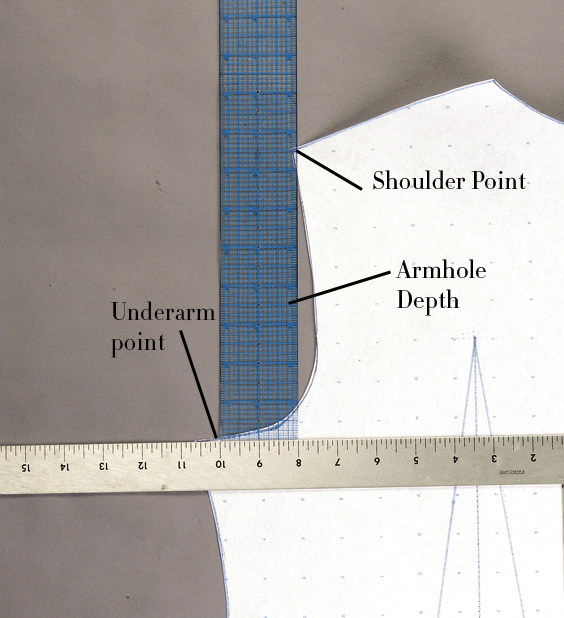
1. Take the armhole depth measurement from the bodice pattern. Square a line on both the front and back bodice patterns from the grainline to the underarm at the side seam as shown. Next, measure from the shoulder point straight down to the underarm.
2. Add the front and back measurements together and divide the sum by two.

Start drafting the custom sleeve pattern
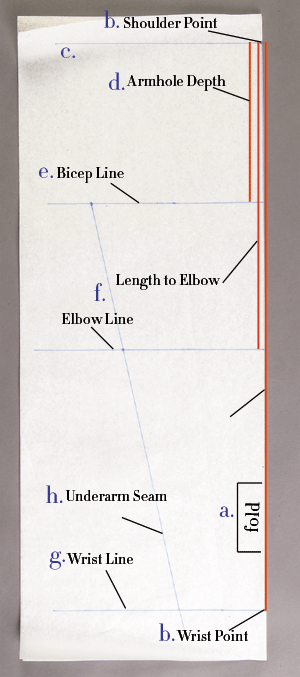
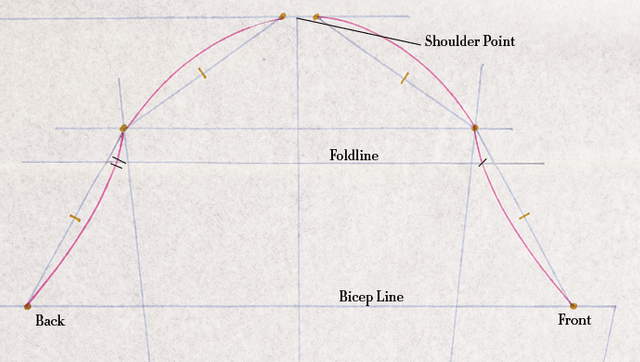
A. Fold a sheet of pattern paper in half lengthwise as shown below. You’ll be drafting on the fold to create a symmetrical pattern.
B. Along the foldline, mark points indicating the full arm length from the shoulder point (top) to the wrist (bottom).
C. Square a line at the top point (draw a line perpendicular to the fold, originating at the shoulder point).
D. From the top, measure down and mark the armhole depth you calculated in “Measure the bodice armhole,” step 2).
E. Square a biceps line out from the armhole depth that is half the adjusted biceps circumference.
F. Measure down the foldline and mark the length to the elbow.
G. Square a line half the adjusted elbow circumference.
H. Square a line at the wrist point from the fold.
I. Draw a line that is half the adjusted wrist circumference.
J. Draw the underarm seamline by connecting the biceps and elbow marks in a straight line that connects to the wrist line as shown.

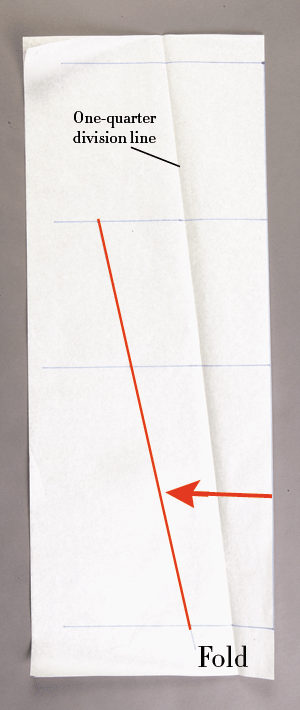
Fold the pattern
Turn the paper’s fold and align it along the underarm seam. Crease the paper to create a one-quarter marking line and then open it again.

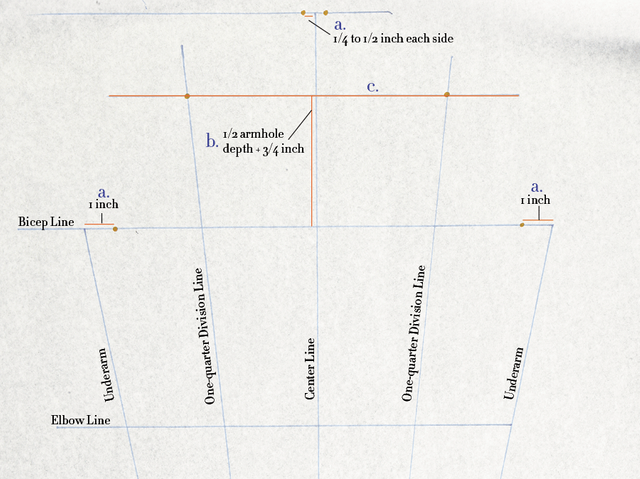
Create the sleeve cap
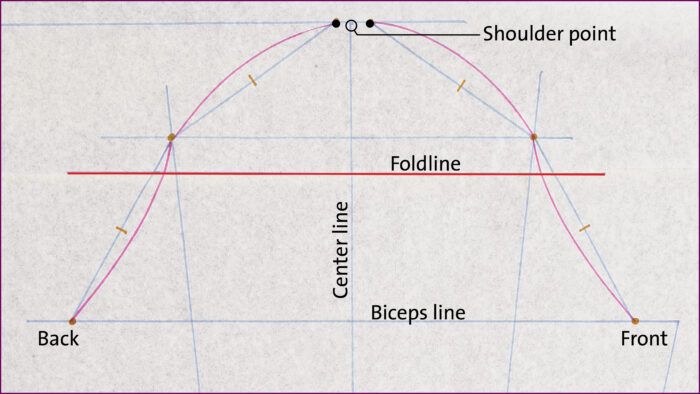
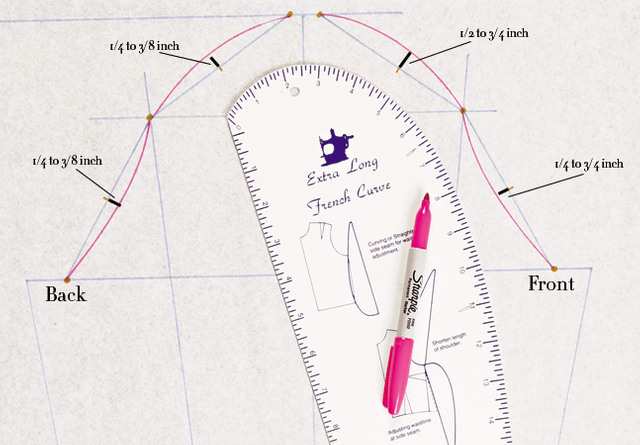
1. Now that you’ve made the basic sleeve shape, you’ll draft the sleeve cap. To start, place marks 1/4 inch to 1/2 inch on each side of the center line at the top of the sleeve and 1 inch in from the underarm seam on the biceps line (A).
2. From the biceps line, measure up from the center line one-half the armhole depth plus 3/4 inch and mark a point (B).
3. Square a guideline through the marks across the sleeve and then mark line intersections (C).

4. Connect the points with straight lines to form the sleeve-cap guidelines.

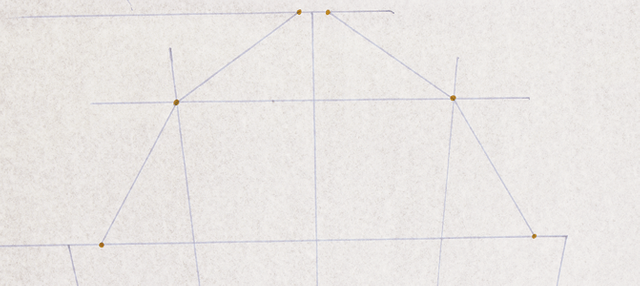
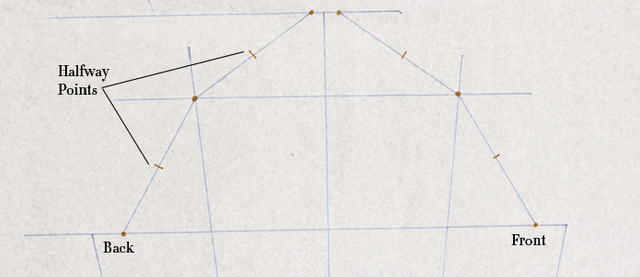
5. Mark a halfway point on each of the sleeve-cap guidelines.

6. Measure in or out from each halfway point as shown. With a French curve as a guide, connect the dots with a smooth, continuous curve. The dots are merely guides, you don’t have to touch each one with the curve. Just try to not make any sharp points in the cap.

Finish the pattern pieces
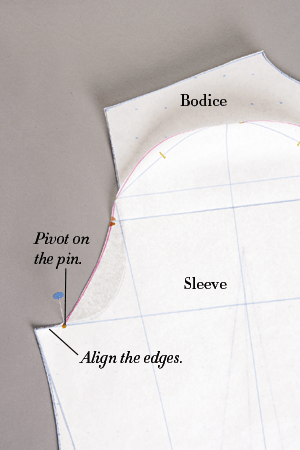
1. When you’re setting a sleeve, notches help as reference points for pinning the sleeve into the armhole. Putting notches on the sleeve and the bodice’s armhole helps you fit them together when you are sewing your own designs. To notch the cap, first fold the shoulder point to the biceps line along the center line and crease the fold.
2. Draw a double notch on the sleeve back and a single notch on the sleeve front at the foldline.

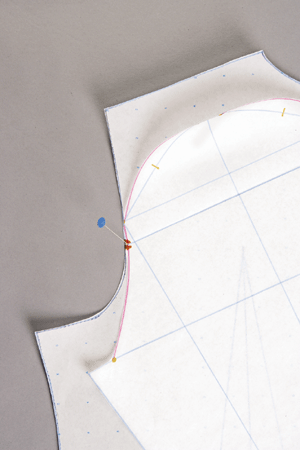
3. Next, you need to add corresponding notches to the front and back armholes. To do this, use a process called “walking.” Beginning at the side seam, align the sleeve back edge to the bodice back armhole edge. Keep the edges aligned and carefully inch the sleeve cap along the armhole edge. Use a pin as a pivot to align the edges as you walk the curve.


4. When the double notch reaches the armhole, mark the armhole edge with a corresponding double notch.

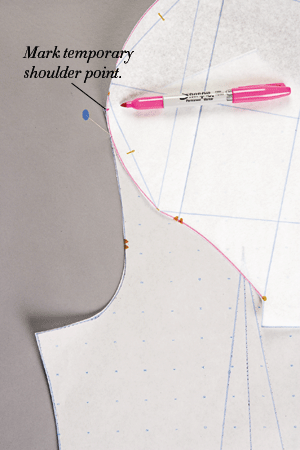
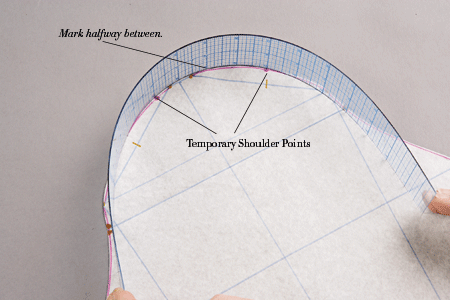
5. Continue walking the sleeve pattern until you get to the shoulder. Mark on the sleeve cap a temporary shoulder placement with a single notch.

6. Repeat to walk the sleeve along the front bodice piece and notch the front bodice armhole. Walk the sleeve to the armhole again and place another temporary shoulder placement notch.

7. Measure between the two shoulder placement notches. Mark a new shoulder placement centered between the temporary points.

You’ve now made a sleeve pattern to match the bodice’s armhole. Be sure to sew a muslin test sleeve and set it into the bodice. You may want to adjust the amount of ease in the sleeve cap and throughout the sleeve.
Adapted from “Add a Sleeve to Your Bodice” by Kathleen Cheetham, Threads #131 (June/July 2007).
More on sleeves

• How to Fit Sleeves
• How to Draft a Square Sleeve Cap
• A Forgiving Bias-Cut Sleeve
• Add a Fluttery Sleeve to a Sleeveless Garment
• Add a Quilted, Zippered Cuff


Hi! Glad to have found this post although I'm having a bit of trouble with this - I don't quite understand point g where you draw a new shoulder line between the two points marked when walking the sleeve around the sloper - does this not end up with a big bit of extra material at the top since pinning it up on both sides will have the shoulder point finishing at the two marks made? I have been staring at this for about an hour now and I can't understand how it will work out. I've made 3 sleeves and I've had this extra material on every one. Help I'm so confused!
Hi, Kirsty,
That extra fabric is the sleeve cap's ease. It contributes to a rounded shape over the top of the shoulder. That excess should be distributed as evenly as possible between the front and back notches when you construct the garment--you don't need to concentrate it at the top of the shoulder.
Carol Fresia, Threads Senior Technical Editor
Try this tutorial that shows you how to draft sleeve pattern with no-ease sleeve cap using My Sloper Sleeve, at http://kosherpatterns.com/draft-sleeve-pattern.html
A free demo can be downloaded right away. Thanks.
I have a concern about this, too. A perfectly-fitting sleeve has a little more ease at the back than at the front. This pattern doesn’t do that. So I suppose I am still searching.
Hi, Queenoid,
This draft gets you to a sleeve that will fit the corresponding armhole and should accommodate the arm's circumference at key points. If you want to truly customize the sleeve cap, though--which I sense you do, and I'm with you on that--take a look at this article:
https://www.threadsmagazine.com/2019/08/21/a-new-way-to-fit-sleeves
You'll need a helper to do the pinning, but once it's done, you'll have a sleeve cap that more accurately works with your shoulder and arm shape. If, like many women, your shoulders are asymmetrical, consider draping a sleeve cap on each side for a truly custom fit.
Carol Fresia, Threads Senior Technical Editor
I’m an avid sewer and love learning new techniques from you. As I read through I kept wondering how you were going to address the almost inevitable issue of adjusting the sleeve cap to get rid of the extra ease that would obviously result in a gathered sleeve cap if sewn up as instructed. That step can be very tricky I have found.
Thank you for your insight - we have other posts that go into more detail on the information you questioned, and we updated the post with some links we think you'll find interesting.